For someone just getting started with cover crops, the sheer number of management choices can seem a bit overwhelming. The goal of this chapter is to simplify the options and narrow them down to the more tried-and-true approaches. Where appropriate, I’ll mention viable alternatives, but I won’t outline every possibility since the objective here is to provide a straightforward approach to some simple options for using cover crops.
This chapter will cover the basic steps for planting and terminating cover crops. Chapter 7 goes into selecting cover crop species. More details on equipment and specific strategies such as planting green, the approach of planting a cash crop into a still-living cover crop, will be addressed in later chapters. Specific topics covered in this chapter include:
- Seeding rates
- Seeding covers–timing
- Tips for overseeding covers into a standing cash crop
- Basic establishment methods for covers
- Termination of cover crops
- Other management adjustments to improve efficiency
Cover crop seeding rates
The next chapter outlines 44 different species of plants being sold as cover crops, and there are easily a dozen other species occasionally sold for cover crop use. While it would be nice to say there is an exact seeding rate to use for each species, that’s simply not the case. When using pounds per acre as the seeding measure, the rate can depend in part on the size of seed for that variety and seed lot. Even more important for determining seeding rate is considering whether the cover crop is being used as the sole species planted or as part of a mix and what the goals are for the cover crop.
Taking cereal rye as an example, I’ve known farmers using anywhere from 15 pounds per acre up to 80 pounds per acre when planting it as the sole species. Most common is in the middle, around 50 pounds per acre. Particularly high rates may be used where the cover crop is going to be grazed and it’s worth paying more for seed to get maximum forage. If broadcasting a cover crop, it’s always wise to use a higher broadcast seeding rate than if drilling or otherwise direct planting the seed into the soil; the reason for this is that not as much seed broadcasted on the surface will sprout compared to seed planted into the soil. A general rule of thumb is to use about 30% more broadcast seed compared to drilling the seed, but it depends some on the type of cover crop and how well the seed works its way down into the cracks and crevices of the soil. Something like radishes that have small round seed are easy to broadcast establish don’t need the broadcast rate boosted as much as oats, which are tougher to broadcast establish. Thus, I might boost radish broadcast rates by only 20% over drilling while boosting the broadcast rate for oats by 50% over drilling.
Farmers who are just looking to get some benefits from living roots may go with a lighter seeding rate. I know of a farmer in central Missouri who uses only 15 pounds per acre of cereal rye because he likes to plant his soybeans “green” into the living cereal rye and doesn’t want too dense of a rye stand. I’ve stood in his fields in spring and he actually had a decent stand of rye, but certainly not as thick as higher seeding rates would provide. Those who are prioritizing weed control, biomass for organic matter, or erosion protection will want a higher seeding rate (and should plant the crop at a reasonable time to get it well established).
With mixes, adjust the seeding rates based on the number of species present and which species you wish to prioritize. For example, if planting cereal rye and crimson clover together, one approach is to simply cut the seeding rate of rye and clover each in half. However, the rye will outgrow the clover, especially in spring, so if you really want good clover growth, you might need to cut the rye to about 20%-25% of the normal rate and keep the clover rate at 70%-80% of normal. Green Cover has a free “SmartMix” seeding rate calculator to help determine seeding rates in multi-way cover crop mixes.
To summarize a somewhat confusing topic, start by seeing what seeding rate is recommended by the seed company selling the cover crop variety. Then look at what Extension, NRCS, or other trusted advisors recommend for your area. The regional cover crop councils, such as the Midwest Cover Crop Council, have cover crop selector tools available for free use online that provide tips on seeding rates. Adjust the seeding rate to fit your goals for the cover crop and your seeding method. It’s also worth doing a little experimenting, trying a few different seeding rates to see what works well for you.
When to seed covers
In the majority of cases, cover crops are fall-planted. Almost all fall cover crops benefit from being planted earlier in the fall rather than later. However, some cover crops definitely need to be planted while the weather is still warm to perform well, while others tolerate planting in mid-fall or late fall. A key question to consider when planning your seeding schedule is whether the cover crop is intended to overwinter. If so, planting date and other factors will affect winter survival. Of course, whether a given cover crop will over-winter depends on the region it is grown in, as well as planting date and other factors. For example, winter oats can overwinter fine in southern states but not the Midwest. Crimson clover overwinters in the southern Corn Belt but not the northern Corn Belt. Even variety differences can affect how far north a given cover crop will overwinter.
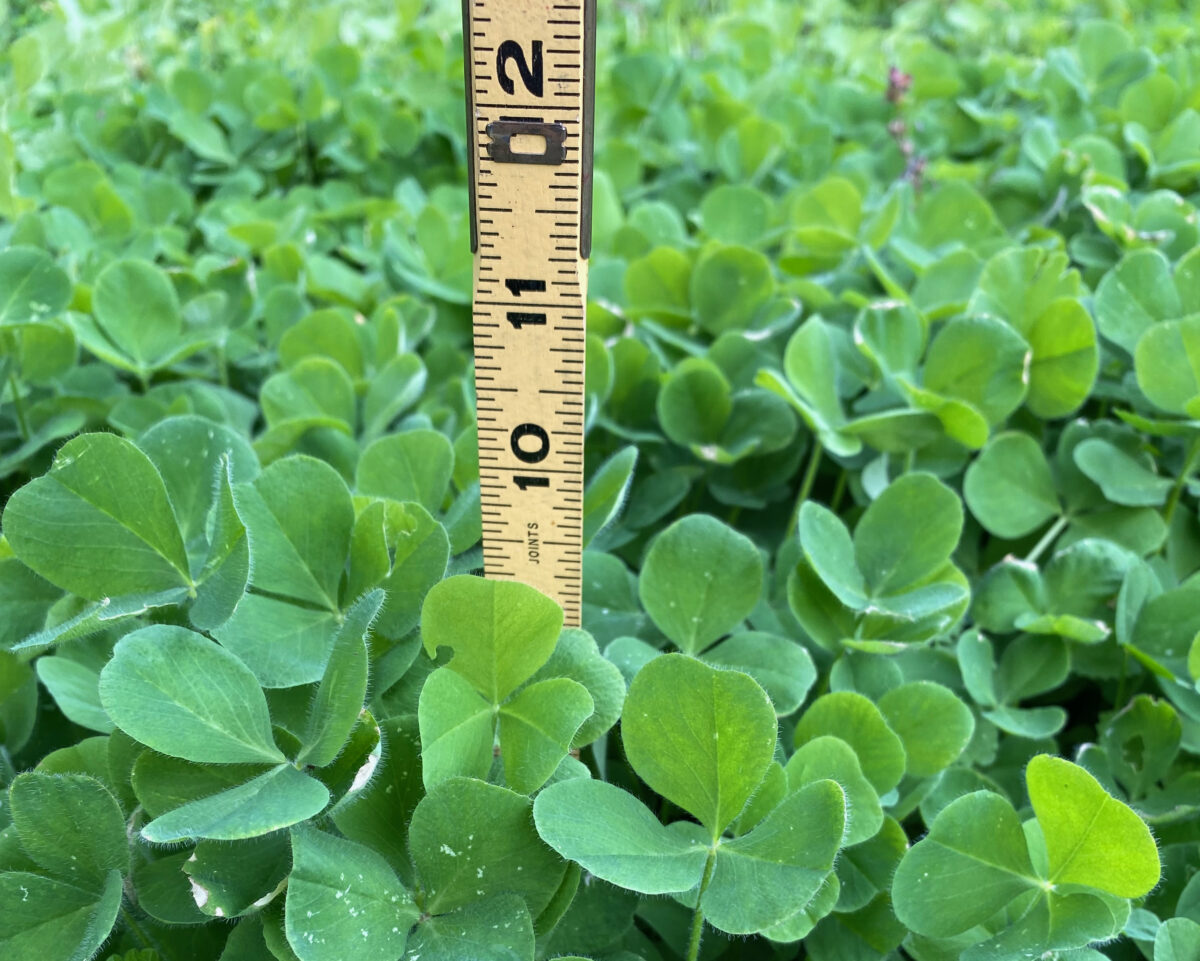
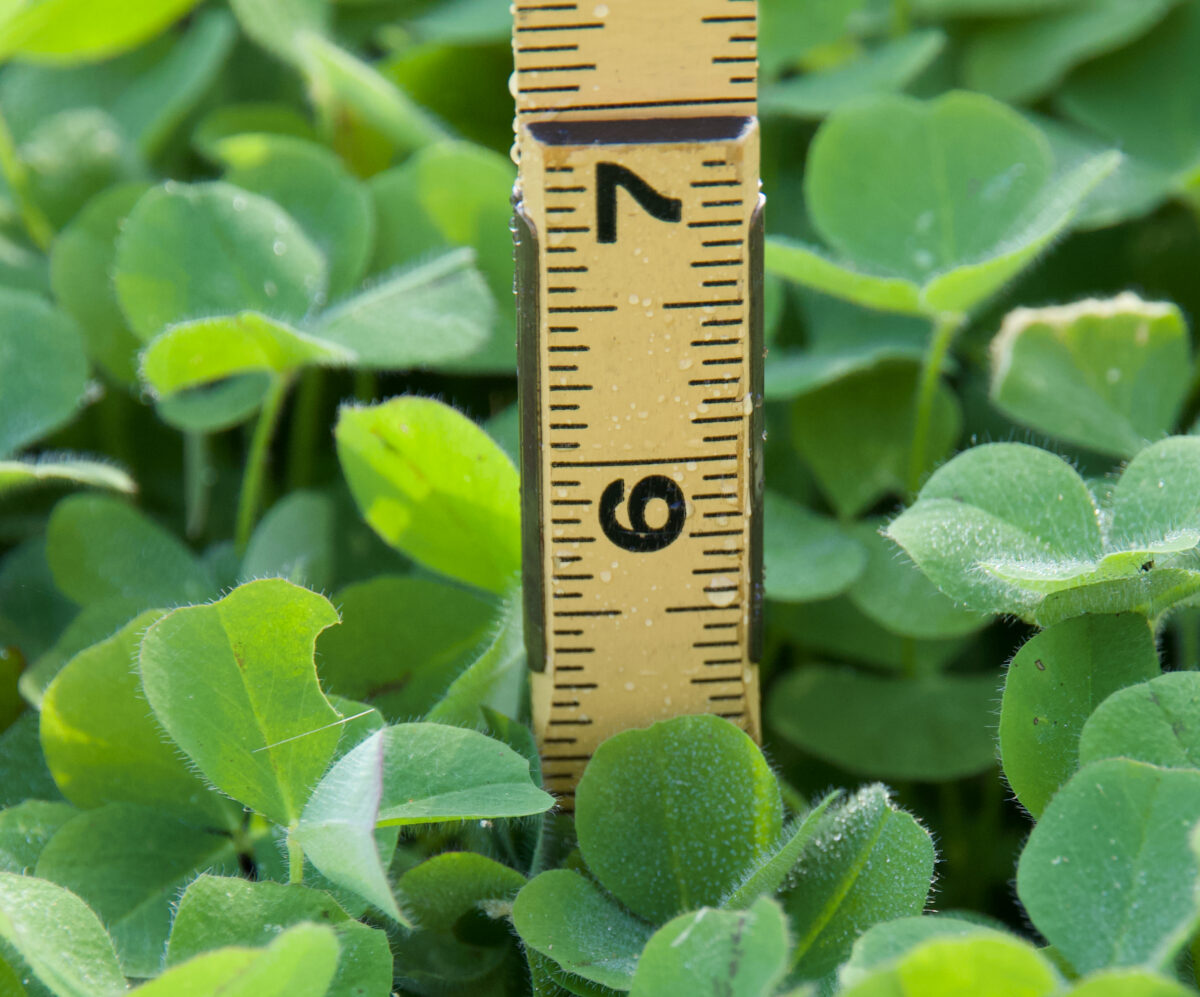
An example of how two weeks can make a significant difference in fall growth of crimson clover. One the left, clover planted on September 15; on the right, clover planted on September 30. Photos taken on December 2.
Cereal rye can be planted later than any other cover crop that is commonly used. As with the other covers, early fall is best and mid-fall is still okay, but late fall can work in a pinch. In northern areas, it’s not unusual for cereal rye to be planted after the first fall frost has occurred. It may not grow much when planted late, but it has a remarkable ability to survive until spring even with a late-fall planting. Just keep in mind that erosion control will not be as good, nor will the rye root as deeply if fall planting is done late versus earlier. For fall grazing of rye (or any fall cover), early fall planting is particularly important, and higher seeding rates are helpful to maximize biomass.
Another point on timing the planting of covers is that covers that are broadcast-seeded often take longer, sometimes much longer, to start growing than ones planted with a drill or planter. If broadcast cover crop seed ends up sitting on top of dry ground, it can potentially remain unsprouted for weeks, waiting for a fall rain to come. Therefore, it’s particularly important to accomplish fall broadcast seeding as early as possible, which is why some farmers broadcast cover crop seed into their cash crop prior to harvest.
Below is a table that outlines optimum planting windows in relative terms compared to other common cover crops. Sometimes covers are planted outside the time windows listed below, such as in mixes or possibly when inter-seeded in a cash crop.
| Target planting window | Species that don't overwinter in colder climates | Over-wintering species |
|---|---|---|
| Early to mid-summer* | Sorghum-sudangrass | |
| Sunflower | ||
| Sunn hemp | ||
| Buckwheat | ||
| Cowpeas | ||
| Millets | ||
| Late summer to early fall | Radishes | Rapeseed/canola |
| Turnips | Austrian winter peas | |
| Mustards | Pennycress | |
| Camelina | ||
| Mid-fall (ideally at least two weeks before average frost) | Oats | |
| Black oats | Crimson clover | |
| Balansa clover | ||
| Hairy vetch | ||
| Winter wheat | ||
| Barley | ||
| Late-fall is tolerated | Cereal rye | |
| Triticale | ||
| Early spring ** | Crimson clover*** | Sweet yellow clover |
| Austrian winter peas*** | Red clover | |
| Hairy vetch*** | ||
| Oats | ||
| Flax |
*There is a long list of plant species that can potentially be used as summer cover crops. Only the most common of the warm-season covers are listed in the table. It should also be noted that some cool-season cover crops that are normally fall-planted are sometimes planted as part of a cocktail mix in mid-summer, just for convenience of planting the entire mix at one time.
**Although cover crop planting in early spring is not common, sometimes it is done to fill in for a cover crop that did not become established in fall or failed to survive the winter. It may also be done with a biennial plant like sweet yellow clover that can be overseeded into winter wheat and allowed to grow the rest of the summer and fall right through to the next spring. Red clover is considered a weak perennial, meaning it can live for a few years once established, whether the planting is in fall or spring (assuming it’s not terminated, which it normally would be for cover crop use).
***Crimson clover, Austrian winter peas, and hairy vetch will generally overwinter if fall-planted in an appropriate climate; if these legumes are spring-planted, they will flower that spring, then either be terminated as covers or, if allowed to grow until maturity, die after setting seed by mid-summer.
Tips on overseeding cover crops into a standing cash crop
One way to start cover crops growing earlier is by overseeding them into a cash crop like corn or soybeans before the cash crop is harvested. This overseeding can be done by airplane, helicopter, or high-clearance seeder.
The most commonly used approach to overseeding in commodity crops is to overseed into corn after the leaves start to turn color. At this point, light infiltrates better through the corn canopy and the cover crop seed has a better chance of establishing. Typically, there is a three-week window to plant the cover crop into corn between the first yellowing of leaves and harvest.
Soybeans are more challenging to overseed into successfully, mainly because the window for best timing is smaller–often only a week long. The soybean leaves must be turning color, but not yet dropping on the ground. If too many soybean leaves are already on the ground when the cover crop is seeded, much of the seed may sit on top of the soybean leaves and not contact the soil. Additionally, if the cover crop is seeded too early, it can interfere with soybean harvest. A few inches of growth of grass covers like rye or oats is not usually an issue for soybean harvesting, but radishes or other broadleaves that get too big can cause too much green material to be collected by the combine head. A better approach may be to plant an earlier-maturity soybean where cover crops are to be planted, and then drill the covers immediately after soybean harvest.
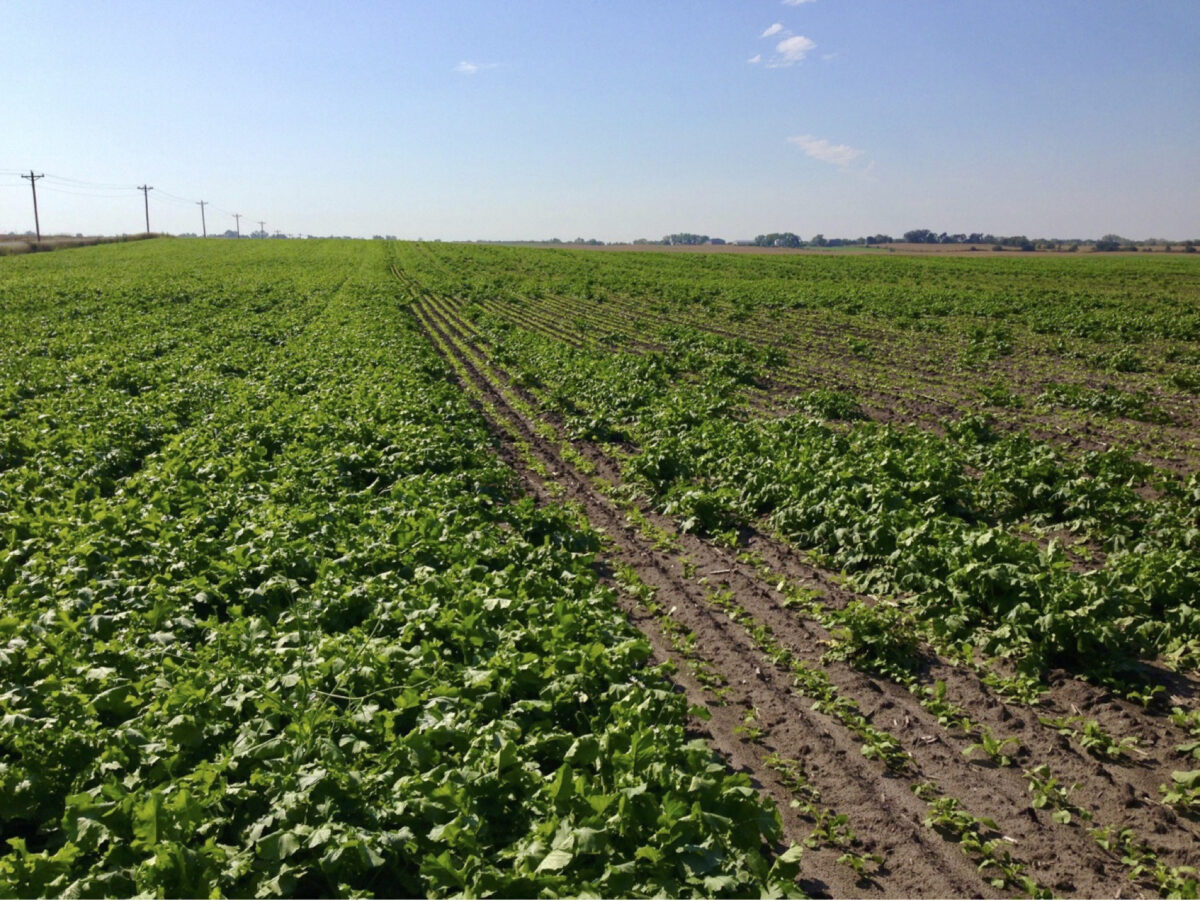
Soybeans are more challenging to overseed into successfully, mainly because the window for best timing is smaller–often only a week long. The soybean leaves must be turning color, but not yet dropping on the ground. If too many soybean leaves are already on the ground when the cover crop is seeded, much of the seed may sit on top of the soybean leaves and not contact the soil. Additionally, if the cover crop is seeded too early, it can interfere with soybean harvest. A few inches of growth of grass covers like rye or oats is not usually an issue for soybean harvesting, but radishes or other broadleaves that get too big can cause too much green material to be collected by the combine head. A better approach may be to plant an earlier-maturity soybean where cover crops are to be planted, and then drill the covers immediately after soybean harvest.
In recent years, some farmers have had success interseeding cover crops earlier in the year, particularly into corn in the northern states. Various strategies for interseeding corn have been tried. Most often, interseeding has been done at the V3 to V5 stage by broadcasting cover crop seed among the corn plants. Some have used high-clearance seeders, such as the Cover Crop Interseeder (Interseeder Technologies), a high-clearance drill that can also spray herbicide and/or fertilizer solutions. A few farmers have even experimented with planting the cover crop at about the same time as corn is planted and trying wider corn rows to allow better cover crop growth.
Regardless of the method of interseeding, it’s critical to give consideration to the herbicide program being used and how it might affect the cover crop(s) being interseeded. It may be necessary to use a different set of herbicide products to avoid killing the cover crop.
Establishment methods for covers
(More details on equipment can be found in Chapter 9.) The most effective method for seeding most cover crops is to use a grain drill. A close second is to use a row crop planter, particularly one with split rows such as on a 15-inch spacing so the cover crop rows aren’t too far apart. In fact, some farmers with split-row planters will seed alternating rows of two types of cover crops, such as radishes and rye or oats.
The advantage of either a drill or row crop planter over any type of broadcast seeding is better seed-to-soil contact. This is especially important in a dry fall or with larger-seeded cover crops such as Austrian winter peas. Small-seeded cover crops such as clovers, annual ryegrass, or Brassicas can generally be broadcast and establish effectively, especially if they receive rainfall soon after. Intermediate-size seeds like cereal rye and wheat are a little hit-or-miss when broadcast-seeded. If it rains shortly after broadcasting, they usually sprout, but sometimes there are complete failures with broadcast seeding, especially later in the fall. For this reason, it may be helpful to do broadcast seeding before combining or perform light incorporation with a vertical tillage tool or other implement. Keep in mind that some cover crops, like the clovers and Brassicas, need very shallow seeding, so a vertical tillage tool or other tillage implement may bury the seed too deep if the operator is not careful.
Regardless of the type of seeding method, the sooner the seeding is done in the fall, the better. I’ve heard many farmers say they have better luck broadcasting or drilling right after harvest, such as the same day, than waiting a week. This is because the cash crop residue may start to mat down and make it hard for the cover crop seed to establish, whereas right after combining, the residue is more fluffed up, and it is easier for the seed to make contact with the soil.
If you’re short on labor during harvest, see if you can find a retiree or family member who wouldn’t mind running a grain drill or broadcast seeder right after the combine. They might consider that an enjoyable job, and a rewarding one in terms of the conservation benefits of planting cover crops.
Termination of cover crops
One of the things that sometimes makes farmers hesitant to use cover crops is concern about dealing with terminating them in the spring. You do need a plan, but it’s really not that complicated with most cover crops. If it is a big concern with you, start out with cover crops that winter-kill in your area–possibly oats and/or radishes. Something like cereal rye does have the deserved reputation of being relatively fast-growing once warmer spring weather comes around, but the good news is that cereal rye is very easy to kill with glyphosate. Some farmers planting soybeans following rye terminate the rye when it is still relatively small, such as 6-12 inches tall. Others let the cereal rye grow and terminate it the day they plant or shortly after (called planting green—see more on this approach in Chapter 8).
The main thing to be careful about when terminating cover crops is to either do it early or wait until planting. When problems usually occur is if termination is done roughly a week or two before planting, particularly if the cover crop is getting big and soil conditions are moist. Then you run the potential risk of a mat of dead cover crop residue preventing the soil from drying out. However, if the spring is a dry one, terminating a week or two ahead of planting may be an effective strategy. Just monitor your soil moisture conditions and adjust accordingly. The first time around, if you’re nervous about it, just terminate early.
One other key consideration is to know the correct termination strategy for the cover crops you are using. As mentioned, cereal rye is straightforward to kill with glyphosate, even when it’s several feet tall. Annual ryegrass, a completely different species, can be more challenging to spray-kill. I strongly recommend reading one of the several online publications about terminating annual ryegrass if you’re using that crop. Other cover crop species may require a product other than glyphosate. For example, crimson clover and most of the clovers are easier to terminate with a combination of glyphosate and 2,4-D than with glyphosate alone.
Other management adjustments to improve efficiency
To maximize profit when using cover crops, here are some points to keep in mind:
- Use good-quality seed but use it efficiently. This means seeding the cover in such a way that a high percentage of the seed will grow and using a seeding rate appropriate to your goals. If the goal is only to obtain a modest amount of cover, a lower seeding rate may suffice. If the goal is good weed suppression or grazing use, a higher seeding rate will be needed.
- Plant the cover crop in a timely enough fashion to see full benefits from it. There’s no benefit in throwing thousands of dollars of cover crop seed on the ground in late November if it’s not going to grow. Treat the cover crop like your other cash crops, meaning have a plan for its use, and be timely with operations. That way, you’ll get a better return on your investment. Think of it like fertilizing: you apply your fertilizer early in the season, not late in the summer–otherwise you’re wasting that input cost.
- Terminate in a way that helps rather than hinders your cash crop in the spring. Maybe you need to let the cover crop grow longer to suppress weeds or dry the soil for planting. Or maybe you need to terminate it early because there’s dry weather or your planter is not set up well for planting into heavy cover crop residue.
- Be prepared to adjust your cash crop planter when planting into cover crop residue versus planting in conventional fields. It may take 20 to 30 minutes to get everything set optimally when switching from a conventional field to a cover crop field, but that time and effort will more than pay off in the form of a good stand of the cash crop.
- Consider where you might be able to cut some input costs in conjunction with cover crop use. You may want to maintain your existing herbicide and fertilizer regimen in the first year of cover crop use, but over time, you should find that you can cut back on certain inputs to gain cost efficiencies.
- As you gain experience with cover crops, think about what else you can change in your cropping system to improve overall efficiency. Maybe you can get by with less tillage, saving on fuel, labor, and equipment costs. Maybe you can plant some of your fields to earlier-maturing crop varieties, allowing you to spread out labor and start some cover crops earlier. Maybe some of those early cover crops can be grazed by you or a neighbor (who pays you a rental fee).
- Take time to monitor your soil, at a minimum with a shovel, but preferably with soil health testing. As when you get your own health checked by doctors, doing soil health checks will help you realize where your soil needs improvement and where you’re making progress.