Over the last decade, there has been an explosion of new equipment, tools, and add-ons to work with cover crops and in other high-residue situations. As with every phase of agricultural advancement, the availability of efficient and effective equipment has played a big role in making progress possible; part of the modern success with cover crops is based on new varieties and new management techniques, but equipment changes have also contributed significantly to the success. In this chapter, we’ll take a look at some of the newer equipment approaches impacting cover crops. We’ll start out by exploring equipment for seeding cover crops, then options for terminating cover crops and planting your cash crop into covers. We’ll also consider special-application equipment.
Equipment for seeding cover crops
There are a wide variety of equipment approaches being used to seed cover crops, and I expect we’ll see further innovation in this area. The most reliable methods of establishing cover crops involve creating good seed-to-soil contact and proper depth placement, just as with planting any crop. Of course, these goals are best accomplished with direct-seeding tools such as grain drills and row crop planters. Although alternative seeding methods will be discussed in this chapter, we’ll start with the tried-and-true methods of cover crop seeding, given the high success rate of using a drill or other planter.
Grain drills
Not everyone has a grain drill, and if you don’t have access to one, skip ahead to the section “Row crop planters and when they can be an advantage.” However, if you don’t own a grain drill, you may find you can borrow one from a neighbor or even rent one from your local Soil and Water Conservation District office (some of these offices rent drills and some don’t, but it’s worth a phone call to check). Most grain drills today are well-suited to plant into residue following commodity crop harvest. Drills designed as no-till drills will do best in heavy-residue situations, given the solid weight of the drill and extra down-pressure on the row units. They are also typically equipped with coulters ahead of the row units that can slice through residue and have furrow closers better suited to no-till or high-residue situations.
Most cover crops benefit from being planted in the narrow row arrangement possible with grain drills. The narrow row spacings, such as 6-8 inches, lead to better weed suppression by the cover crop and improved soil erosion protection. If wider rows are desired, alternating rows on the drill can be blocked within the seed box.
If you are considering buying a drill to use with cover crops, evaluate whether it’s worth the modest extra cost to get a second seed box. Many grain drill manufacturers offer a “small seed” box as a secondary option to the main seed box. The small seed box is normally not only smaller in volume of seed held, but also suited to smaller seeds that may need to be planted at a lower seeding rate, such as clovers or Brassicas. With two seed boxes, it’s easy to plant at both a high seeding rate of a cereal such as rye and a low seeding rate of clover, radishes, or other cover crop species.
Having two seed boxes isn’t required in order to use cover crop mixes, however. Nowadays, many cover crop seed companies sell pre-mixed packages of cover crops that can all go into the main seed box on a grain drill. Grain drills, unlike row crop planters, can be used with a wide variety of seed sizes without needing special seed plates or other modifications. Whether you buy pre-mixed seed or mix your own, pay attention to the seed going into the box to make sure it’s uniformly mixed and not segregating out. Usually, mixes don’t have too much of a problem with this, but it depends on the seeds being used. Generally, seed segregation or separation is most likely to happen when large round seed like Austrian winter peas is used with small round seed like clover or radishes.
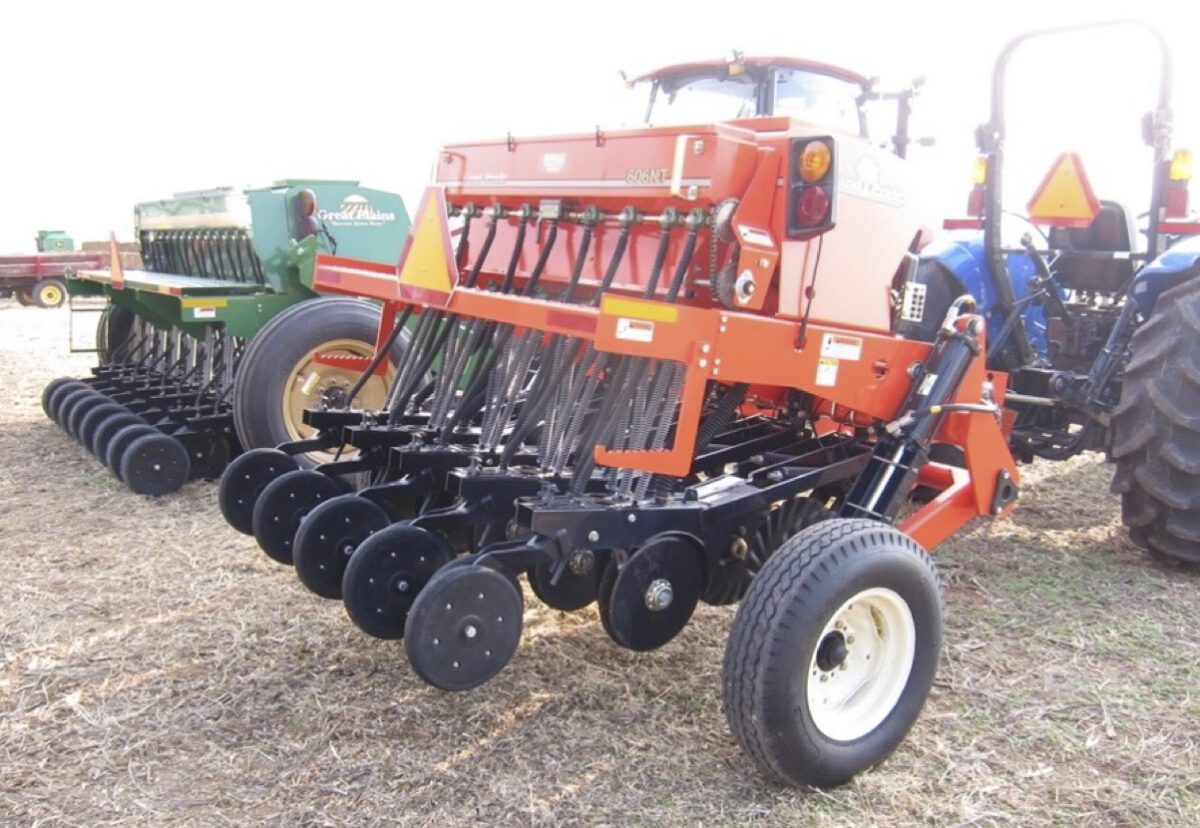
One final thought on using traditional grain drills for cover crop seeding: a number of experienced cover crop users have told me they prefer to run a grain drill right after the combine–and I mean the same day if possible, often within an hour or two. This requires an extra person in the field, but if seasonal help is available, it’s something to consider. Another advantage of this method is that the stalk and leaf residue spread by the combine is still fluffy in the hours after harvest, and therefore easy to plant into. If cover crop planting is not begun until some days later, the crop residue will be more packed down, especially if a rain has occurred in the meantime.
High-clearance drills for interseeding
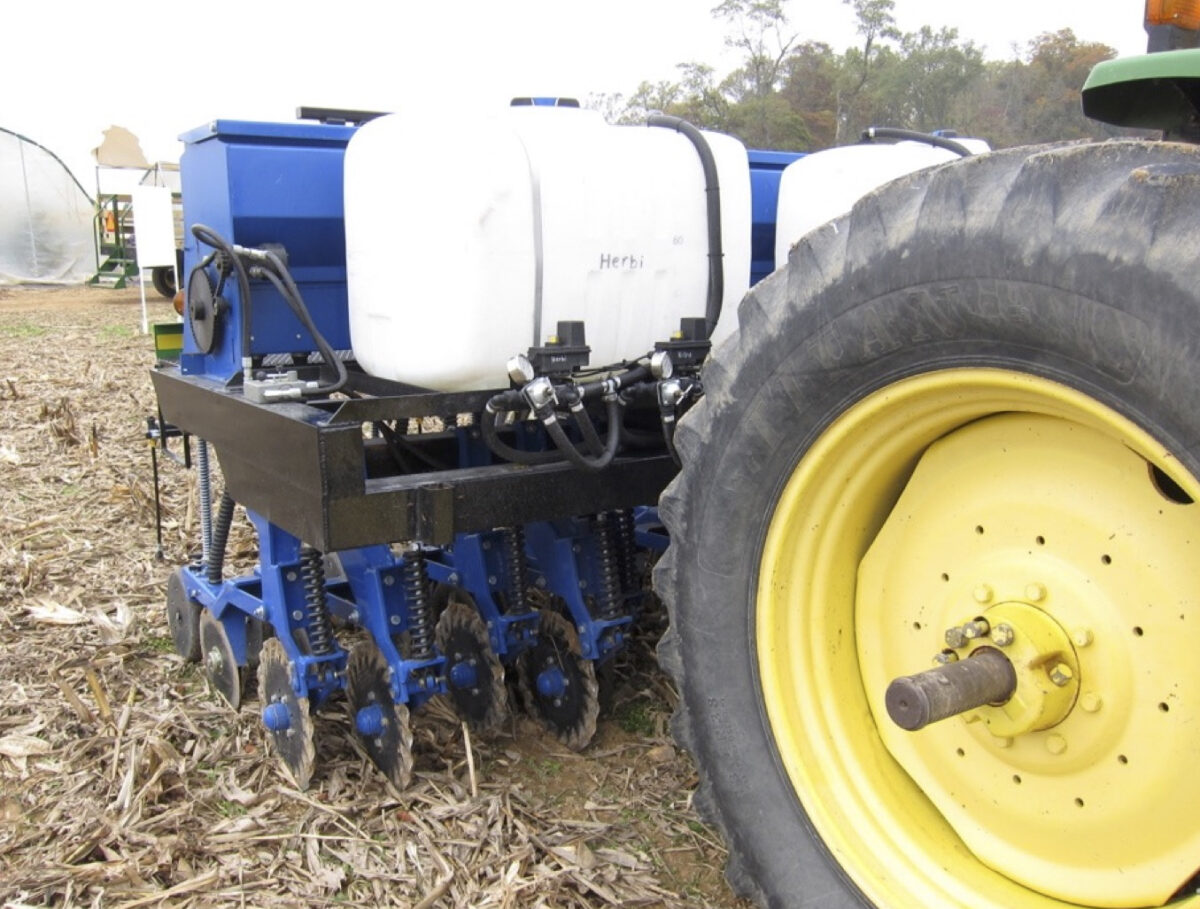
A relatively new equipment option among grain drills for cover crop planting is high-clearance drills, such as the one sold by Interseeder Technologies. Typically, these high-clearance drills are designed to interseed cover crops into a standing cash crop such as knee-high corn. The idea is to start the cover crop as early as possible. Normally the cover crop emerges by mid-summer, but then stops growing in the heavy shade of the cash crop canopy until early fall, when the canopy opens up. Based on research to date, the interseeded cover crop does not normally create a yield drag on the commodity crop. However, any herbicide programs in use may need to be adjusted to allow for the interseeded cover crop.
The high-clearance drill approach that was developed by researchers at Penn State University, and is reflected in the products sold by Interseeder Technologies, can also spread liquid fertilizer and/or an herbicide or pesticide spray at the same time as seeding the cover crop. This allows making one trip over the field and accomplishing up to three tasks at the same time, making it a great approach for labor efficiency.
Row crop planters and when they can be an advantage
Whereas a lot of older grain drills are only 10-15 feet wide, many of today’s row crop planters are 30-40 feet wide or more (although 30-foot-wide drills can be purchased as well). Some row crop planters can also operate at a higher speed than grain drills. This extra ground-covering ability means that row crop planters provide a significant advantage when planting large acreages of cover crops. Farmers have also told me they feel they can cut back on their cover crop seeding rate with a row crop planter, because the more precise seed placement and depth control creates better stands from fewer seeds.
It’s best if the row crop planter can plant rows narrower than 30 inches for erosion control purposes. However, some farmers have reported satisfactory results with wider row spacings for covers, especially when planting on a contour with any slopes. Besides the fact that better ground cover is provided by a split-row planter that can plant on 15-inch centers or similar, I like that row crop planters provide some flexibility in seeding arrangement. Assuming individual seed boxes are being used on each row or twin bulk seed boxes are being used, it’s possible to plant alternating rows of two different cover crops.
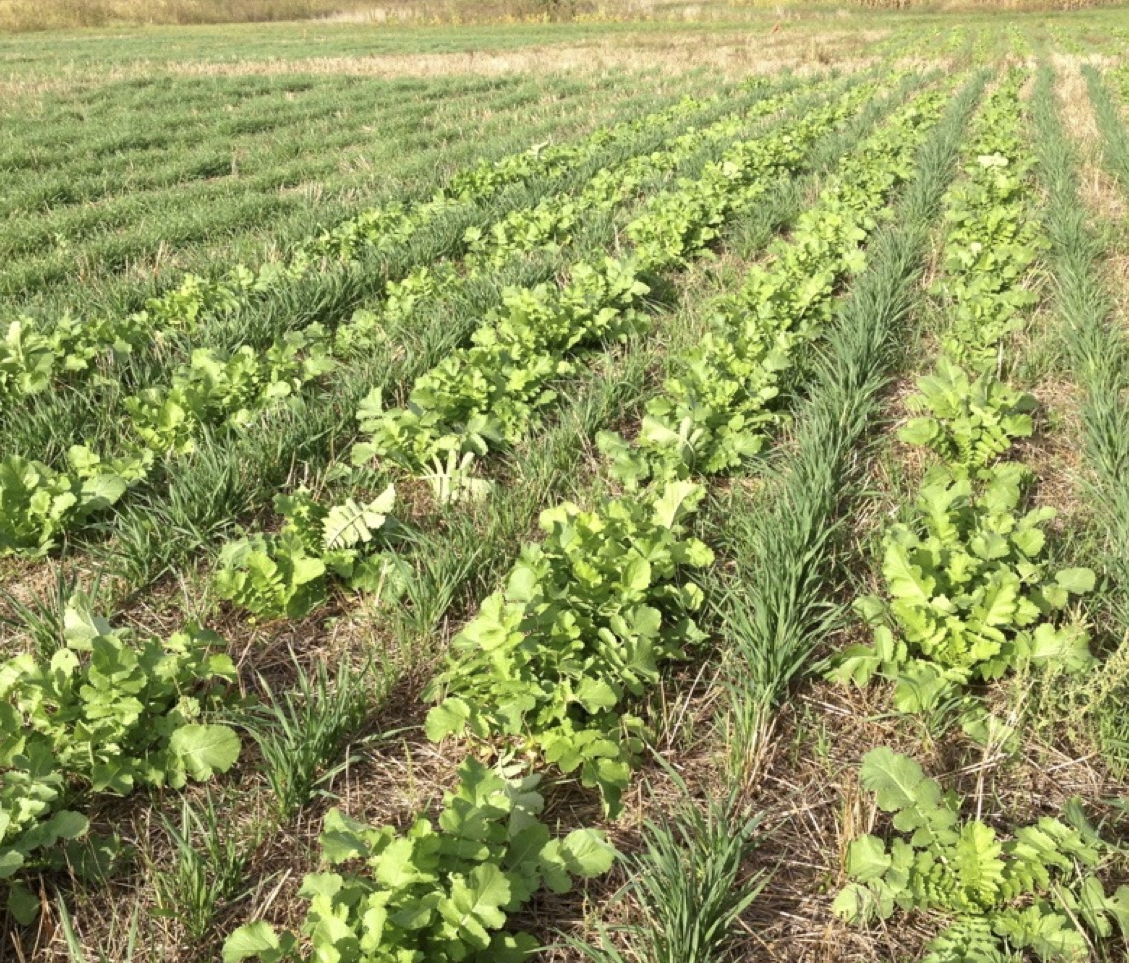
The most common method of planting alternating rows of two cover crop species is to plant one of the rows with a crop that will winterkill–typically a Brassica such as radishes–and any kind of over-wintering cover crop in the other row. The following spring, you can use GPS to plant corn in the same strip the radish plant was in. The radish plant–assuming it achieved adequate fall growth–will have formed a rosette of leaves about 4-6 inches in diameter that crowds out winter annual weeds. The rosette of leaves will die in early winter, then decompose by corn planting time, often accelerating the decomposition of underlying residue from the previous crop. This is because radish leaves are high in nitrogen compared to most commodity crop residue, so the combination of radish leaves with crop residue creates a more favorable C:N ratio for microbes to work with, speeding their breakdown of residue. This process creates a bare or nearly bare strip of soil to plant corn into the next spring. Some have called this approach “bio strip-till.”
Broadcast seeding pros and cons
Some farmers simply broadcast cover crop seed, and this approach is particularly common for first-time users of cover crops who hire out the spreading or need to do it quickly themselves. Broadcast seeding can work well if the seed makes good contact with the soil and adequate moisture is present. Usually, it works best if there is rain within a week or two after broadcast seeding. Seed that sits on top of residue and/or remains dry for a prolonged period is unlikely to ever establish. Also, the longer the seed sits on the ground, the more subject it will be to birds, crickets, other insects, small mammals, or even nightcrawler worms eating the seeds.
Some farmers have reported that their best results with broadcast seeding occur when it is done the same day as harvesting, so that the seed has a better chance of making contact with the soil while the residue is still “fluffed up” from the combine and before the residue is matted down by rain and time.
A potential downside of row crop planters is that the settings are seed-size-dependent, meaning it’s hard to use mixes of cover crops with different seed sizes. On some planters, a seed cup can be used to handle multiple seed sizes. Specialized seed plates normally limit use to similarly-sized seeds. Use of seeding plates can also involve buying a few sizes of plates if various cover crops are to be planted. This is not a large expense, but one that involves a little extra labor to change plates or change a seed drum, if using an air planter. I’ve had a few farmers tell me they prefer not to use a row-crop planter for cover crop seeding to avoid extra wear on the planter.
Broadcast seeding with fertilizer spreaders
One of the most common methods of cover crop seeding on farms of all sizes is to use some type of broadcast fertilizer spreader, such as a power take-off mounted spreader on the back of a tractor, an electric-powered spreader on an all-terrain vehicle (for smaller acreages), pull-type fertilizer spreaders, or a large truck-type spreader such as the ones used by fertilizer dealers. Regardless of the size of the rig, depending on species involved, the cover crop seed may not broadcast or throw as far as fertilizer pellets do, so be sure to check the seeding width and take wind patterns into account when determining the broadcasting pattern. Also, with mixes of different cover crop species, some lighter seed may not throw as far as heavier seed, so some overlap on the seed spreading pattern may be desirable.
Granular fertilizer can be mixed with cover crop seed and broadcast at the same time. Again, pay attention to the pattern of distribution; the fertilizer may throw farther than the cover crop seed, so be sure to set an application width that ensures complete coverage with the seed. Avoid storing seed that has been mixed with fertilizer. The fertilizers function as salts that draw moisture from the cover crop seed, drying out the seeds if left mixed together for too long and effectively ending the viability of some or many of the seeds. It’s best to broadcast a mix of fertilizer and seed within a few hours of mixing.
Broadcast seeding with high-clearance sprayers
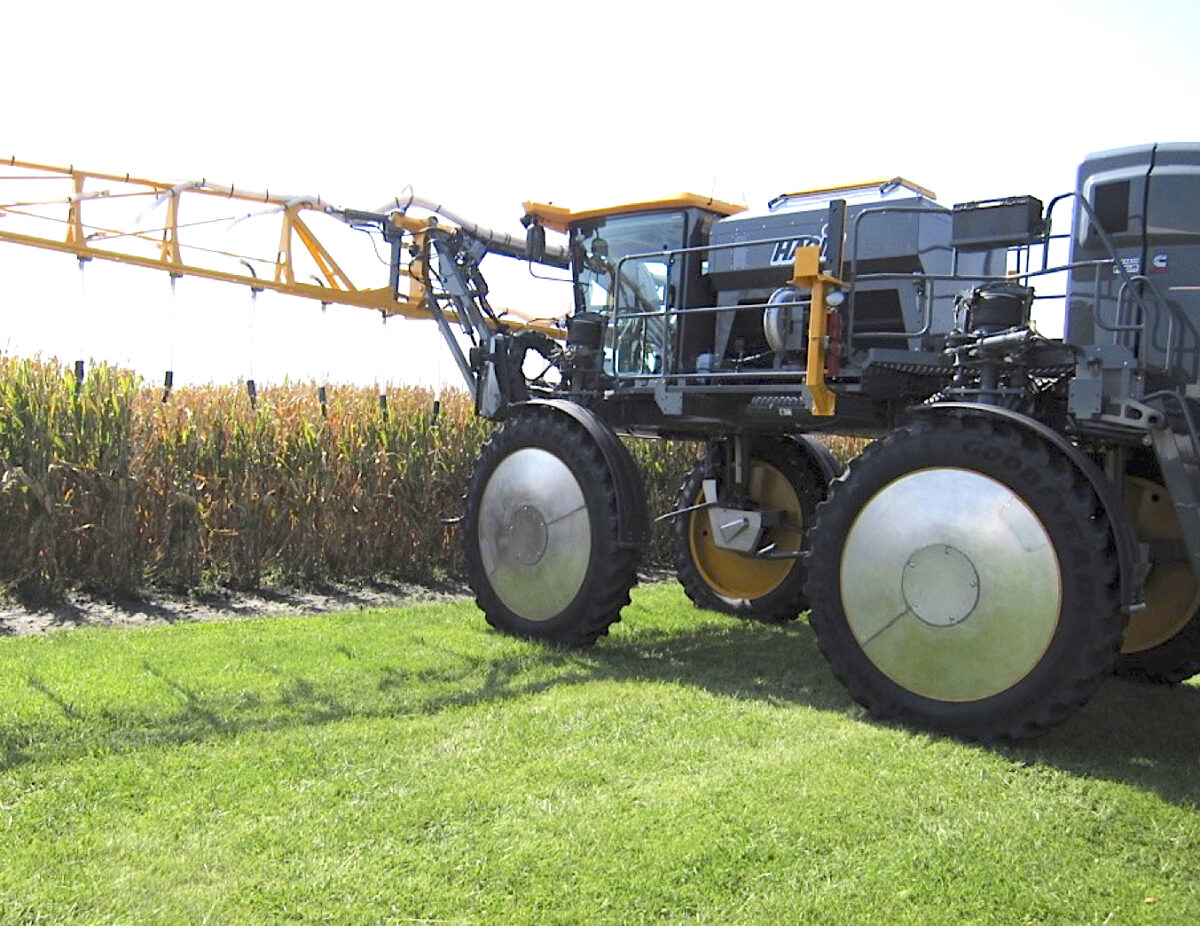
A relatively new trend in cover crop seeding is to use high-clearance sprayers modified for spreading seed. These high-clearance sprayers, designed to navigate through full-height corn in mid-season, can also comfortably move through corn in late August or early September, which can give cover crops a head start before harvest. Some companies have started selling modification kits for their high-clearance sprayers. In other cases, farmers have made their own custom modifications. In all cases, the liquid sprayer box is removed and replaced with a seed box. An air blower is attached to blow seeds through long tubes that are distributed along a spreader boom. Depending on the seed to be spread and the strength of the blower, seed booms are 60-120 feet wide. The seed distribution tubes blow the seed onto a metal diverter that spreads it over the width of the row. Typically, the diverters are on drop tubes that run about 3-4 feet above the ground. Depending on set-up, high-clearance cover crop seeders may be able to seed up to 500 acres per day in optimal conditions.
The advantages of high-clearance seeders over aerial application include the following:
- More even distribution of seed
- Ability to spread seed on days that are too windy for aerial seeding
- Keeps seed on your field and out of your neighbors’ fields
- Creates custom seeding opportunities for farmers
- Makes use of existing equipment that can be run by a farmer or ag retailer
The last point is a particularly noteworthy one in the context of ag retailers. The late-summer and early-fall time period is a relatively slow one for many ag retailers, with summer spraying over and fall fertilizer applications not yet begun. They therefore have a labor capacity during this time period that is often underutilized and high-clearance sprayers sitting idle. Why not take this opportunity to spread cover crop seed?
If the local ag retailers are not doing custom cover crop seeding, there can be a niche opportunity for farmers who want to adapt their own high-clearance spray rig (or buy one) and do some cover crop seeding. A typical modification kit for a high-clearance sprayer costs roughly $50,000 and takes about a half-day to install. This price sounds steep, but when you consider that aerial seeding can cost $12-$15 per acre (or more for small remote fields) and the modification kit can do hundreds of acres per day, in one season or two at most, the kit can pay for itself.
Aerial seeding
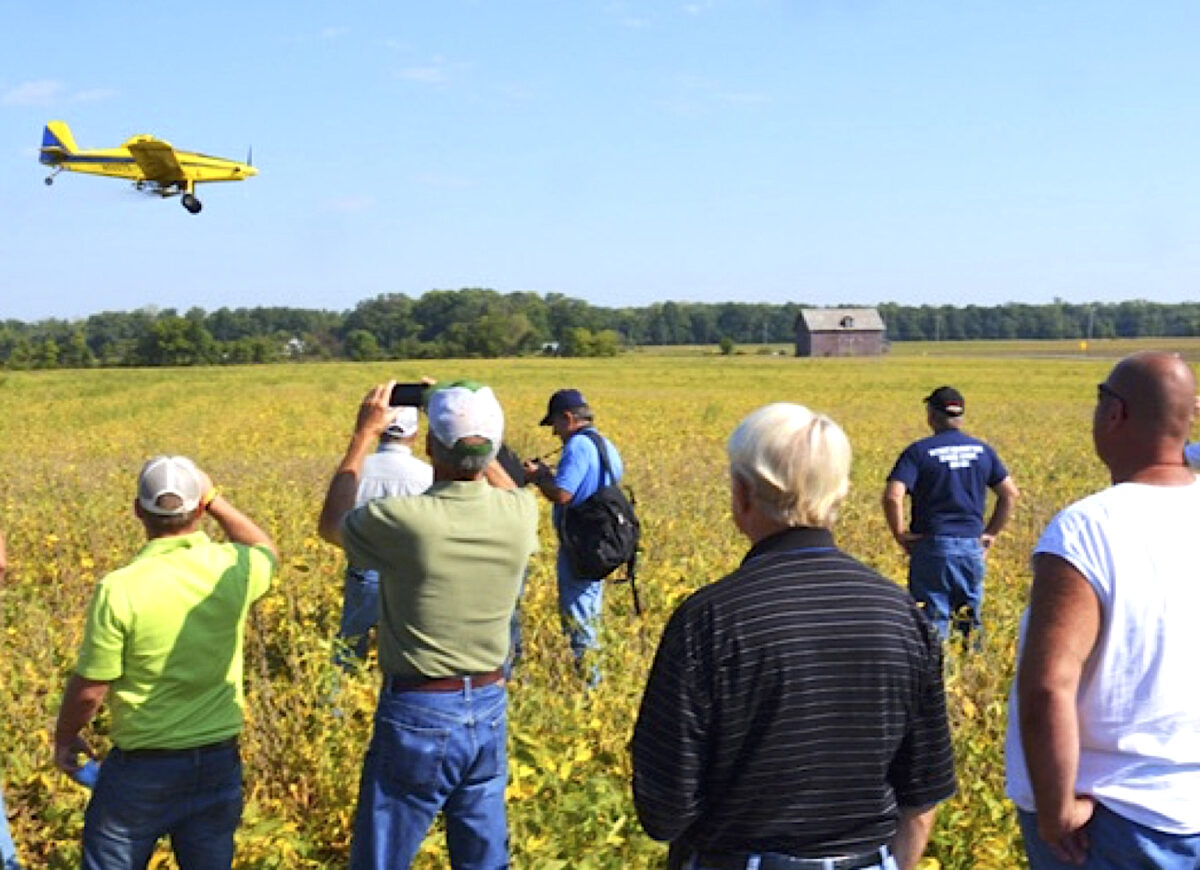
In 2015, about 16% of farmers responding to the SARE/CTIC National Cover Crop Survey indicated that they were primarily using aerial seeding. Over the last several years, many aerial applicators have gained experience with cover crop seeding. It’s worth asking potential aerial applicators about how much they have worked with cover crops, because it involves some different strategies than other field operations they may be used to. The number-one advantage of aerial application is that it is possible to do when field conditions are too wet for ground operations. Since soil moisture is critical for seed establishment, this can be a significant advantage of having seed flown on, assuming it can be done in a timely fashion right after or before a rainstorm. Of course, hiring an aerial applicator also eliminates the time demand of having to plant cover crops.
Besides the ability to fly seed on when ground equipment would get stuck in the mud, aerial application allows cover crops to be seeded while cash crops are still in the field. Just as with high-clearance seeding rigs, seeding into standing corn should be done during the window after corn leaves have started to turn color and before harvest. Flying seeds onto soybeans successfully is more challenging, as it requires working within a narrower time window of about a week, after the leaves start yellowing but before the leaves have dropped. If you fly seed on too early in corn or soybeans, the heavy shade (particularly in soybeans) will likely prevent growth. If cover crop seeds are flown on after soybean leaves have dropped, the dense mat of soybean leaves on the ground will prevent seed-to-soil contact by the cover crop seed, making establishment unlikely unless a heavy rain can wash the seed off the leaves.
Another consideration with aerial seeding is the type of cover crop you are going to use. Some cover crop seeds have been found to work reasonably well with aerial application. Brassicas (such as radishes, turnips, or canola) work well because they are seeded at a low rate (thus more acres can be flown on per plane load) and they have a dense, round seed that broadcasts uniformly and establishes well. Cereal rye and annual ryegrass work reasonably well from a physical distribution standpoint and for broadcast establishment. Large seeds such as Austrian winter peas are difficult to broadcast-establish, and lighter-weight seeds such as oats or sunflowers can be difficult to spread uniformly by airplane.
Broadcast seeding while combining
Being mechanical innovators, some farmers latched onto the idea of rigging up a seed blower to their combine. Gandy sells seed blower kits of various sizes specifically for mounting on a combine header. This offers the advantage of applying seed simultaneously with harvesting, avoiding a separate trip over the field and allowing more growing time for the cover crop.
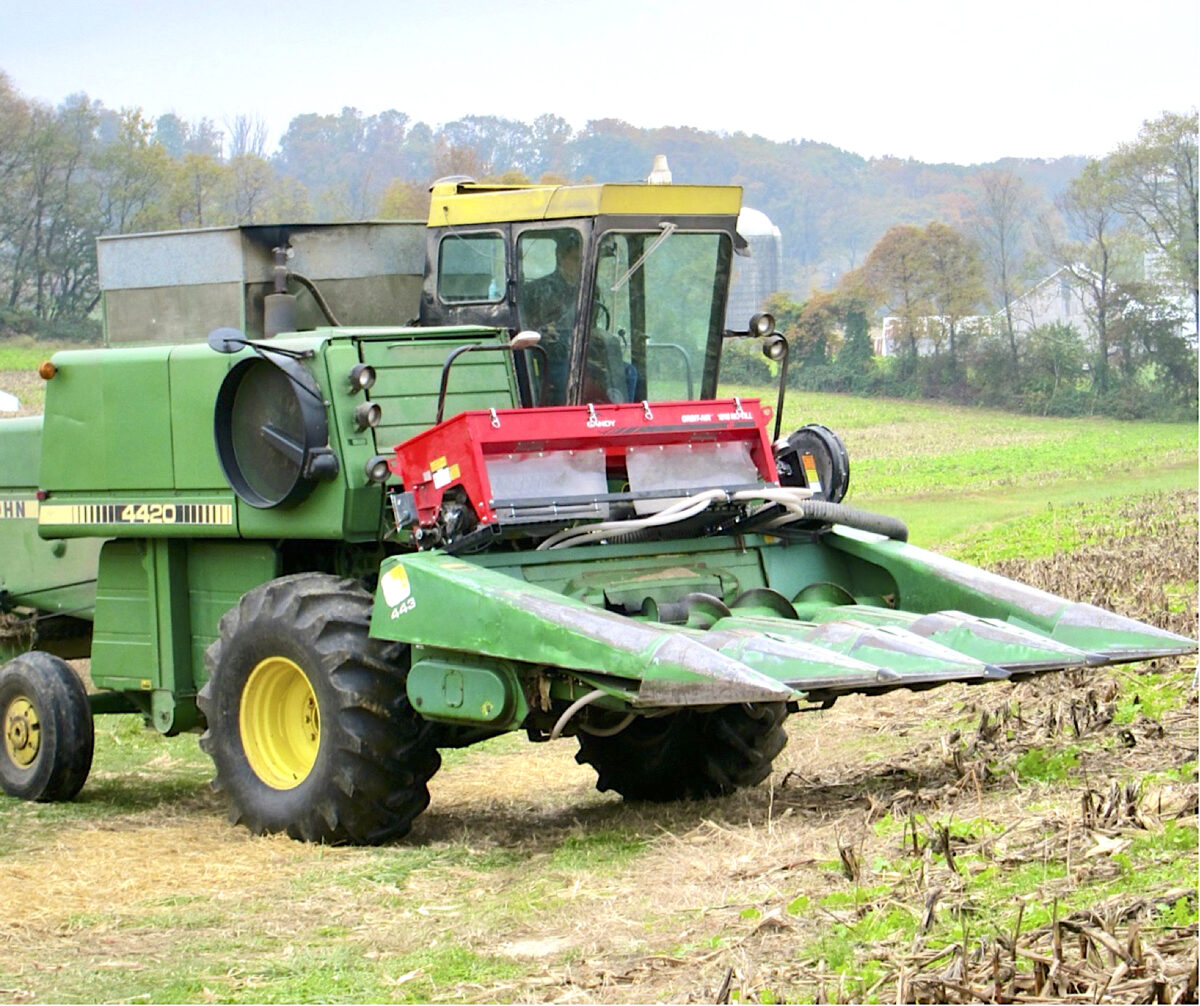
The normal approach to this method is to blow the cover crop seed onto the ground through tubes and diverters directly underneath the combine head. In my opinion, this is a strength of the approach because it puts the seed in contact with bare soil before all the leaves, stalks and chaff are blown out the back of the combine. Instead of seed being broadcast later on top of that residue, it is blanketed by the residue, maintaining the seed moisture. As long as the residue is not too thick and some soil moisture is available (at planting or soon after), the seed has a decent chance of establishing. Having a good stalk chopper on the combine that distributes residue evenly will enhance the odds of success with this approach.
However, I’ve heard some farmers who tried this approach say that they are not keen on stopping the combine to get out and load cover crop seed. Thus, this system will probably work best on a farm where there is a person driving a grain cart or grain truck who can help out with the cover crop seed loading, to minimize downtime for the combine operator.
Broadcasting with incorporation
In the 2022-2023 SARE/CTIC National Cover Crop Survey, about 44% of the responding farmers said using a grain drill was their primary seeding method, while 32% primarily broadcast with ground methods and 13% by aerial seeding (the remainder used a precision row crop planter or other method). When broadcasting cover crops, some farmers do it with an air seeder attached to a tillage tool, with vertical tillage tools being a common technique.
Seeding with a vertical tillage tool
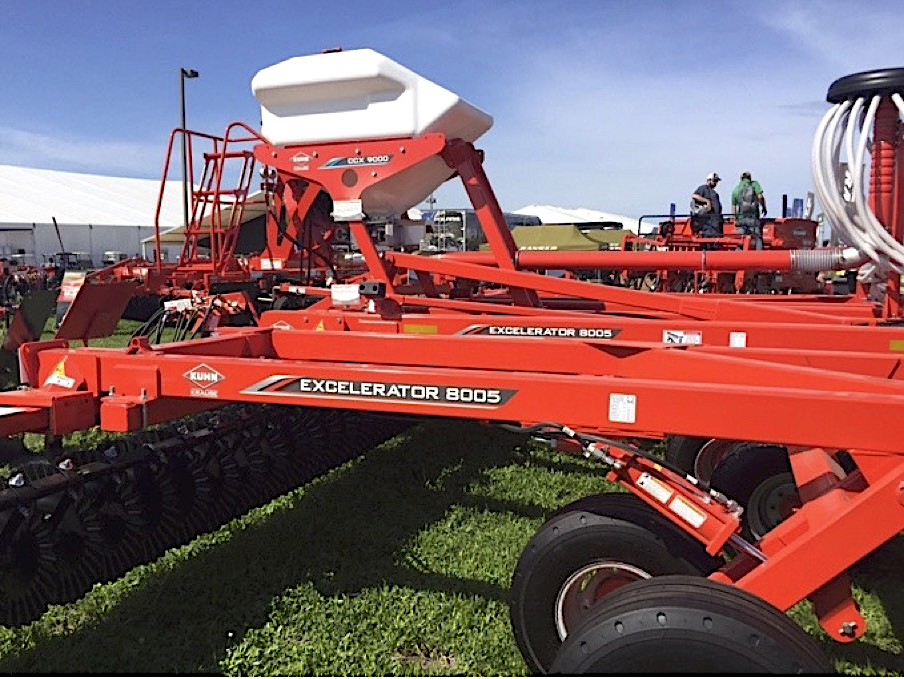
Vertical tillage tools, which look like traditional disks except with flat blades, have become a popular approach for “light” tillage in the fall, particularly on corn ground following harvest. For farmers who are already making a trip over the field to do vertical tillage, it is possible to seed cover crops at the same time with the vertical tillage machine; it just involves putting an air seeder box and distribution tubes onto the vertical tillage unit. Valmar and Gandy are two of the companies that make seeding kits compatible with vertical tillage units. Normally, the seed is blown out at the front of the unit, allowing incorporation of the seed as the tillage unit goes over the ground.
On the plus side, this is a good labor-saving approach and generally achieves a higher percentage of cover crop seed establishment than just broadcasting. There are two potential drawbacks, however. One is that the depth of seeding is difficult to control, unlike with a drill or row crop planter; some seed will stay on the surface and some will be buried too deep. This is more of a problem for shallow-seeded cover crops like radishes and annual ryegrass than for covers that can tolerate deeper seeding, like cereal rye, wheat, or oats. The other potential issue is the timing of the operation. If vertical tillage is done within a few days of harvest, it can be a workable approach for cover crop establishment, particularly for cereal rye or other cereals. However, if vertical tillage doesn’t start until every last field is harvested, then some of the seeding may end up happening much later than desired. If possible, when using this approach, try to have someone lined up to run the vertical tillage unit through the field either right behind the combine or within a couple of days of combining.
Other incorporation methods in combination with broadcast seeding
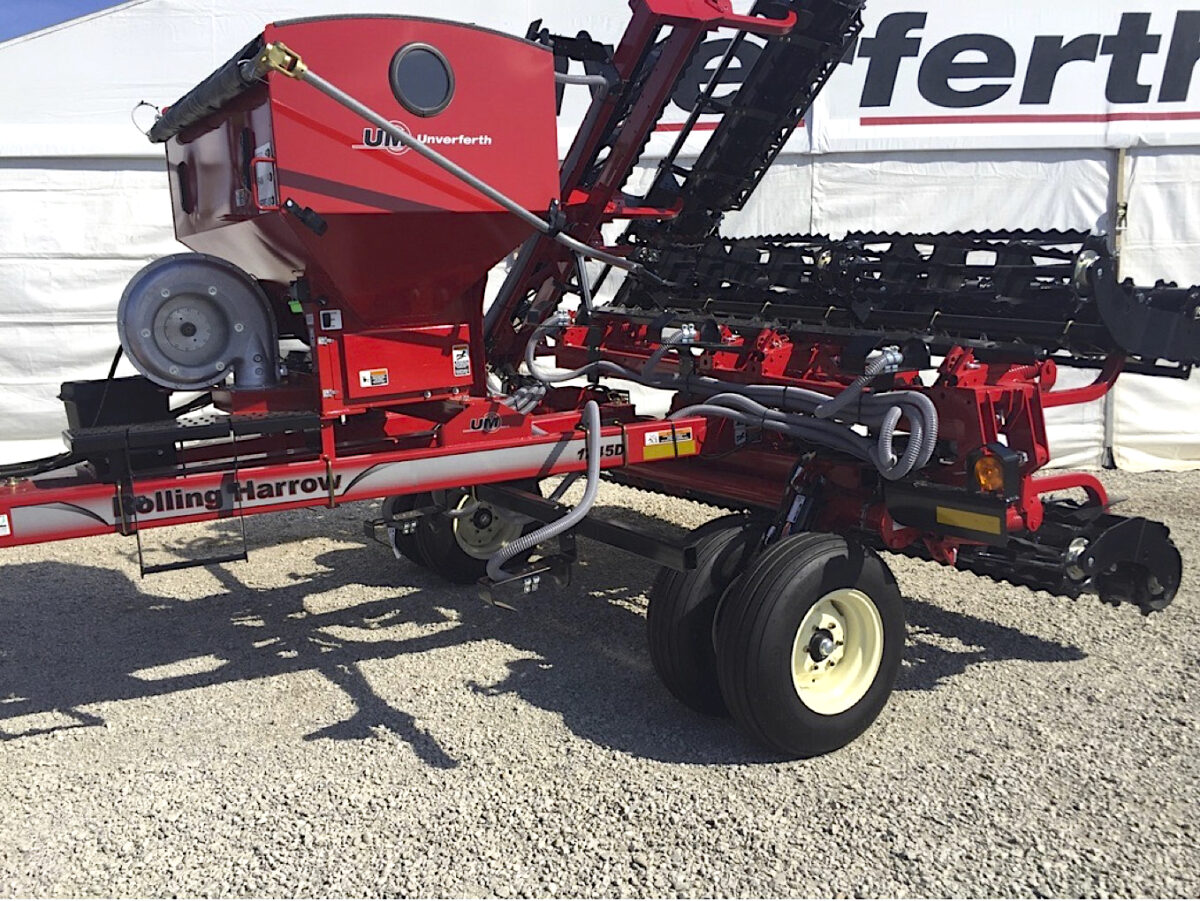
Besides vertical tillage, other shallow tillage tools can be used for cover crop seeding. Sometimes traditional disks are used, but they have the drawback of throwing more soil than a vertical tillage unit, potentially burying some of the cover crop seed too deep. A field cultivator could be used, but those are rarely employed in the fall when cover crop seeding is typically done. Rolling harrows set up with an air seeder are another option. Some farmers have used aeration-type fall tillage tools that leave most residue in place but provide some soil disturbance action that can further incorporate cover crop seed.
Equipment for terminating cover crops
The most common ways to terminate a cover crop are to let winter do the job (using winter-killed species of covers) or to terminate the covers through use of a spring burn-down herbicide. In either case, no extra labor or equipment is needed, unless spring burn-down is not a normal practice for control of winter annual weeds.
For less-common termination approaches, a variety of termination equipment has emerged, and more will likely be developed in the future. Below I will briefly discuss terminating your cover crops with a variety of equipment options, including lightweight spray rigs, roller crimpers, or mowing. More detailed information on termination strategies is in the two preceding chapters (Chapters 7 and 8).
Lightweight spray rigs
As cover crop acreage began to expand over the last 10-15 years, a few companies started marketing light-weight spray rigs that could cover a substantial number of acres simply using a large ATV with flotation tires. The idea was that it might be difficult to get across a wet field, especially one just thawing out, early enough in the spring to terminate a cover crop ahead of corn. Some of these rigs had booms that could cover a 60-foot-or-wider width, and I’m sure a number of these are in use, particularly in areas with colder, wetter springs. However, my impression is that more farmers are terminating cover crops later than was typical a decade ago, and so termination may be more easily done by larger spray rigs, including ones run by ag retailers.
Roller crimpers or just rolling cover crops
Probably one of the most talked about innovations in modern cover crop management has been the use of roller crimpers. Steve Groff, a Pennsylvania farmer and widely-known cover crop innovator and expert, was perhaps the first to develop and use a roller crimper for cover crop termination. Around the same time, the Rodale Research Center started experimenting with them, also in Pennsylvania. As mentioned in Chapter 8, I heard a presentation by Jeff Moyer of the Rodale Research Center in 2008 about their success terminating cover crops with a roller crimper mounted on the front of a tractor, while simultaneously pulling a no-till planter behind the tractor. I was intrigued by the approach at the time and encouraged our University of Missouri agronomy farm manager at the time, Tim Reinbott, to obtain a roller crimper, which he did. Since then, hundreds of farmers and researchers have experimented with the best ways to use roller crimpers. While the total acreage managed with roller crimpers remains modest, for organic no-till and other special circumstances, they are an invaluable tool.
The biggest limitation of roller crimpers is the speed of operation. A typical unit from I & J Manufacturing is only 10 or 15 feet wide, although they can custom-make wider, folding units. Howard G. Buffett had a custom unit made for a 60-foot John Deere folding toolbar. I have seen this unit and it can certainly cover a lot of acres, but its width is not common.
Another limitation of roller crimpers is their effectiveness at completely killing the covers. They work best when the ground is not too wet; otherwise, the cover crop stems may simply be pressed into the mud and not crimped enough to terminate growth. Also, if the cover crop biomass is lush, the roller crimper can fail to totally crimp all the stems in a several-inch layer of fresh residue. Sometimes a second pass is needed in such situations. As with mowing a cover, most species are far more easily killed by a roller crimper once they’ve reached their reproductive stage. The majority of cover crops are usually easier to terminate at a vegetative stage by spraying than crimping.
A tip for those trying to do no-till with cover crops is to roller crimp after planting rather than before (especially for organic fields). Researchers and farmers have learned that planting into already-rolled cover crops has two drawbacks: one is pinning the residue into the furrow, and the other is that the action of planter openers creates a zone of tillage that exposes weeds to sunlight. If rolling is done after planting, this furrow area will be covered with residue, reducing weed emergence but not hindering vigorous cash crops like corn and soybeans. For those who are rolling before planting, it’s best to plant in the same direction as the cover crop was rolled. Also, it’s a good idea to experiment with different types of closing wheels to produce optimal furrow closure.
The design idea behind a roller crimper is that the metal crimping edges of angular steel welded onto the roller will break the vascular tissue (xylem and phloem) when pressed with force into the cover crop stems, effectively killing the plant. This provides more effective termination than just using a plain, round roller does. However, some farmers, particularly in the southern U.S., have successfully terminated selected covers such as cereal rye with plain rollers or cultipackers. This usually involves waiting until the rye or other cereal is heading out, at which time it’s easier to break the stems during the rolling action. However, if the cover crop stems are rolled down without breaking, they will likely stay alive.
Mowing cover crops for termination
A sure-fire way to break cover crop stems is to use a mower. I learned the hard way back in the early 1990s that mowing too early offers little benefit, much like mowing your lawn and watching it regrow. At that time, I tested several cover crops and terminated them with either tillage, spraying, or mowing. The mowing worked well on crimson clover that had started to bloom and on the rye that was starting to head, but the hairy vetch was not yet flowering and immediately started to regrow after mowing. Thus, I advise waiting until after flowering is well under way before trying to terminate a cover crop by mowing alone.
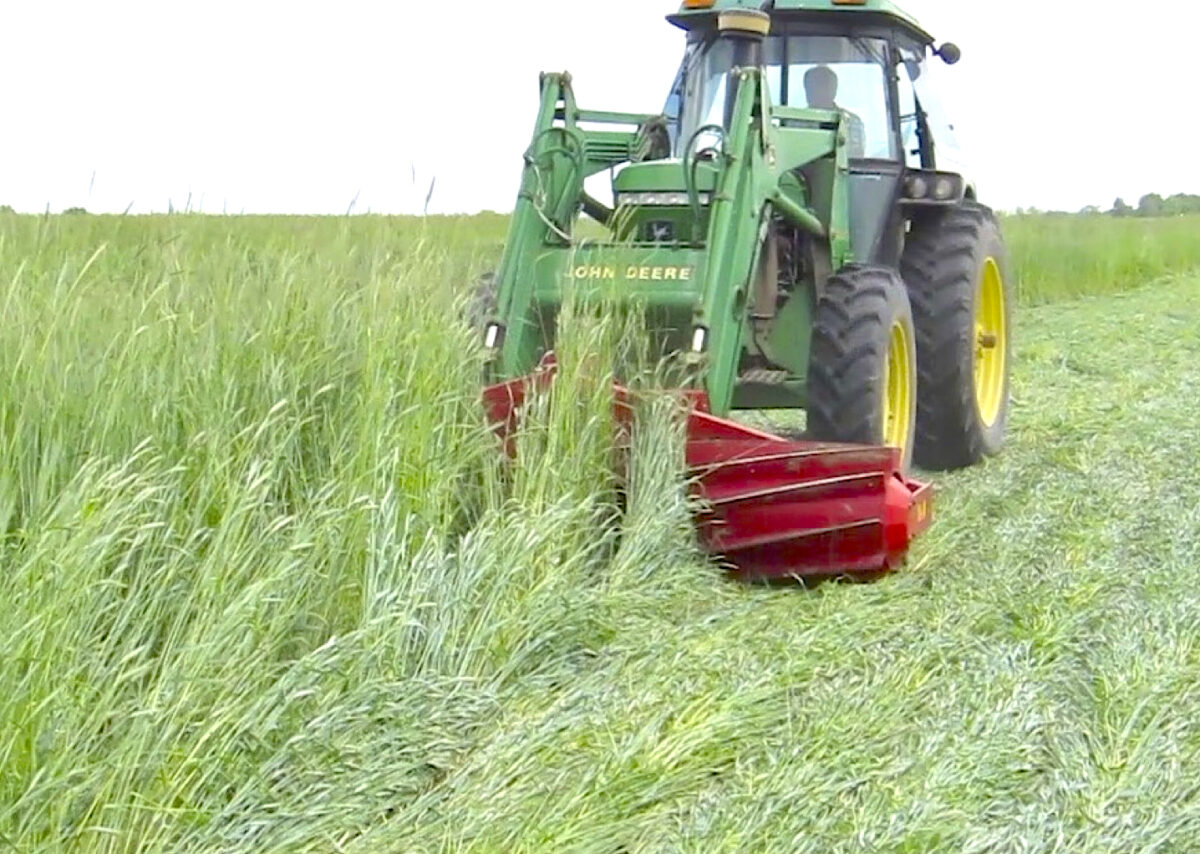
One other tip for mower termination of covers is that a flail mower can do a more even job of chopping up and spreading the residue. Flail mowers are a particularly good idea in vegetable fields or other horticulture operations where other workers may be around. Flail mowers are much less likely to throw stones or other debris than rotary mowers. Other types of mowers can be used for terminating cover crops as long as safety is taken into consideration.
Mowing cover crops for termination
I don’t recommend terminating cover crops with tillage, both for soil health reasons and to avoid creating a clumpy mess that is hard to plant into. When a cover crop is terminated at a small size, it’s possible that a decent seedbed can be prepared with light tillage after the cover crop is grown. However, when there are several tons of biomass per acre, such as 5-foot-tall rye or a dense cover crop mix, I’ve found that tilling such a large amount of biomass leads to major seedbed preparation challenges. The cover crops can be terminated easily enough, but it might take multiple tillage passes over multiple days with some time for drying in-between to get to the point where the field is ready for a planter to be run through it (and that’s assuming there’s a run of dry weather at the right time).
The exception to the above advice on tillage termination is for smaller vegetable or home garden operations, or other situations where spray termination is being avoided. In these situations, the extra labor is generally not an issue that would prevent making an extra pass or two over the planting area. If a significant amount of cover crop biomass is present in a home garden or small vegetable plot, I’ve often mowed first to chop up the residue and then rototilled it. The small pieces of residue usually incorporate into the soil well with the rototiller, especially if allowed to dry for a day or two before tilling. Just keep in mind that each tillage pass has a potentially negative effect on soil health and leaves the soil more subject to erosion.
Equipment modifications for planting in cover crop residue
You might think that a no-till drill or no-till row crop planter is all you need for planting into cover crop residue, and in many situations you would be right, particularly if cover crop growth is minimal at planting time. However, in situations with higher amounts of cover crop residue, additional modifications may improve the success of your cash crop planting.
One thing I’ve heard from a few farmers is that they found it was actually beneficial to remove the no-till coulters from their planter when planting into cover crop residue. Those farmers said the coulters were pinning too much cover crop residue into the furrow area. This might not always be the case, but it is something to watch for. Likewise, trash-clearers or row-cleaners that are effective for loose corn stalk residue might create problems with living, anchored cover crop plants, leading to tangling and pulling of the covers. The row-cleaners might have to be lifted up or taken off the planter in these circumstances.
Generally, a double-disk opener with reasonably sharp blades can function well in cover crop residue. I’ve heard of an occasional situation where a farmer found a serrated type of disk opener performed better for their soil and residue situation to slice through the residue.
Some farmers have found it helpful to switch to different types of closing wheels when working with high-residue covers. Quite often, some type of spiked or knobby closing wheel will perform better than a smooth-edged rubber or steel closing wheel, but it depends on soil type and other conditions. I encourage you to buy a few different closing wheels and experiment to see what works best for you in various situations.
Equipment modifications for using cover crops with manure and/or fall fertilizers
It is possible to combine the cover crop seeding with liquid manure application. The cover crop seed can be mixed into a manure slurry. The moisture and nutrients of the slurry can help the cover crop seed sprout well; often some light incorporation may be helpful, other times surface application might suffice. Here are a few tips to consider when using this approach:
- A recirculating pump can help keep the seed in suspension and avoid clogging.
- Light incorporation of the manure and seed can help to both establish the cover crop and reduce runoff of manure, if the operation is no-till.
The downside of seeding the cover crops with the manure application is that the best timing for each may not coincide. The cover crops should be planted as early as possible after harvest, if not before, whereas colder weather (such as in November) may be optimal for the manure application. In cases where the cover crop needs to be seeded earlier than the manure application, I recommend a review of the manure injection equipment to evaluate it for amount of ground disturbance. If the injection knives or blades disturb more than about 20% of the soil surface, they will do a large amount of damage to the planted cover crop, so a less disruptive injection knife may need to be installed. The exception is in cases where the knifed zone is spaced out to where corn rows will be planted the next spring, effectively creating a strip-till situation.
Having a growing cover crop near the time of manure application can help tie up some of the manure nutrients in biological form, reducing runoff or other loss of the manure nutrient value. Similarly, fall cover crops can help benefit fall nutrient applications.
As with manure injection, some thought should be given to the method used for fall application of fertilizers, especially if they are being incorporated, such as anhydrous ammonia. Anhydrous knives normally don’t disturb a high percentage of soil, so they can be compatible with a cover crop; in fact, the cover crop can tie up some of the nitrogen, acting as a biological nitrification inhibitor and potentially reducing the need for a chemical nitrification inhibitor. Still, it’s best to review your plan for fall fertilization to make sure it is compatible with survival of the cover crop you are investing in.
Looking ahead on future equipment development supporting cover crop use
Anyone who goes to farm machinery shows or reads farm magazines knows that equipment is continually redesigned. There is no doubt further customization and modifications will lead to improvements in cover-crop-related equipment. One of the incremental improvements I am hoping to see is the development of more high-clearance seeding equipment that can incorporate the cover crop seed rather than simply broadcasting it. I discussed the use of high-clearance drills earlier, but those are currently limited to corn that is about two feet tall; I’m interested in seeing development of equipment that can navigate through full height corn while performing some incorporation. Hagie actually developed such a machine using a modified version of their high-clearance nitrogen toolbar. They experiment with rolling-basket-type units and simpler roller-press wheels to incorporate the cover crop seed. The machine showed some promise of having improved performance for seed establishment over a high-clearance broadcast rig, but they told me the limitation was the speed of seeding; the toolbar is considerably narrower than their modified spray rigs. Future equipment might accommodate high-speed seeding with light incorporation at the end of August. That would be a plus for establishing covers earlier.
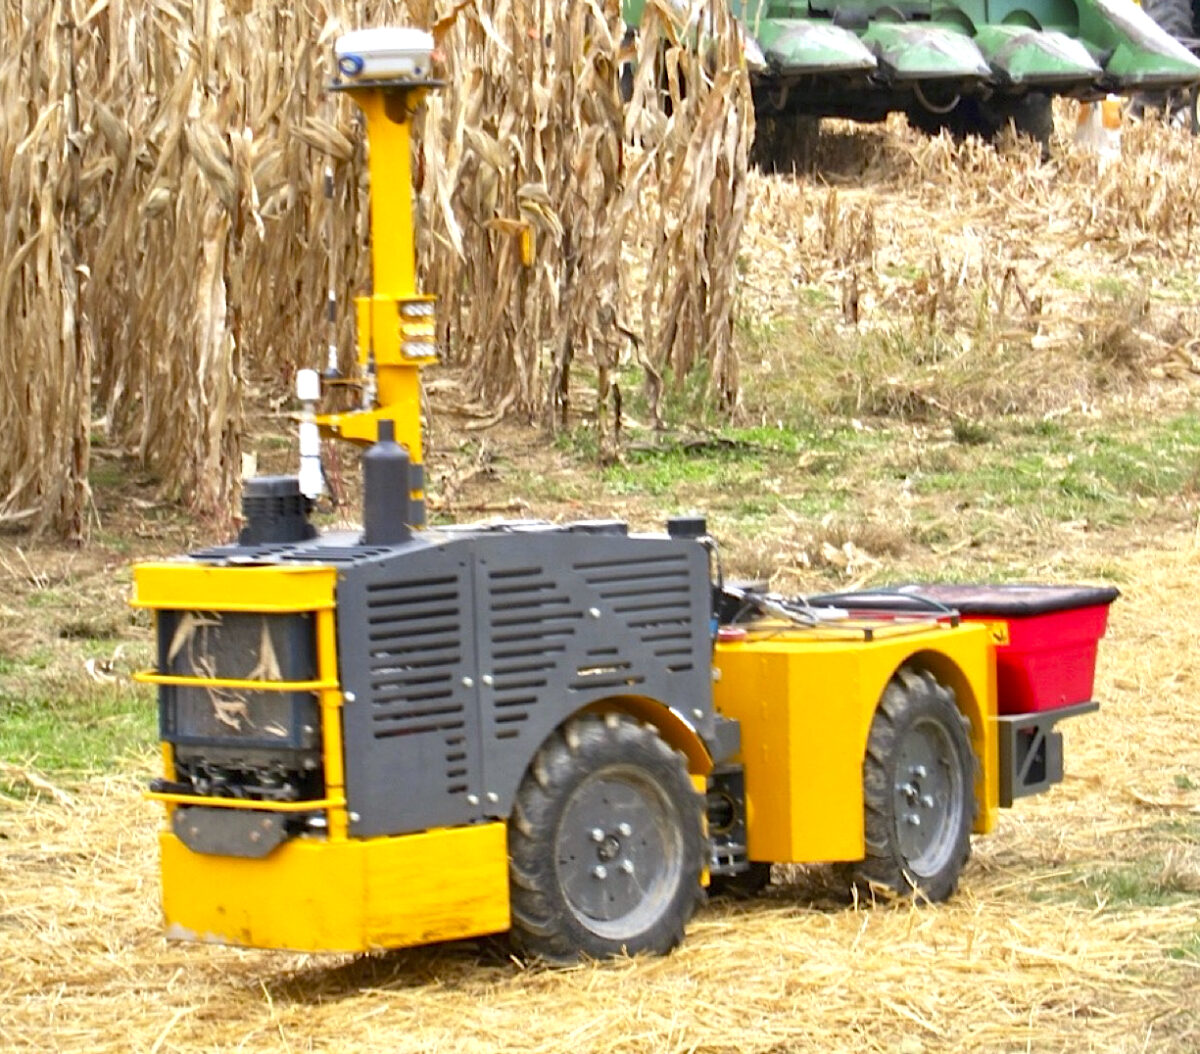
An alternative approach to planting the cover crop seeds into a standing cash crop field is to use small, precision-guided robotic units. A company out of Minnesota, Rowbot, was the first to envision such a system. I got to see their founder, Kent Cavendar-Bares, operate a prototype unit at a field day in 2014 and was quite impressed. Kent grew up on a farm in Minnesota and went on to complete advanced technical training while doing a Ph.D. at MIT. I hope his vision receives further evaluation and trialing going forward. He envisions a fleet of small, GPS-guided, diesel-powered robots spreading fertilizer, sprays, or cover crop seed and operating 24/7 to cover fields with minimal labor. You can see videos of the Rowbot in action if you do an internet search for the product by name. Other companies have also started to research this approach of having small, autonomous robots go through the field.
Another hot area besides robots is the emergence of drone use for agriculture. So far, drone use has been focused on aerial survey and photography and, in some high-value crops, spraying of pesticides. Might we see drones used in conjunction with cover crop and soil health goals to identify areas of the field that need adjusted management, not unlike other aspects of precision agriculture? Drones don’t yet have the capacity to seed large acreages of cover crops, but they already offer potential for helping us evaluate field variation. New generations of drones may work well to broadcast selected cover crops that have a low seeding rate, like radishes or other Brassicas.