
Essential Concepts of Mechanical Weed Management
Soil disturbance is the most powerful lever a farmer has for manipulating the ecological processes of a field. Soil disturbance changes the physical environment of all species present, including soil microorganisms, insects, diseases and, most importantly for the purposes of this chapter, weeds and crops. Tillage and cultivation directly affect weeds by burying shoots, by cutting up plants and by uprooting plants so that they desiccate. As discussed in Chapter 2, soil disturbance stimulates the germination of many weed species (see “Seed Germination: Why Tillage Prompts Germination”). Finally, tillage changes the vertical distribution of weed seeds in the soil, and this affects their probability of survival, germination and emergence.
A central principle of this chapter is that the effect of tillage or cultivation on a weed population depends on the interaction between the nature of the soil disturbance and the ecological characteristics of the weed. The size, shape, position and physiology of shoots and underground organs, and particularly whether the species is an annual or a perennial, greatly affect whether a weed survives a particular tillage or cultivation practice. Similarly, the size, longevity and germination characteristics of seeds largely determine how they respond to a tillage or cultivation event. Thus, to effectively control weeds with tillage and cultivation, you need to think about the properties of the particular species and size of weeds in a field and choose tillage and cultivation practices that prey on the weaknesses of those weeds. Moreover, your best choices will vary depending not only on the weeds but also on the crop stage, the weather and soil conditions. Understanding what you are specifically trying to do to the weeds, and balancing this with the machinery options available, is the essence of good mechanical weed management.
A second general principle of mechanical weed management is that timing determines how successfully tillage and cultivation control weeds. First, season, weather and soil conditions greatly affect how the operation will affect the soil and the weeds. Second, the effectiveness of tillage and cultivation methods depend on the size of the weed. For example, tine weeding only works on very small weeds; controlling very large weeds often requires heavy tillage implements. Thus, the choice of implement and how it is set up and used depends on the size of the weeds. Finally, the stage of crop development and soil conditions determine the types of cultivation that the crop can tolerate.
A third general principle is that mechanical weed management is most effective when you use several operations in a planned sequence. Each operation should target particular types and sizes of weeds in accord with the previous two principles. For example, corn production usually begins with tillage to bury early emerging annuals and disrupt the growth of perennials. After planting, a grower will usually cultivate two or three times with a rotary hoe or tine weeder to remove weeds in the white thread and early cotyledon stage from the crop rows. Typically, these operations will be followed by inter-row cultivation with a row-crop cultivator. During inter-row cultivation soil is usually thrown into the row to bury weed seedlings. Burial only works, however, if the weeds are small. Hence, the success of that operation depends on removal of the first flushes of seedlings during the earlier tine weedings or rotary hoeings. The sequence and types of practices you use will depend on the crop, but in general, your success at eliminating weeds will depend on a well-planned program of multiple operations with a variety of tools.
Types of Tillage and Their Effects on Weeds
Different tillage implements move soil in different ways, and consequently they differ in their effects on weeds (Table 4.1). Moldboard plows invert the soil and are thus very effective at burying weeds. Since large blocks of soil within the furrow remain relatively undisturbed, a moldboard plow is relatively poor at fragmenting weeds or dislodging soil from weed roots. Chisel plows crack the soil laterally and send a wake of soil rolling away from both sides of the shank. A chisel plow uproots weeds that are directly in the track of a shank, but these are a small proportion of the total. Many weeds are buried, however, by the soil thrown from the shank. Field cultivator blades cut deeper roots of weeds, and their relatively steep pitch churns the soil, thus burying small to moderate sized weeds. In contrast, the lower pitch of a sweep plow blade primarily lifts and loosens the soil. The roots of large weeds are sliced off the shoots by a blade plow, and seedling weeds may subsequently dry out and die due to loss of soil-root contact. Disks and rotary tillers are very effective at chopping weeds into fragments. They also separate weed roots from soil by fragmenting soil masses, and the rotary action tends to bury the fragments. Plowing with either a moldboard or chisel plow is usually followed by disking or harrowing to create a level seedbed of uniform consistency. In the process, weeds are further fragmented, and roots are exposed to additional drying.
| Table 4.1. Effectiveness of Tillage Implements for Uprooting, Breaking and Burying Weeds (Reproduced from Mohler 2001) | |||
|---|---|---|---|
| Implement | Uprooting | Breakage | Burial |
| Moldboard plow | Good | Poor | Good |
| Chisel plow | Moderate | Poor | Moderate |
| Field cultivator | Moderate to good | Moderate | Moderate |
| Sweep plow | Poor | Moderate | Poor |
| Disks | Moderate | Good | Moderate |
| Rotary tiller | Moderate | Good | Moderate |
Annual weeds that germinated earlier in the same season are usually completely killed by any kind of tillage. Annuals that germinated the previous season are well established by the time of tillage and may respond to tillage more like perennials.
The growth habit of perennial weeds indicates to what extent they are susceptible to uprooting, breakage or burial (Table 4.2). The effect of tillage on a creeping perennial species depends on the depth of the storage organs. Species like field bindweed and common milkweed, in which most of the storage organs are below the normal depth of tillage, are not susceptible to uprooting. Moreover, if the shoot is buried, it will usually quickly resprout from dormant buds on the vertical rhizome just below the soil surface. Thus, the damage these species sustain from tillage comes primarily from severing the shoot from the deep roots or rhizomes. Several cycles of tillage and resprouting are usually required to deplete deep storage organs (see “Exhaust Perennial Storage Organs”).
| Table 4.2. Susceptibility of Perennial Weeds with Different Growth Habits to Uprooting, Breakage and Burial by Tillage Implements | |||||
|---|---|---|---|---|---|
| Growth Form | Uproot | Sever Shoot From Root | Fragment Storage Organ | Burial | Examples |
| Creeping perennials | |||||
| Storage organs are below tillage depth | Very low | Moderate | Very low | Moderate | Field bindweed, common milkweed |
| Storage organs are in the plow layer | Moderate | Moderate | Moderate, propagates | Moderate | Quackgrass, perennial sowthistle |
| Stationary perennials | |||||
| With a taproot | Low | Low | Moderate1 | High | Dandelion, curly dock |
| With fibrous roots | Moderate | High | High | High | Broadleaf plantain |
| 1Fragmentation can potentially propagate taprooted perennials, but this rarely poses a problem in practice. | |||||
Creeping perennials with shallow storage organs (for example quackgrass or perennial sowthistle) are easier to exhaust because the storage roots or rhizomes can be broken into small pieces, each of which has less stored energy (see “Vegetative Propagation of Perennial Weeds”). Moreover, creeping perennials that have storage roots or rhizomes in the plow layer are more easily controlled by tillage because they are susceptible to uprooting and desiccation (see “Dry Out Perennial Storage Organs”), and may be susceptible to physical removal from the field.
A few perennials spread by rhizomes but overwinter by means of a bulb or tuber (for example, yellow nutsedge, purple nutsedge or wild garlic). Usually, most of the tubers are in the plow layer, though a few may form deeper in the soil. Tillage usually has little effect on dormant tubers. It may redistribute them vertically, but energy stored in the tuber is generally enough to allow sprouts to emerge from anywhere in the tilled layer. Once the tubers sprout, however, tillage that breaks or cuts the shoots from the tuber will force resprouting and weaken the plant. Both dormant and sprouting tubers can also be killed by drying. See individual species accounts for details on using these management strategies against particular weeds.
Fixed perennials, including biennials, have to reproduce by seeds, and when they are young, they are susceptible to the same methods that control annual weeds. The response to tillage of fixed perennials that have developed substantial taproots is similar to that of creeping perennials with storage organs in the plow layer. Usually, species with taproots cannot be killed by uprooting unless the taproot is brought to the soil surface and thoroughly dried. Just cutting the shoot off with shallow tillage does not usually control a taprooted weed because it quickly grows new leaves using the large reserves of energy in the root. Using tillage to chop the roots into small pieces and burying them deeply is a good first step toward exhausting the plants, but usually will not be sufficient to control the weed without additional measures. Biennials like bull thistle and common burdock are susceptible to tillage, however, after they have bolted and transferred energy to the shoot.
Tillage easily kills most fixed perennials without taproots (for example, broadleaf plantain). These species cannot easily grow back to the surface after burial, and they do not tolerate getting chopped up. Consequently, these species are rarely a problem in tilled fields but are instead primarily weeds of no-till fields and perennial crops, including fruit, mowed forage crops and pastures. Overwintering populations of annual bluegrass are an exception that proves the rule. They often do survive tillage, but not because they tolerate burial or dismemberment. Rather, the tight little clumps of roots embedded with soil resist breakage and tend to float to the surface if harrowing is used to create the seedbed.
Using Tillage Against Perennial Weeds
Exhaust Perrenial Storage Organs
Many perennial weeds have deep storage roots or rhizomes that resprout after the tops are cut (for example field bindweed or common milkweed). Since the storage roots or rhizomes are too deep in the soil to damage with normal tillage, your best hope for controlling these weeds without chemicals is to exhaust the storage organs by repeatedly removing the top growth. Generally, the net flow of carbohydrates is from the storage organ until at least three or four leaves have formed (see “Vegetative Propagation of Perennial Weeds”), but it may be later in some species. Timing your operations to correspond to the target species’ minimum food reserves will reduce the population with the least amount of labor. Typically, eradication of deep-rooted perennials requires about six to eight well-timed tillage events the first year followed by three to five the second year. A field cultivator, spring tooth harrow or sweep plow run shallowly are good implements for this job. However, many repeated diskings can cause soil compaction. If previous activities have removed most storage organs from the plow layer, deep cutting at 16–18 inches can greatly slow re-emergence and reduce the number of operations needed to control the weed.
Few growers can afford to remove land from production long enough to completely eradicate perennials by exhausting the storage organs. If the population is light to moderate, one to three cycles of sprouting followed by tillage may, however, be sufficient to keep the weed at tolerable levels.
Species that have their storage organs primarily in the tilled layer of the soil (quackgrass, perennial sowthistle, dandelion) are easier to exhaust than deep rooted perennials. Use a tillage method that breaks up the storage organs into small pieces, but if the problem is localized, avoid dragging the pieces all over the field. Breaking up the storage organs will increase the number of plants but will make each one substantially weaker (see “Vegetative Propagation of Perennial Weeds”). The little sprouts can then be killed by shallow tillage or, in some cases, suppressed by a dense, competitive cover crop. Since the point is to induce the fragments to sprout and then be killed, tilling at a time of year when the weed is actively sprouting is usually best, although breaking up dormant storage organs may be useful as well (Anbari et al. 2011).
If the perennial weed is posing severe problems, try to bury the storage organs as deeply as possible. This will force the weed to put more energy into reaching the soil surface and thereby weaken the plant. For example, a tillage sequence for weakening a perennial with storage organs in the tilled layer might begin with two passes with a disk or one slow pass with a rotary tiller. Note that the tines of a rotary tiller cut off pieces of the well anchored root or rhizome on the first pass but may just throw the pieces around on the second. Thus, the slower the first pass, the smaller the pieces will be. Follow the initial tillage with deep moldboard plowing to bury the fragments and finish with shallow harrowing to create a seedbed. Follow the tillage treatment either with extraordinarily intense competition, as from a densely planted cover crop, or with regular shallow tillage before the plants begin to restore root or rhizome reserves (see species chapters). Either approach should reduce the population to manageable levels. Clearly, such an intensive tillage regimen, and particularly the deep moldboard plowing, will be hard on your soil and should be used only when less stringent measures fail. Use cover crops or heavy applications of high organic matter compost to restore the soil structure and biological activity after this technique.
Remove Perennial Storage Organs
Perennial weeds depend on resources stored in roots, rhizomes and tubers to establish new shoots the following year. You can reduce the population of creeping perennials with tough rhizomes like quackgrass and johnsongrass by physically removing the rhizomes. Moldboard or chisel plow the soil, and then work the rhizomes to the soil surface with a spring tooth harrow. Rake them off the field or into piles with a bent tooth tine weeder. Piles can then be forked onto a wagon. You can feed them in moderation to livestock or chickens, or dump them in woods or a hedgerow where they cannot grow due to shade. The practicality of this approach depends on the size and configuration of the area to be cleaned. Removing rhizomes from a large field may not be practical, but often only restricted areas of a large field will be infested. If a mowed field margin or grass waterway is nearby, the rhizomes can be raked onto that. The thickened storage roots of most perennial broadleaf weeds are too fragile to allow this technique to work.
Dry Out Perennial Storage Organs
You can also control creeping perennials that have most of their rhizomes or tubers in the plow layer by drying. Start by watching the long-term weather forecast. When the weather will be dry for at least a week, work the perennial storage organs to the surface with a spring tooth harrow as you would to remove them (see “Remove Perennial Storage Organs”). Stir the soil with a spring tooth harrow every couple of days to ensure that the surface soil dries completely, and that all storage organs are fully dried. A peanut digger has been used to bring nutsedge tubers to the soil surface for drying. Drying storage organs is much quicker than exhausting the storage organs, but unless the dry weather period is long and you till deeply, some fragments will likely escape. Nevertheless, the treatment can reduce a severe infestation to a minor one.
As with all procedures for controlling perennials, its long-term success will depend on follow-up measures. If you keep pressure on the population with additional fallow cultivation or strong competition with a vigorous cover crop, the population will continue to decline rather than begin to recover.
European farmers in the early 20th century often had severe infestations of perennial grasses due to the high frequency of cereal grains in their crop rotation. One way in which they dealt with the problem was to plow the soil when wet to create clods. During dry weather, they then stirred the clods with a field cultivator to thoroughly dry them out and kill the grass rhizomes. This is obviously an extreme measure that should only be used in desperate situations. It might be preferable, however, to frequent, long periods of tilled fallow.
In general, all tillage measures to control perennial weeds tend to have a negative effect on soil tilth, and some also expose the soil to erosion. Consequently, when you use these methods you need to compensate for them with actions that build soil quality, both to maintain good crop yields and to cultivate effectively (see “Soil Tilth and Cultivation”).
Tillage Effects on Weed Seedling Density
Timing of Tillage Affects Weed Density
Tillage has profound effects on weed seeds and seedlings as well as on perennial weeds. Since most agricultural weed species have particular times of the year in which they germinate most profusely, the timing of weed emergence relative to the timing of tillage and planting can either help control a weed species or ensure that it becomes a problem. You can reduce weed problems by timing tillage relative to weed germination in two ways, either 1) by destroying a large proportion of the weeds that will emerge that year with your seedbed preparation, or 2) by planting well before the weeds emerge to increase crop competition and the intensity of cultivation. Which option you use will depend on the crop.
Many spring germinating weeds reach peak emergence in mid-spring, with emergence decreasing later. If you wait until many seeds have already produced seedlings before tilling, then the tillage operation will eliminate a large fraction of the weeds that will appear that year. For example, a study in Wisconsin showed that delaying corn planting from April 25 to May 15 reduced in-row weed density after rotary hoeing by 55%. In organic systems, delayed corn planting has other advantages as well (see “Planting Date” in the “Crop Competitiveness” section).
Since many of the weeds that infest winter grain crops germinate best in late summer or early fall, delaying seedbed preparation and planting until mid to late fall also potentially reduces weed density. Delayed planting can, however, reduce the crop’s competitiveness in the spring and may decrease yield.
Delaying tillage and planting for summer planted vegetable crops like tomatoes and peppers tends to be less effective than for spring or fall planted crops. The weeds that dominate following tillage in hot weather tend to be species like hairy galinsoga and common purslane. Seeds of such species do not go dormant in hot weather. Consequently, you cannot out-wait them.
Note that to use tillage and planting date to eliminate early emerging weeds, you need to manage your tillage in a particular way. Specifically, primary tillage must occur long in advance of final seedbed preparation and planting. The reason is that if you till deeply just before planting, you will eliminate the current weed seedlings, but you will also bring many new seeds to the surface. Many of these will be released from dormancy by the usual cues associated with tillage and near-surface conditions (see “Seed Germination: Why Tillage Prompts Germination”). Your crop may then end up as weedy as it would have been if you had not delayed planting. Consequently, a shallow final seedbed preparation will result in less weed emergence than deep preparation.
Spring grains germinate and establish well at low temperatures. If planted in early spring they will emerge before most weeds. In particular, most annual grass weeds do not emerge in large numbers until mid or late spring. Moreover, after the soil settles due to rain and the crop begins to cast shade, the intensity of tillage-related cues that prompt germination will be reduced and consequently, so will weed emergence. The head start the grain gets from early planting also makes the crop more competitive against weeds. The larger difference in size between crop and weeds allows you to tine weed more aggressively to remove weeds that do emerge. In principle, early spring planting of vegetable crops that thrive in cool weather should also reduce weed density and favor the crop relative to the weed. The effect of tillage and planting date on weed-crop interactions in vegetables has not, however, been well studied.
Type of Tillage and Weed Seedling Density
Tillage redistributes weed seeds vertically in the soil column. This has three main effects. First, it changes the proportion of seeds that germinate. Seeds that move downward toward constant soil temperatures and away from light and gas exchange tend to become dormant, whereas those that move up into the light, warmth, fluctuating temperatures and rapid gas exchange of the surface soil tend to lose dormancy and germinate (see “Seed Germination: Why Tillage Prompts Germination”). Second, vertically redistributing the seed bank changes the fraction of germinating seeds that successfully grow to the surface and emerge. Finally, vertically repositioning seeds in the soil will change the proportion of weed seeds that are killed by the several factors that influence seed mortality.
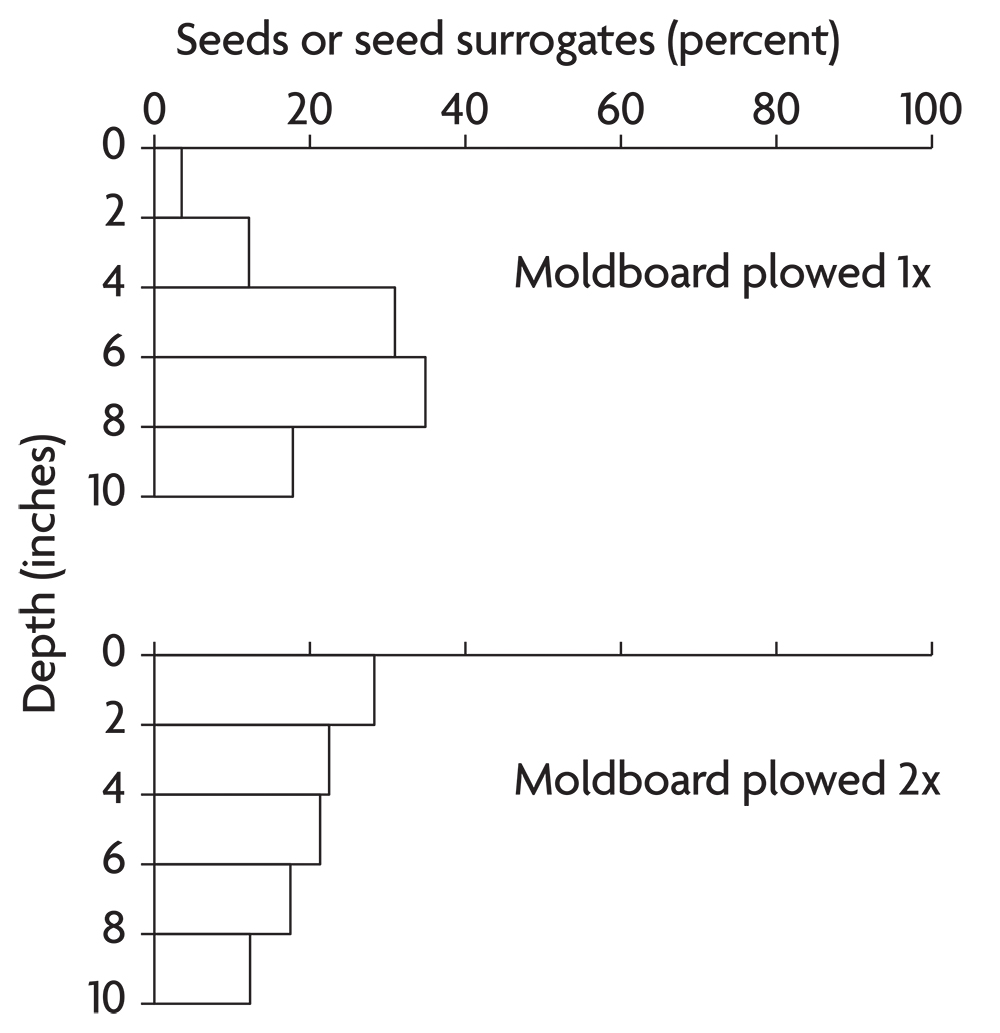
Various tillage implements redistribute seeds differently. A moldboard plow distributes surface sown seeds in a bell-shaped curve, with the peak density usually 5–7 inches deep. The location of the peak depends on how deeply you plow and how well the soil is inverted (Figure 4.1). Regardless, a moldboard plow usually places seeds that were formerly on the surface too deep for emergence. Other implements keep most seeds relatively close to the soil surface, with ever fewer seeds present as depth increases. However, when you use any implement a second time, particularly a moldboard plow, the seed bank becomes more vertically even (Figure 4.1).
With time, seeds become mixed throughout the soil profile. Their exact distribution depends on how fast they germinate or die at various depths and how the tillage implement redistributes the seeds that are already buried. We studied the redistribution of buried seeds by placing millions of colored seed-like beads at various depths in the soil and then tilling with various implements (Mohler et al. 2006). By analyzing the location of the beads after tillage we developed tables showing the probability of beads (or seeds) moving from one position in the soil to another.
As expected, moldboard plowing followed by disking and shallow harrowing tended to move shallow beads downward and deep beads upward. Chisel plowing followed by disking and shallow harrowing tended to move seeds in the top 4 inches downward, but mostly left deeper beads in place. Remarkably, a single pass with a rotary tiller or disk moved beads in a qualitatively similar way to the chisel plow followed by disks.
The utility of this information for weed management comes through understanding the relation of the vertical position of seeds in the soil to survival and emergence (Mohler 1993). As discussed in "Characteristics of Weeds That Affect Their Management", weed seedlings emerge best from near the soil surface and germination deep in the soil will produce seedlings that fail to emerge. Consequently, seeds of most weed species have been selected to remain dormant when deep in the soil. Some fatal germination occurs below the surface zone of optimal emergence, particularly if the seeds have been exposed to favorable conditions for germination before they are buried by tillage. Nevertheless, deep burial usually reduces mortality of dormant seeds whereas seeds near the soil surface age rapidly if they do not germinate. Consequently, burying weed seeds with tillage tends to preserve them, both by reducing germination and by slowing the aging process. However, species differ greatly in how fast they die off in the soil.
If effective herbicide regimens are available in a conventional agricultural system, then a strict no-till program provides an opportunity to quickly deplete the near-surface seed bank and may result in fields with very low weed pressure within a few years. In addition to maximizing seed mortality, a no-till system provides good conditions for germination of seeds that fell the previous year, thus making them susceptible to both pre-emergence and post-emergence herbicides. A few intensive organic vegetable growers have produced a similar effect by combining no-till with mulch and intensive hand weeding (see “Continuous No-Till Vegetable Production Using Mulch”).
Information on seed movement, seed survival and emergence depth can also be combined to predict the optimal type of tillage, if tillage is a regular practice. First, if the seeds of a species are short lived and the seed must be near the soil surface to emerge successfully, then inversion tillage will help control the weed. Consider hairy galinsoga, whose seeds rarely live more than a year or two and which must be within 0.25 inch of the soil surface to successfully emerge. If the seeds are plowed under, the probability of a seed returning to the top 0.25 inch of soil in any future year is very low. Since seed survival is low, even when well buried, the chances are good that any given seed will die before it is plowed back up again.
Generally, for spring and summer germinating species, plowing is best left until the spring to allow seeds to die off on the soil surface through the winter. Some tillage may be necessary to establish a winter grain, cover crop or late vegetable crop, but if seeds were shed during the summer, then minimizing tillage in the fall will increase winter mortality. If the field must be plowed in the fall, then till shallowly in the spring to avoid plowing up seeds before they have had time to die.
In contrast with shallow emerging species with short lived seeds, a species like ivyleaf morningglory that survives very well when deeply buried and emerges from a depth of 2 inches or more has a high probability of eventually returning alive to its emergence range if you regularly moldboard plow. If the seeds are left on the soil surface over the winter, however, many will die. If you follow this treatment with shallow tillage that prompts germination, you can then kill off many of the remaining individuals with a shallow tillage pass. In neither the galinsoga case nor the ivyleaf mornigglory case will these methods completely control your weed populations. Rather, they provide one component of an overall ecological weed management program.
When is deeply incorporating weed seeds a preferable strategy to keeping them on the soil surface? Although we are working on that question, we do not yet know the answer. However, evidence indicates that cumulative velvetleaf density over several years is lower when seeds are plowed under relative to shallow tillage or no tillage. This occurs despite velvetleaf’s good persistence when deeply buried (Figure 2.7) and its high rate of emergence from anywhere in the top 2 inches of soil. This indicates that most species that have regular seed input to the soil probably have lower average density with annual moldboard plowing than with any reduced tillage regimen or rotary tillage, which produces vertical seed distributions similar to typical reduced tillage practices (Mohler et al. 2006). The lower the seed survival rate and the shallower the depth from which seedlings can emerge, the greater will be the benefit of moldboard plowing. Reduced tillage has many benefits for soil health, and we do not advocate continuous moldboard plowing. However, understanding the effects of different types of tillage on weed populations will help in making informed choices about how you manage your cropping systems.
Most fields have a diversity of weed species but, generally, only one or two cause most of the problems. Choosing a tillage strategy that reduces the population of these problem species will allow other management tactics to act more effectively (see “Weed Density Affects Death and Reproduction” in Chapter 2). A shift in tillage regimen may favor other species, even as it is helping reduce the problem species. Our experiments (Mohler unpublished) indicate that sometimes a rotation of tillage regimens is more effective for weed management than following a single practice consistently. For example, the many seeds produced during a weedy year can be plowed under, and then shallow tillage can be used for a few years while the deeply buried seeds die off. (see the Nordell case study in Chapter 5).
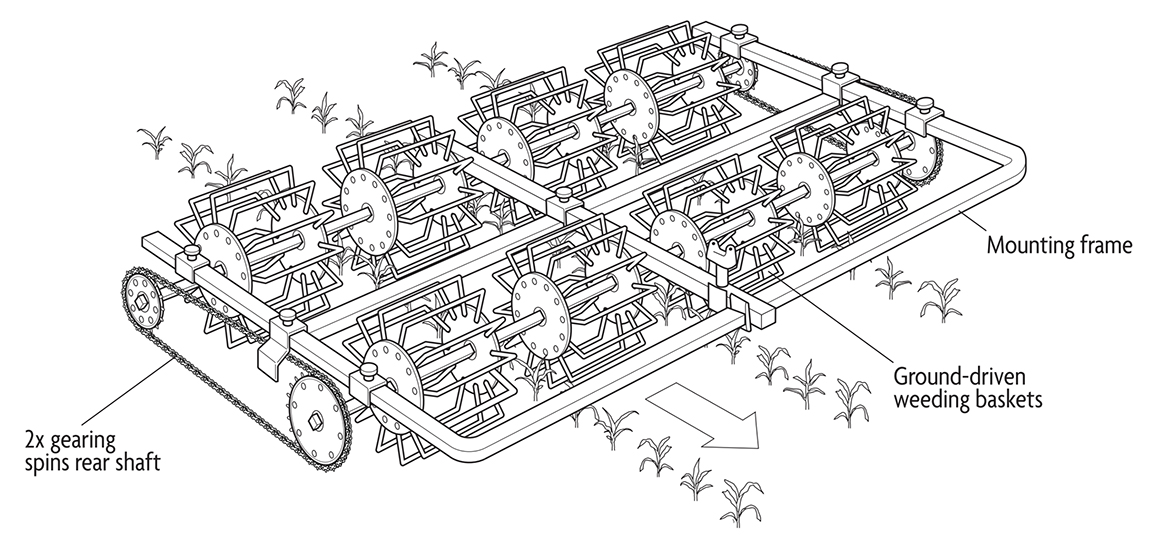
Ridge Tillage
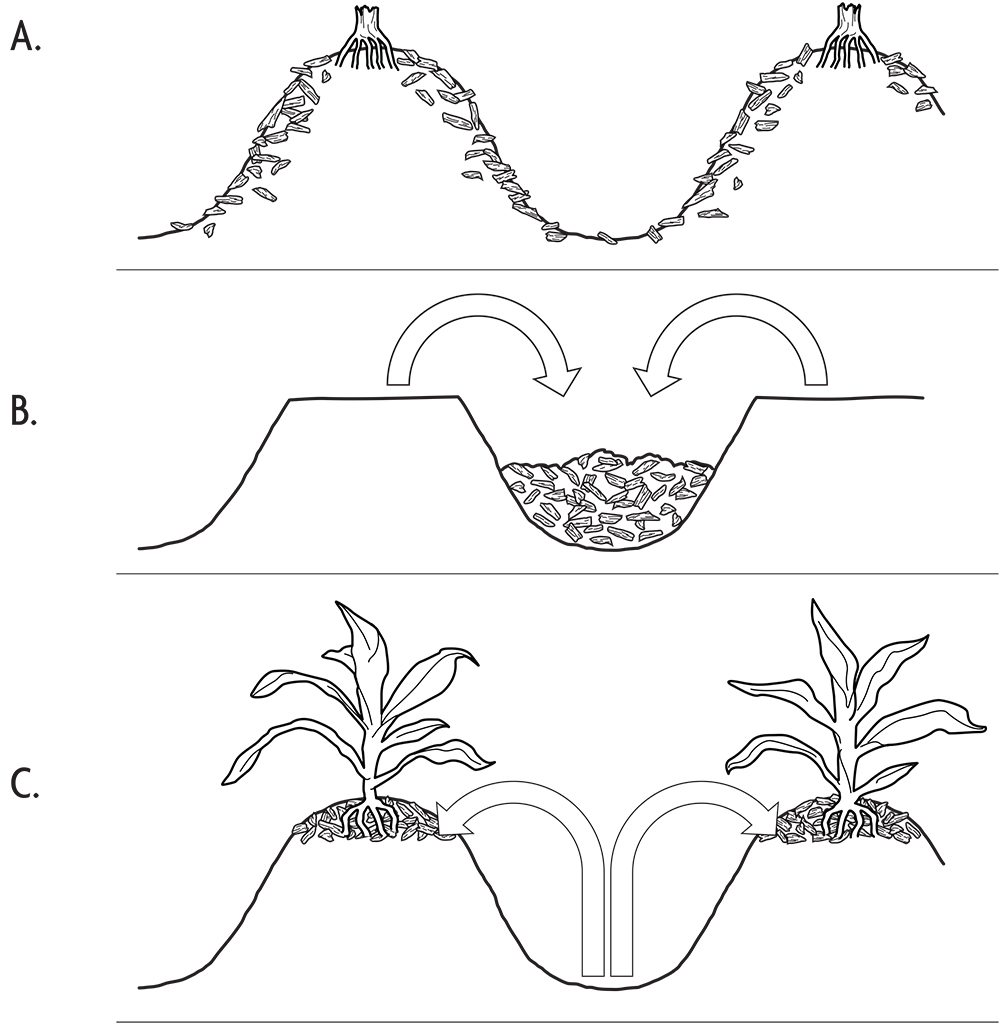
Ridge tillage is a highly reduced tillage system in which tillage is done with just the planter and a row-crop cultivator. An attachment on the planter scrapes the top off the ridge, pushing the top few inches of soil, crop residue and weed seeds produced the previous year into the inter-row area. Meanwhile, the planter units place crop seeds on the scraped down ridges. The cleaned area on the ridge can be cultivated with a rotary hoe if needed, and weeds emerging in the inter-row area can be eliminated with a row crop cultivator. At the final row-crop cultivation, soil is piled up around the base of the crop, which buries small weeds and recreates the ridge for next year (Figure 4.2).
Studies have shown that the density of weed seeds near the row immediately after planting is only about one third as high in a ridge till system as with conventional tillage, whereas seed density in the inter-row area is about two times higher. Thus, most of the seeds get moved to the inter-row area where they are easier to control with cultivation after they germinate. Moreover, the soil remaining in the ridge is only slightly disturbed, so fewer seeds there are prompted to germinate than with conventional tillage. Since the soil in and below the base of the ridge is not disturbed by implements or packed by wheel traffic, it tends to develop good crumb structure that promotes healthy plant growth. The permanent, firm ridge bases also allow use of guide cones on the cultivator to ensure accurate and relatively stress-free cultivation.
A comparison of ridge tillage plus rotary hoeing versus conventional tillage plus herbicide in 51 on-farm trials in Iowa showed no difference in corn yield between the two systems and only slightly higher weed densities in the ridge till system. Extensive farmer experience with the system has led to several rules of thumb for ridge tillage:
- The ridge should be wide and flat topped, about 12 inches wide for crop rows spaced 30 inches apart. The wide ridge allows the planter ridge cleaning attachment to remove last year's crop of weed seeds from a strip several inches wide on both sides of the row. It also allows a wide strip of residue-free soil to speed soil warming and thereby encourage rapid crop emergence.
- Usually, you want to remove about 2 inches of soil from the top of the ridge at planting. This is enough to move most of last year's weed seeds out of the row and clear off residue from the previous crop, but to still leave an elevated ridge base for rapid soil warming and cultivator guidance.
- Ridge till planting should occur early enough in the spring that weeds have not yet grown too large to eliminate with the planter attachment. A winter cover crop can help slow spring weed growth so that a good weed kill on the ridges is more likely.
- Ridge building should occur early enough in the season that you can move a lot of soil from the inter-row to the row without pruning crop roots. You probably want to minimize root pruning when cultivating anyway, but root pruning when ridging is especially likely since the cultivating tools dig deeper relative to the base of the crop plant than when cultivating a flat tilled field. We find that a sweep with hilling wings builds a more uniform ridge than disk hillers, and since it operates further from the row, it is less likely to cause root pruning. We have also built excellent, wide, flat topped ridges with potato hillers.
As with other reduced tillage methods, perennial weeds can increase in ridge tilled fields. Certainly, you will not want to use ridge tillage on a field unless it is nearly free from perennial weeds at the outset.
Compost or manure applied prior to planting will become concentrated in the inter-row areas after scraping and planting, as will legume cover crop residue. Consequently, nutrient availability during early crop growth can be an issue, and banding starter fertilizer next to the row may be useful for some crops.
Ridge tillage also poses some problems for crop rotation. With crops like cabbages, beets and lettuce, the ridges have to be built in a separate operation after harvest since ridging at inter-row cultivation will bury the crop. For small grains, some grain drills will not plant well on both the ridges and valleys, and the grain in the valleys may grow poorly in any case. For hay crops, the field has to be tilled flat before planting since ridges will interfere with hay harvest. This limits the soil structure benefits of the undisturbed ridge bases.
Most growers who avoid using herbicides rotate ridge tillage with other tillage systems (see the profile of Paul Mugge). For example, Dick and Sharon Thompson in Iowa used a five-year rotation of hay–corn–soybeans–corn–oats underseeded with hay. The field is moldboard plowed after the hay, ridges are created by cultivation in the first corn crop, the soybean and second corn crops are ridge-till planted, and the field is disked flat for planting the oats and hay. A study of this system showed an increase in the weed seed bank, mostly waterhemp and foxtail, following the oats and hay due to seed production during the oat/hay establishment year (Buhler et al. 2001). Waterhemp declined steadily during the years with corn and soybeans. Foxtail dropped greatly following moldboard plowing and the first corn crop and it was then held low through the following soybean and corn crops. This demonstrates the utility of ridge tillage for weed management in a tillage rotation/crop rotation.
Tilled Fallow
A tilled fallow is a period during which no crop is planted and the soil is regularly tilled to eliminate weeds. The bare soil and regular stirring of the soil provide cues that prompt seed germination (see “Seed Germination: Why Tillage Prompts Germination”) and the young weeds are then destroyed. If many weeds went to seed the previous year, avoid deep tillage that will place many seeds deep in the soil where they will remain dormant and have a higher rate of survival. In addition, if you clean the surface soil with a shallow tilled fallow, avoid using deep tillage when you prepare the seedbed for the next cash crop, because this will bring up more seeds. Tilled fallows are also an effective way to decrease perennial weeds (see “Exhaust Perennial Storage Organs”).
A period of tilled fallow prior to planting is sometimes referred to as a “stale seedbed,” though properly, this term only applies if the weeds are killed without disturbing the soil surface, for example with a propane flame or an herbicide (see the next section, “Stale Seedbed”). Other opportunities for tilled fallows exist between harvest of early crops (for example spinach or lettuce) and fall crops (for example broccoli), or after the harvest of cereal grains. The optimal time to use a tilled fallow for weed management depends on the seasonality of the weeds that are causing your most severe problems.
How often should you weed during a tilled fallow? The answer depends on the weed species you are trying to control. Most annuals require at least five weeks to set seeds, though common purslane in warm weather can set seed in four weeks. Certainly, you should till before any weeds go to seed! Usually, you will want to till sooner, while the weeds are small and easy to kill. Also, if you are targeting perennials, you will want to kill them before root reserves are replenished (see “Exhaust Perennial Storage Organs”). Once every three weeks is often the right interval.
When cultivating in a crop, part of the objective is to create a loose layer of surface soil (dust mulch) in which weed seeds germinate poorly. In a tilled fallow, however, you want the seeds to germinate so you can kill them, and for this you need good soil-seed contact. Thus, either use disks, which leave a firm seedbed, or firm the seedbed with a roller or cultipacker. Rolling the seedbed will usually be more effective, since it firms the surface layer where the seeds you are trying to flush out are most likely to germinate (see “Seed Germination: Why Tillage Prompts Germination”). Rolling is also easier on soil tilth since the compaction will be localized to the surface inch or two. Waiting a day or two between tillage and firming the soil is often beneficial to allow uprooted weeds a chance to die. Otherwise, you may be firming the soil back around the roots and encouraging re-growth. As with all tillage and cultivation, tillage for a fallow is most effective when the surface soil is drying and the weather is warm and sunny. However, rainfall or irrigation may be needed to bring on the next flush of weed seedling emergence.
Tilled fallows tend to harm soil structure. If your intent is to clean out seeds from the surface soil prior to planting a crop, then only shallow tillage is necessary to kill the weeds, and this reduces the problem since less of the soil column is disturbed and lighter tractors can be used to reduce wheel compaction. Nevertheless, soil-building practices discussed in the section “Soil Tilth and Cultivation” should be used to counteract the damaging effects of tilled fallows. A modification of the tilled fallow is to grow short season cover crops between tillage operations. The cover crops protect the soil from sun, wind and rain, and the incorporation of the cover crops feeds the organisms that build soil structure. With the cover crops slowing weed growth rates due to competition, fewer tillage operations may be needed to prevent weeds from producing seeds. Parallel experiments in Pennsylvania and Maine showed that a sequence of yellow mustard, buckwheat and winter canola with tillage before each cover crop was as effective as a season long bare fallow with four tillage operations (Mirsky et al. 2010). Both treatments nearly eliminated the seed bank of foxtail and reduced common lambsquarters and velvetleaf seeds by over 80%. Systems with less soil disturbance were not as effective, though a snap bean cash crop cultivated between the rows followed by a rye/hairy vetch cover crop also substantially depleted the seed banks of these long season summer annuals.
Another strategy for preserving soil health during a tilled fallow is to chop up the cover crop and then incorporate it only shallowly. The soil then acts like a sponge to absorb rainfall with minimal runoff and erosion, while nitrate released from the decaying cover crop can stimulate emergence of some weed species.
Stale Seedbed
The stale seedbed technique is a special variation on the tilled fallow. For a stale seedbed, you till the soil and prepare a firmed seedbed. Then after 2–3 weeks, when the weeds have sprouted, you kill them without soil disturbance. In organic systems this can be done with a flame weeder or natural product herbicide like acetic acid. You then immediately plant into the stale seedbed with as little soil disturbance as possible. Since you have depleted the near-surface seed bank and have not provided the disturbance related cues that would prompt another flush of germination (see “Seed Germination: Why Tillage Prompts Germination”), relatively few new seedlings will emerge. The procedure is even more effective if the flame weeding or herbicide treatment is repeated again just before crop emergence.
The stale seedbed technique is commonly confused with tilled fallow. If even a minimal amount of secondary tillage is used prior to planting, for example, by taking a light harrow or basket weeder over the field, then the surface soil is disturbed, not “stale,” and additional weed seeds will be prompted to germinate (see “Tilled Fallow”).
The stale seedbed technique is an exacting and potentially expensive procedure. Thus, it is usually reserved for high value but hard to weed or slow growing crops like parsnips, carrots or onions. One way to reduce costs for less valuable crops is to stale seedbed only a strip centered on where you intend to plant the row, and then cultivate inter-row areas using shields to keep soil (and therefore weed seeds) off of the cleaned area. If you plan to attempt this, we suggest you set up your cultivator, planter and flame weeder or band sprayer with a good guidance system (see “Cultivator Guidance Systems”).
Principles of Mechanical Weeding
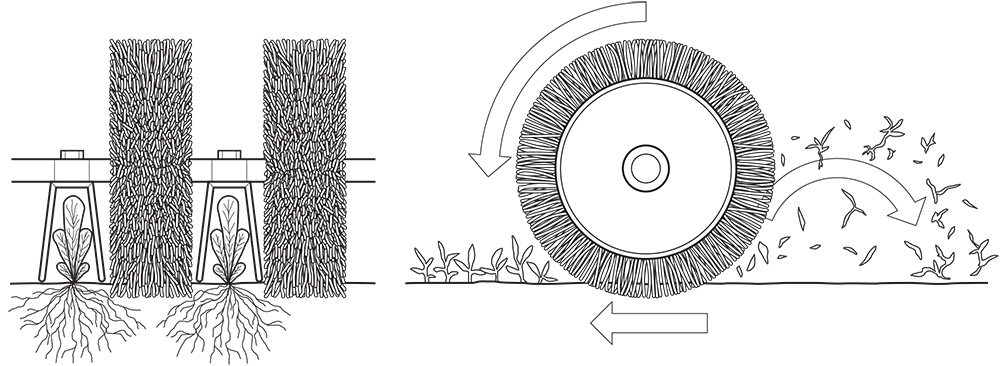
Cultivators act by cutting, uprooting or burying weeds with tools that disturb the soil. In addition to cultivators, other types of weeders can damage weed tissues with heat, cold or electricity. The most common of these are the various types of flame weeders that disrupt weed tissues with a propane flame. Mowers are also used to control weeds between rows or beds, especially when sod strips are sown between beds. Weed pullers can pull tall weeds out of crop rows. All of these implements may be classified according to where they work relative to the crop row. Inter-row cultivators remove weeds between crop rows. They are what most growers think of when the word “cultivator” is used. In contrast, in-row cultivators and weeders specifically attack weeds within the crop row. Near-row cultivators and weeders may or may not kill weeds between rows, but they can harm weeds closer to the crop row than most inter-row cultivators. Finally, some machines act similarly on both the in-row and inter-row areas, and we will refer to these as full-field cultivators. These are often used for blind cultivation: that is, cultivation before crop emergence. The most difficult weeds to remove with cultivators are the ones that establish in the crop row, and much of our discussion will focus on implements that control these weeds.
The use of cultivators and other mechanical weeders is guided by several simple principles.
Principle 1: Cultivators other than full-field implements should work the same number of rows as the planter, or a simple fraction of this number (for example, one half).
If the planter and cultivator have incompatible sizes, inexact spacing between rows in adjacent planter passes may place cultivator tools too close to some rows and too far from others. The result will be damage to the crop where the rows are too close together and poor control of weeds in the inter-row where the rows are too far apart. Even if the planter passes are only off by 2–3 inches, root pruning and suboptimal weed control will be likely if you use, say, a 4-row cultivator with a 6-row planter or vice versa.
Principle 2: The action of the cultivator must be appropriate for the growth stages of the weeds and the crop.
The timing and number of cultivations depends on how fast the weeds are growing and the size range over which the weeds are susceptible to the implement. Based on many years of farming experience, Jim Bender suggests that staggering planting times helps improve the timeliness of cultivation when only short time periods are available between rainfall events.
The degree to which precise timing is critical depends on how close to the crop row the implement operates. Tine weeders, rotary hoes and in-row weeding tools will damage the crop if they dig deeply. Consequently, these machines have to catch the weeds after they have germinated but before they become well rooted. Delay of even a single day may allow many weeds to escape once they begin to appear above ground. Implements that work close to, but not in the row, like spyders and basket weeders, have a larger window of opportunity for killing weeds but still require attention to timing. In contrast, timing is less critical for inter-row cultivation of many crops. For example, experiments in New York showed that timing of cultivation with an S-tine cultivator with goosefoot shovels had little effect on either the dry weight of between-row weeds or on corn yield (Mt. Pleasant and Burt 1994). Of course, if an inter-row cultivator is used to bury weeds in the row, then timing becomes critical.
Principle 3: Control of weeds in the crop will be more effective if you create and maintain a size difference between the crop and the weeds.
The most sophisticated mechanical weed management programs begin with a stale seedbed or blind cultivation to ensure that the crop emerges before the weeds. Many vegetable crops can be transplanted to give the crop a head start over the weeds. Regardless of how the initial size difference is created, full-field, in-row and near-row cultivation can then increase in depth and degree of soil movement as the crop grows larger. For many row crops (for example, corn, sorghum, soybeans or potatoes), once the crop is well established, you can move large amounts of soil around the base of the shoots to cover small weeds. Because most agricultural weeds have a high relative growth rate, however, burying weeds in the row will be most effective if you have already killed the first flushes of weeds that emerge after crop planting. Ultimately, the greater the size differential established, the greater the competitive advantage the crop will have over the weeds.
Principle 4: The effectiveness of cultivation declines when weed density becomes very high.
Over a wide range of weed densities, cultivation will kill the same proportion of weeds. However, when weeds become very dense, cultivation can become ineffective for several reasons. First, some weeds in the crop row will escape even a well-timed and well managed cultivation program. If the density is high, enough weeds may escape to cause substantial yield loss. In contrast, if the density before cultivation is low, the few weeds that survive will cause little harm to a competitive crop species and can be cost-effectively hoed or hand-weeded out of a high value crop. Second, soil clings better to a mat of roots from a dense stand of weeds than it will to the roots of an individual weed. Consequently, more weeds will reroot when weeds are dense. Finally, some shallow-working implements will not penetrate well if the soil is tightly bound by roots and the soil surface is lubricated by plants smashed by the cultivation tool. For these reasons, if the field is badly infested with perennial weeds or the weed seed bank is unusually high, consider reducing weed pressure by using a tilled fallow period before planting. Also consider rotating to a vigorous crop that tolerates early and frequently repeated cultivation to keep emerged weeds from accumulating to a high density. Or, rotate to a crop that grows during a different season than the problem weed species.
Principle 5: Planting density should be increased when using implements that randomly kill a percentage of the crop.
Rotary hoes, tine weeders and some in-row tools often reduce crop density by several percent. This stand loss associated with tools that attack weeds in the crop row usually takes the form of random missing individuals rather than as blighted row sections. Consequently, you may find planting at a rate near the upper limit of the acceptable range improves yield and competitive pressure on surviving weeds. Good understanding of how your machinery interacts with your particular soils and crops is necessary to balance the risks of yield loss from stand reduction with the yield loss from weed competition. Attempting to preserve every crop plant will usually result in an ineffective in-row weeding operation. As a rule of thumb, we aim for a stand loss of around 2% when using full field and in-row tools, but the optimal balance between tolerable stand loss and the intensity of weeding depends on the density of the weeds.
Principle 6: Good soil drainage and careful timing relative to changing weather and soil conditions can improve the effectiveness of cultivation.
Rotary hoes just poke holes in the ground if the soil is too wet. Flame weeders work best when leaf surfaces are dry. Most cultivators kill more weeds during hot, dry weather since uprooted weeds dry out quickly without rerooting. Thus, planning cultivation with the weather forecast in mind will frequently improve results.
Because timeliness is critical to the success of most in-row, near-row and full-field cultivation, adequate soil drainage may make the difference between successful weed management and substantial crop loss. When storm events are following in close succession with short rain-free periods in between, then adequate tile or swale drainage may allow cultivation on fields where it would otherwise be impossible. Similarly, improving surface drainage of poorly structured and compacted soils with deep rooted cover crops and crops can increase the possibility of timely cultivation.
Principle 7: Effective cultivation requires good tilth and careful seedbed preparation.
Good tilth is critical for effective cultivation. Good tilth facilitates shaking soil from weed roots. It also decreases the chances of knocking over crop plants with clods when soil is thrown into the row. Moreover, tools that work shallowly in or near the crop row are relatively ineffective in cloddy soil for three reasons. First, seedlings of some species emerge from greater depth in cloddy soil (Cussans et al. 1996), and the tools cannot reach them without damaging the crop. Second, when clods are moved, seedlings emerge that otherwise could not reach the soil surface. Finally, seedlings that sprout in clods may eventually take root if rain or irrigation subsequently allows the clods to merge into the soil matrix. All of these factors argue for practices that improve soil structure, including cover crops, compost, rotating with sod crops and controlling wheel traffic. They also argue for delaying tillage until soil moisture conditions are appropriate, even if this requires a delay in planting.
Depending on the way the seedbed is prepared, clods can form even in well-structured soil. A coarse seedbed does not inhibit establishment of many large seeded crops and may help reduce erosion. However, for the reasons mentioned above, a coarse seedbed is never an advantage during cultivation.
For shallowly working implements, a level seedbed facilitates depth control. For some implements like basket weeders, a level seedbed is essential for adequate performance.
Principle 8: Create a dust mulch.
In regions where the risk of wind erosion is slight, one objective of cultivation should be the creation of a dust mulch. This is a surface layer of loose soil crumbs, typically 0.5–1.5 inches deep. The term “dust mulch” is really a misnomer but is in wide use. Ideally, the loose layer consists not of powder but of small aggregates (0.1–0.4-inch diameter) that allow good air circulation to dry out the surface soil. This loose surface layer can be achieved with most tools that work the soil shallowly. Since most annual weed species emerge from the top inch of soil, maintenance of a loose, dry surface layer of soil greatly decreases weed establishment. At the same time, this loose soil slows upward movement of moisture from deeper in the soil and can facilitate emergence of crops planted deeply into moist soil (1.5–2 inches) while restricting weed establishment in the dry surface soil. Obviously, you cannot maintain a dust mulch during wet weather, but a dust mulch is a highly effective weed management technique when weather allows. It is also an effective way to conserve soil moisture during dry periods.
Principle 9: Weed early, shallow and often.
Most annual weed seeds are tiny—often about the size of the head of a pin or smaller (see “Seed Weight”). Because their food stores are small, they cannot emerge from deep in the soil, and they are very thin and fragile shortly after germination. Hence, very shallow disturbance of the soil (less than 2 inches) can effectively eliminate a large percentage of these weeds. Deeper soil disturbance brings additional seeds to the surface where they will germinate.
If planting has been delayed since the seedbed was prepared, work the surface soil thoroughly with a spring tooth harrow, field cultivator or similar implement before planting to kill any weeds that have germinated. Most tine weeders are not aggressive enough for this job. You may not see the weeds yet, but if the soil is moist enough for germination you can be sure that they are getting a head start on your crop.
Note that you may not be able to see newly emerged seedlings unless you get down on hands and knees. For large seeded crops that are planted more than 1 inch deep, such as corn or snap beans, you can cultivate right over the row with a tine weeder or rotary hoe before crop emergence until the crop is several inches tall. These "blind cultivations" as they are sometimes called are the best technique you have for controlling weeds in the row for crops that will tolerate such treatment. Note, however, that blind cultivation is pointless if the surface soil is too dry for seed germination. So, look for tiny weed seedlings and check the soil for the white threads of germinating weeds before you cultivate.
As weeds get larger, rerooting following cultivation becomes more probable. Hence, inter-row cultivation should occur before the weeds are larger than about 2 inches in height or lateral spread.
Principle 10: Plant carefully and adjust the cultivator.
Weed control will be improved and stand loss minimized if the rows are straight and the space between planter passes is identical to the spacing between rows within a pass. Computer guidance can help ensure planting uniformity (see “Cultivator Guidance Systems”).
Adjust tool depth and position relative to the row to ensure safety of the crop and effective killing of the weeds. Be sure the cultivator frame is level front to back and side to side. This will ensure that all tools are working to their maximum effectiveness. For some implements, notably tine weeders, the adjustments must be made after the machine is in the soil, since forward motion in the soil will pull the nose down.
Unless you are using a guidance system to position the cultivator, put on the tractor’s sway bars so that the cultivator is held rigidly to the tractor. This will prevent the cultivator from creeping from side to side, blighting rows and missing weeds.
Expect to readjust the machine, as soil moisture varies across the field. A hydraulic top link can save much starting and stopping and will quickly pay for itself in time saved, decreased crop damage and improved weed control. However, changes in the top link can shift the cultivator out of level and may not compensate for other needed adjustments.
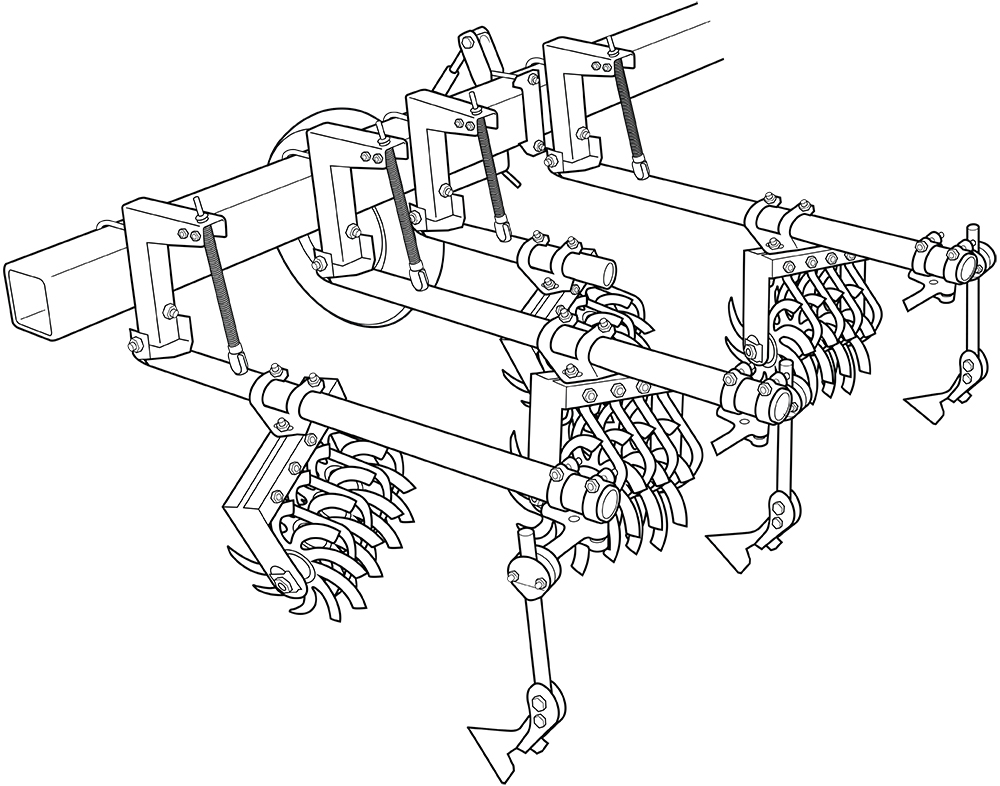
Cultivators and Cultivating Tools
A cultivator consists of a frame and one or more types of tools that engage with the soil and weeds. Most commonly, cultivators are belly mounted under the tractor or carried on a rear three-point hitch. Some implements can be front mounted. Belly or front mounted implements are easier to guide and less prone to damage the crop because the tractor operator can see the position of at least one set of tools relative to the row. However, wider, longer (to accommodate more tools) and higher clearance implements are generally more feasible with a rear mount. Belly mounted implements are stabilized by the tractor, but most three-point hitch mounted cultivators require additional stabilization to prevent sideways drift. Usually this is accomplished by large diameter coulters mounted near both ends of the toolbar. Wheels are also available that track the sides of raised beds, furrows made by the planter or the ridges in ridge-till systems. Some rear mounted cultivators have a seat and steering mechanism to allow working very close to the row.
Frames are of two basic types: rigid toolbars or independent parallel gangs. Usually, rigid cultivators are constructed with several parallel toolbars so that tools can be staggered. Staggering tools reduces opportunities for jamming with weeds, crop residue and stones. Rigid toolbars are adequate for flat land and smooth seedbeds. Parallel gang cultivators are more suitable in areas with swales and rocks, and in crops where back and dead furrows are unlikely to be worked flat during secondary tillage. Parallel gang cultivators work better under such conditions because the gangs for each inter-row track the soil topography independently by means of gauge wheels. Usually, the gangs are connected to the toolbar by a parallelogram-shaped linkage that causes the whole length of the gang to move up or down as a unit. This prevents minor variation in the depth of the forward tools or the gauge wheel from creating larger changes in the depth of the rear tools. Usually, parallel gang cultivators are three-point hitch mounted.
A variety of tools are available for mechanical weed management (Table 4.3). The amount and type of information available on these implements varies greatly. For most equipment, comparative data are meager, and some devices have received no scientific study at all. Consequently, much of the information compiled in Table 4.3 and discussed below is based on our personal experience, derived from discussion with farmers and colleagues who have used the implements, or taken from manufacturers’ promotional materials. Two excellent videos are available that show many of these tools in action (Grubinger and Else no date, OSU 2005).
| Table 4.3: Operating Parameters, Uses and Limitations of Various Types of Mechanical Weeding Tools and Implements | ||||||||
|---|---|---|---|---|---|---|---|---|
| Implement/Tool1 | Position of Action | Operating Depth2 | Speed3 | Weed Size4 | Crop Size5 | Soil Movement | Crops | Soil Limitations |
| inches | mph | inches | inches | |||||
| Shovels and sweeps (hoes) | Inter-row | 1.5–3 (4) | 1.5–5 (6) | To large size | Limit set by clearance | Toward row | All row crops | Few soil limitations; high residue models available |
| Rolling cultivator— spider gangs | Inter-row, near row, sides of beds | 1–3 | 1.5–5 | To 12+ | Limit set by clearance | Operator’s choice | All row crops | Tolerates moderate rockiness; poor in residue |
| Rolling cultivator— disk gangs | Inter-row | 2–3 (1) | 1.5–5 | To large size | Limit set by clearance | Operator’s choice | All row crops | Tolerates moderate rockiness and high residue |
| Horizontal disk cultivator | Inter-row | 1–2.5 | 4–8 | To 16 | Limit set by clearance | Toward row | Most row crops | Tolerates moderate residue |
| Rotary tiller (power hoe) | Inter-row | 1–3 | 1.5–5 | To large size | Limit set by clearance | Random | Most row crops6 | Reduces soil structure |
| Mower, inter-row | Inter-row | None | 2.5–6 | To large size | Limit set by clearance | None | Most row crops | Problem with surface rocks |
| Disk hillers (cutaway disks) | Near row | 1–3 | 1.6–5 | To large size | Limit set by clearance | Operator's choice | All row crops | Few limitations |
| Spyders | Near row | 1.5–3.7 | 1.5–5 | To 12+ | Limit set by clearance | Operator's choice | All row crops | High residue model available |
| Basket weeder | Very near row to inter-row | 1.5–2.5 | 4–6 | To 2 | 1–10 | Parallel to row | Most row crops7, tree seedlings | Intolerant of rocks; best with flat seedbed |
| Brush hoe—horizontal axis | Very near row to inter-row | 1–2 | 1–3 | Uproots seedlings, strips larger weeds | To 8 (11) | Parallel to row | Most row crops6, tree seedlings, cereals | Tolerates wet soil; rocks may jam shields; best with flat seedbed |
| Brush weeder—vertical axis | Near row, in row | 0.5–1.5 | 0.3–2.5 | To 4 | Limit set by clearance | Operator’s choice | Many row crops | Tolerates wet soil |
| Vertical axis tine weeder | Near row, in row | 1–3 | 2–4 | To 4 | Limit set by clearance | Away from row | Many row crops | Tolerates residue |
| Torsion weeders, spring hoes7 | In row | 1–1.5 | 1.5–5 | Thread to cotyledon | Limit set by clearance | Slightly toward row | Most row crops6, heavy model for tree and vine crops | Tolerate minor rockiness and residue |
| Spinners7 | In row | 1–2 | 1.5-5 | Thread to cotyledon (5) | To 4 (8) | Minimal | Many row crops7 | Tolerate moderate rockiness |
| Rubber finger weeder7 | In row | 1 | 1.5-5 | Thread to cotyledon | To 10 (16) | Minimal, or away from row | High value row crops, nursery stock | Poor in crusted soil or large pieces of residue |
| Rubber star wheels7 | In row | 1 | 1-5 | Thread to cotyledon | Limit set by clearance | Usually toward row | Most row crops | Poor in crusted soil |
| Rotary hoe | Full field | 1-1.5 | 7-13 | Thread to cotyledon | To 16 | Random | Large seeded crops, cereals | Tolerates moderate rockiness; poor in wet soil; high residue models available |
| Tine weeder (weeding harrow) | Full field | 0.7–2 | 2–5 (6) | Thread to cotyledon | To 6 (8) | Random | Large seeded crops, cereals, transplants | Poor in residue or crusted soil |
| Spike harrow, chain harrow | Full field | 0.7–2 | 2–5 (7) | Thread to cotyledon | To 6 | Random | Large seeded crops, cereals | Poor in residue |
| Rod weeder | Full field | 1.5–2.5 | 8-12 | To large size | Fallow, post-harvest | Minimal | Primarily dryland fallow | Tolerates residue |
| Flame weeder | Full field or in row | None | 0.6–4 (8) | To 2 (8) | Mostly pre-emergence; to large size in a few crops | None | Pre-emergence in most crops; post-emergence in crops with protected buds | Fire hazard in residue |
| Hot water weeder | Inter-row, full field | None | 1–4 | To large size | Tall, woody crops | None | Tree and vine crops | Potential for compaction |
| Weed puller | In row | None | 3-5 | >8 taller than crop | Mid-season | None | Short row crops | Best in slightly moist soil |
| Mower, weed topper | In row | None | 4-6 | >3 taller than crop | Mid-season | None | Short row crops | Not affected by soil conditions |
| Electric discharge weeder | Full field | None | 2-5 | >3 taller than crop | To 4 | None | Short row crops | Best with dry soil |
| 1Implements are in singular form; tools that attach to another implement are given in plural. Synonyms are given in parentheses. 2Unusual operating depths that are used in some circumstances are given in parentheses. 3Unusual operating speeds that are used in some circumstances are given in parentheses. Speeds listed assume normal operating conditions and no special guidance system. Variation is largely due to variation in crop size and skill of the operator. 4"To large size" indicates that the implement is effective against even large weeds; how big a weed the implement can destroy will depend on the weed species and operating conditions, but generally, the effectiveness of the implement is not affected by the size of the weeds. A number followed by a plus indicates that normally the machine is effective to weeds of that size, but that in some circumstances it may be effective against larger weeds. 5“Limit set by clearance” indicates that the implement can be used until the crop has spread laterally so much that it is crushed by tractor tires, or is so tall that it will no longer pass under the tractor axle or implement toolbar. “Mid-season” indicates that the implement will generally be used after the crop is well developed but before it is maturing, regardless of crop stature. 6The implement is effective in most row crops but is largely limited to high value crops because of the need for time consuming adjustments or for a flat seedbed, or for its slow operating speed, etc. 7These are high precision tools that must track the row precisely. This requires either an effective guidance system or a belly mounted cultivator. | ||||||||
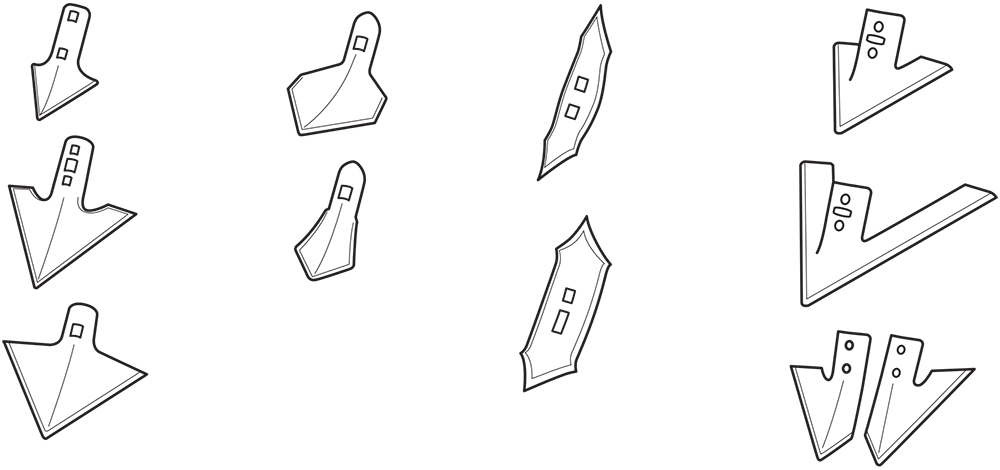
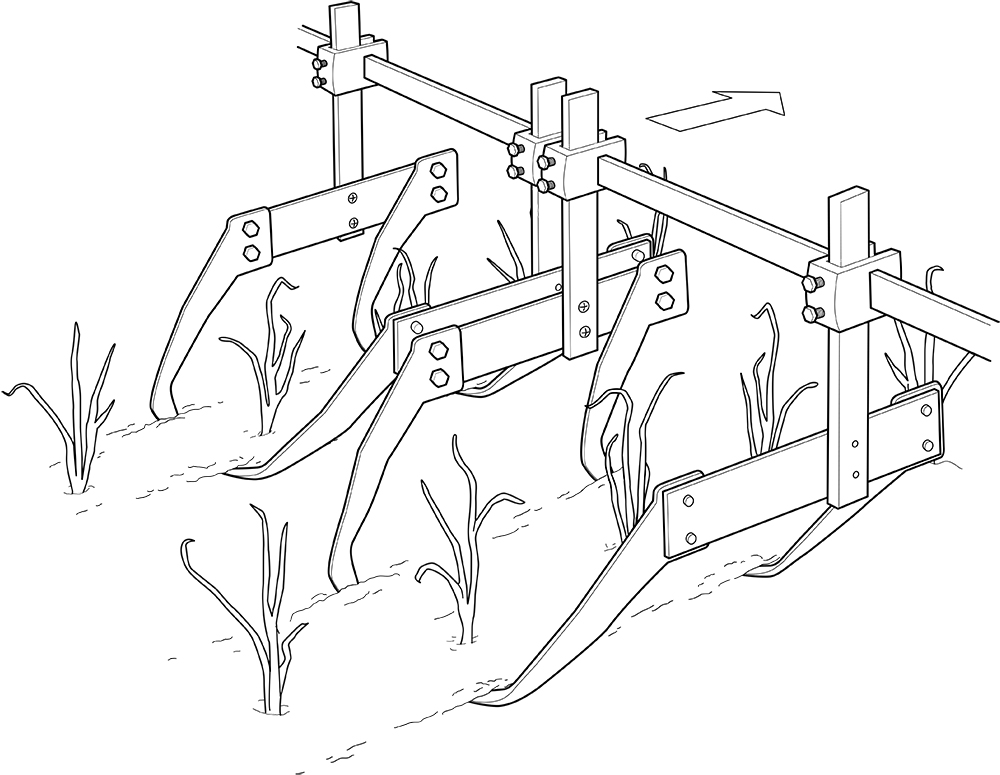
Shovels, Sweeps, and Knives
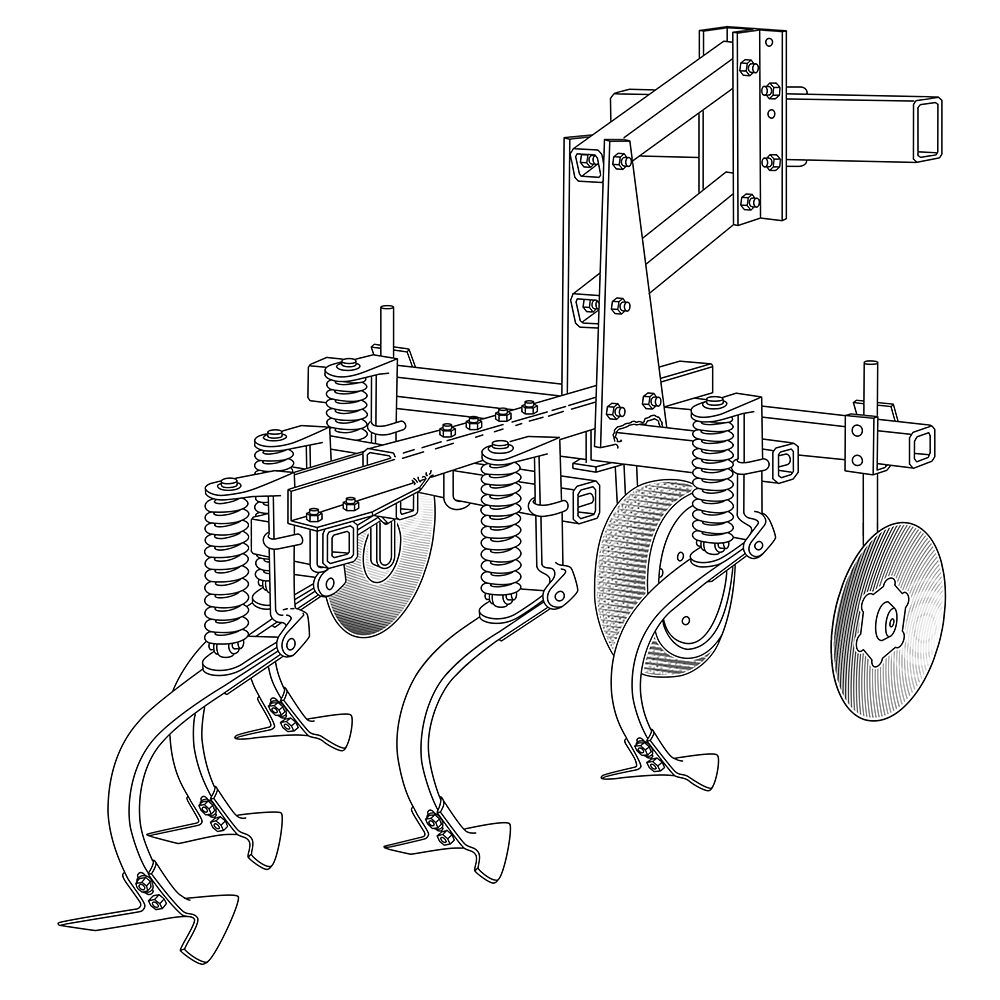
Sweeps and shovels are the most commonly used cultivation tools. They are simple and durable. They vary greatly in width, shape and pitch (Figure 4.3). Generally, soil movement away from the shank increases with width and pitch of the sweep or shovel and decreases with increasing angle between the sides. “Goosefoot” style shovels (Figure 4.3) move less soil than sweeps. Typical cultivators carry three to seven sweeps or shovels per inter-row, each mounted on a separate spring steel shank. S-shaped (Danish) shanks allow greater vibration, which helps bring weeds to the surface and shake soil loose from the roots. They bend to allow the tools to slide by stones. They may also, however, deflect around a well rooted weed, like a large dandelion, rather than digging it out or cutting it off. They are less robust than C-shaped shanks and will do a poor job if they get bent. If you use S-shanks in rocky soil, keep a spare or two on hand and replace bent shanks promptly to avoid crop damage. C-shanks are usually heavier and are protected by springs or break pins, so they are therefore better suited to cultivating untilled or very stony ground.
Multiple shanks provide flexibility. For example, in one experiment we used 1-inch spikes nearest the row when corn was young to reduce soil movement toward the row, but we changed to 4-inch sweeps to throw more soil into the row at the second cultivation. Minimum tillage cultivators designed to operate in high crop residue, however, usually have a single shank with one broad sweep per inter-row. This design presents less metal at the ground level to snag debris and uses a coulter in front of each shank to cut residue so it can flow past the shank. Minimum tillage machines operate with sweeps just below the soil surface to sever weed stems from roots with minimal soil disturbance and are best suited for killing larger weeds. However, hilling can be accomplished with wing attachments that increase the lateral displacement of soil or with disk hillers (see below).
Vegetable knives (beet knives) are a special type of half sweep that is useful for cultivating close to the crop row. They have a shallow pitch so that lateral soil movement is relatively small. When the crop is young, most growers run them with the knife tip pointing toward the inter-row so that no soil is thrown onto the young plants. When the crop gets large, you can turn them around so that the tips of the knives reach in under sprawling leaves of crops like cabbage and sugar beets. Whereas most other types of shovels and sweeps are inter-row tools, vegetable knives are effective near-row tools.
Horizontal Disk Cultivators
Thesemachines are built like a typical parallel gang row-crop cultivator, except that instead of sweeps or shovels, they are mounted with rotating disks that travel roughly parallel with the soil surface. The disks are designed to be self-sharpening. They are tipped slightly so that they rotate as they travel through the soil. The disks cut through weed roots and lift the soil, causing it to shatter and exposing near surface roots to drying. The disks, typically three per inter-row, overlap to ensure complete cutting of the weeds. An advantage of the machine is that the soil experiences little inversion and thus residue is retained on the soil surface, though these benefits are not necessarily superior to what can be achieved with flat sweeps. The spindles that carry the disks are spring loaded to deflect on impact, but high-speed encounters with rocks can damage the disks, making the implement inappropriate for rocky soil.
Rolling Cultivators
This implement usually consists of gangs of “spider” wheels (not to be confused with spyders, spelled with a “y”—see below). Each gang is mounted on a separate tube (Figure 4.4). Two gangs work each inter-row. The spiders are ground driven and cut and dig out weeds as they roll. Aggressiveness and amount of soil movement are controlled by adjusting the angle relative to the direction of travel (Figure 4.4). Depending on the setting of the gangs, soil flow is strictly toward or away from the row. The gangs can also be tilted, which makes this the implement of choice for cultivating the sides of raised beds. In European sources these implements are sometimes referred to as “rotary hoes," but they are constructed and used very differently from the American rotary hoe discussed below.
Rolling cultivators are less able to dig out large weeds than are shovel type cultivators, but they work the soil more thoroughly for shallow cultivation. A sweep can be mounted on alternate tubes to work the center of the inter-row, and this is helpful for digging out weeds that slide between the gangs. The sweeps are also useful for ripping up tire tracks. Because soil flow is strictly in one direction, and because the gangs can be tilted to work very shallowly next to the crop row, rolling cultivators can safely cultivate closer to the crop row than can shovel cultivators.
The rolling cultivator can be outfitted with disk gangs for work in high residue. These chop through dense residue without jamming, but the curvature of the disks prevents the tools from working as close to the row as is feasible with spider gangs.
One drawback of rolling cultivators is that the tubes are connected to the toolbar by a hinge linkage rather than by a parallel linkage. This does not affect the performance of the rolling gangs much, but it means that if the rolling gang hits a rock or hard spot, the end of the tube rises and the sweep comes out of the ground. Also, the hinge linkages are not heavy enough for using the disk gangs in previously unbroken ground (for example, in a ridge tilled system) unless the soil has exceptionally good tilth.
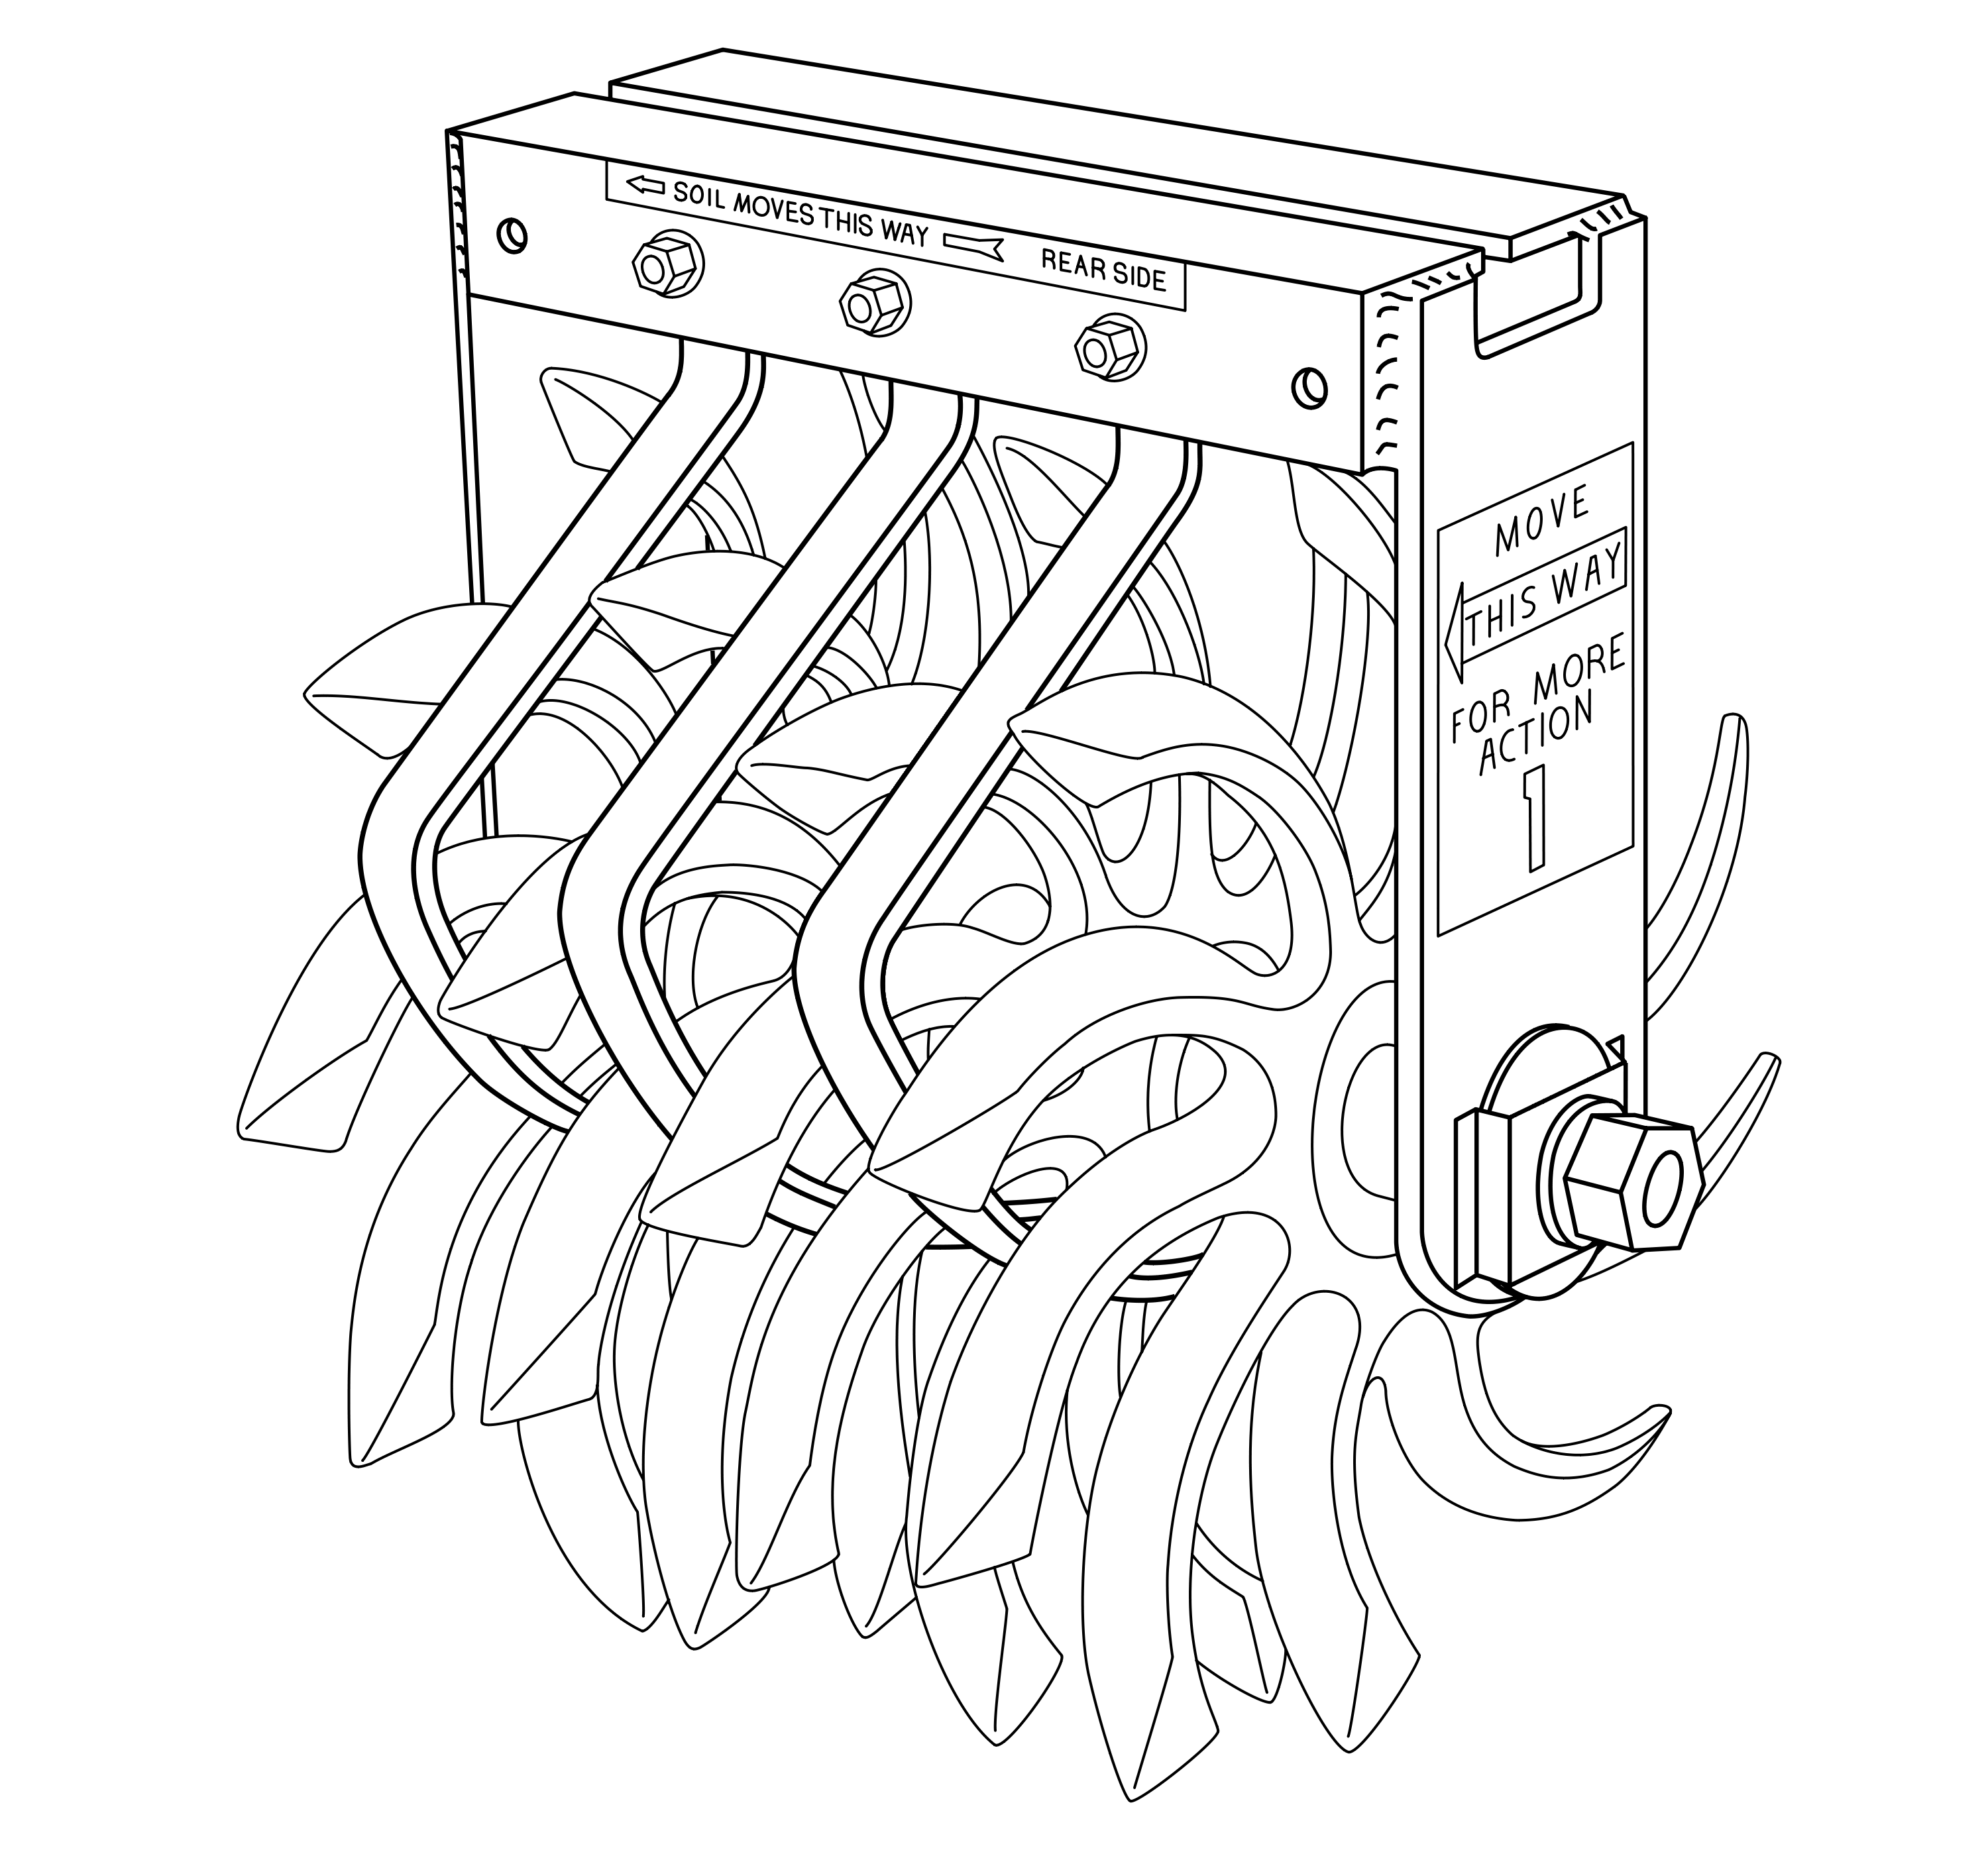
Rotary Tillers (Multivators)
These implements consist of gangs of PTO driven, rotating tines that chop up weeds and mix them into the soil (Figure 4.5). The tines are either curved or L-shaped. In most models you can adjust the position and width of the tilled strip. They are an alternative to zone tillage tools for tilling strips into cover crops if deep ripping is not desired. They are also currently the best tools available for strip tillage into perennial living mulches prior to planting. Their principal advantages in cultivation are that they completely incorporate all aboveground weed tissues, and they chop near-surface roots and rhizomes to smaller fragments than do most other implements. Disadvantages include relatively slow speed compared with shovel type cultivators for similar operations and deterioration of soil structure that results from repeated pulverization.
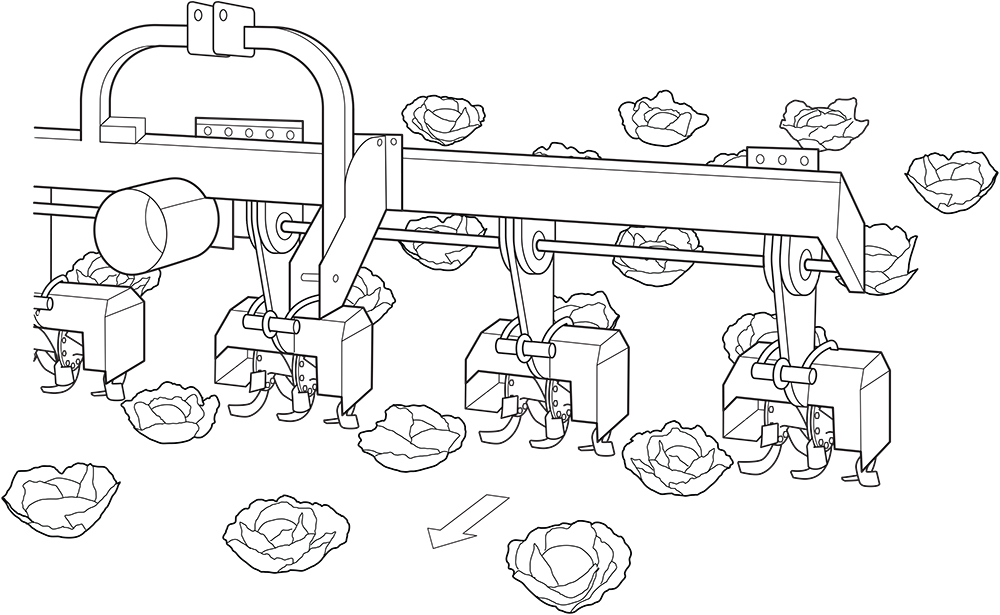
Disk Hillers and Spyders
Disk hillers consist of curved disks mounted on a vertical shank. Usually, they are placed in the front-most position and next to the row on shovel type cultivators (Figure 4.3). Early in crop growth they are set to cut soil and weeds away from the row; later they may be used to hill up soil around the base of the crop. They are aggressive tools that can dig out large annual weeds and cut the stems of rank perennials. This also allows them to perform well in heavy crop residue. Since they are used relatively close to the row, understanding the rooting habit of the crop is required to obtain optimal use of disk hillers without pruning roots.
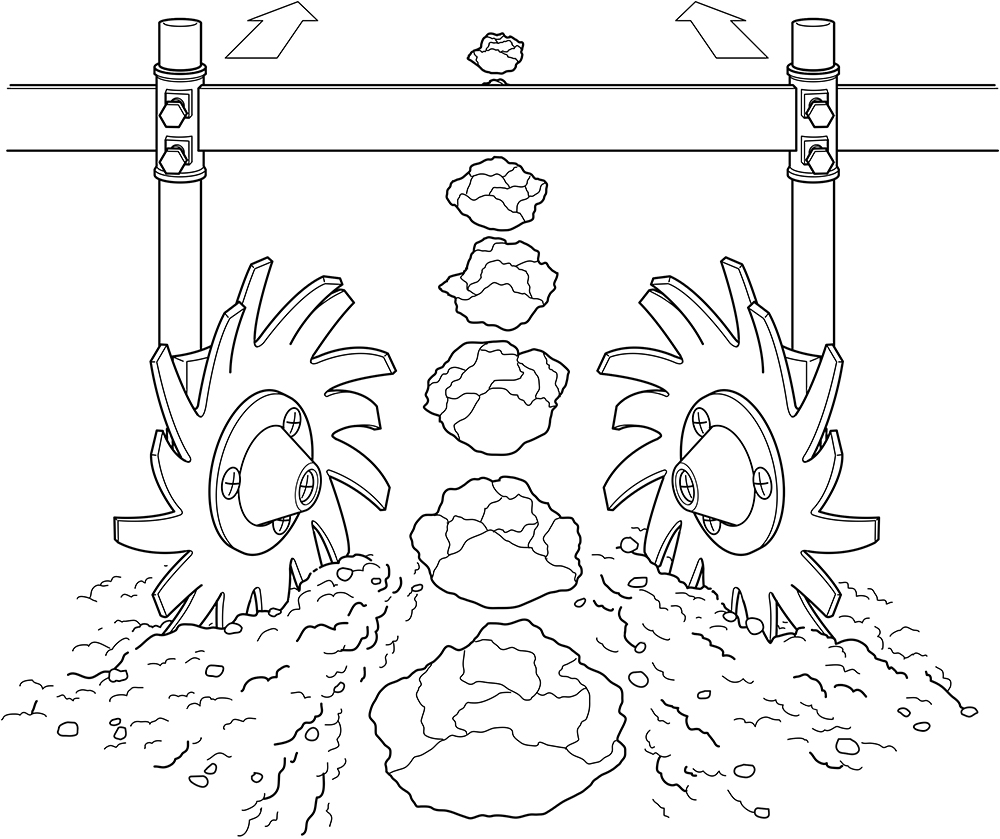
Spyders are star shaped wheels that are used in much the same way as disk hillers (Figure 4.6). They are somewhat similar to the spiders (spelled with an “i”) of a rolling cultivator, but, in addition to important details of design, they are run singly rather than in gangs. They are smaller diameter (13 inches) than most disk hillers, which allows you to get closer to some crops. Also, when cutting soil away from the row, they leave a loose soil layer next to the row rather than a bare shoulder, and this probably reduces drying in the row. A disadvantage of spyders is that unlike a disk hiller that cuts off crop leaves that lie in its path, the thicker blade of the spyder grabs the leaves and drives them into the soil. This jerks the crop plant sideways, causing greater damage than just the loss of the leaf tip that is actually hit. Thus, you can run spyders closer to the row in upright crops, like leeks, than you can in crops where leaves on the young plant spread out, like corn or cabbage. We experimented with shields attached to the spyder shank to protect crop plants from getting snagged. They had to be set close to the ground to push leaves of young plants aside, and consequently they jammed with stones. Shields would probably work well in a stone free soil.
For maximum effectiveness, you should adjust both disk hillers and spyders for angle, distance from crop and depth. On an implement for cultivating six or more rows, this is time consuming. We do not know of any studies directly comparing effects of disk hillers and spyders on different weed and crop species or stages of weed growth.
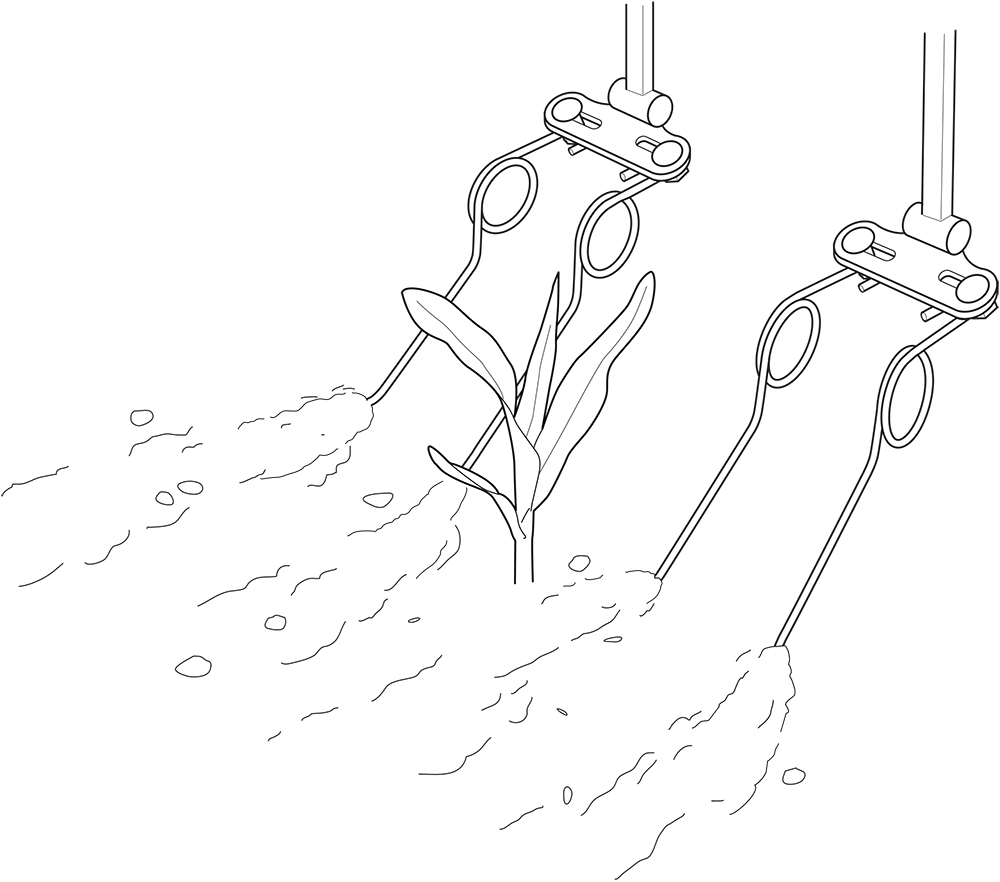
Basket Weeders
These cultivators consist of two sets of rotating wire cages (Figure 4.7). The forward cages are ground driven; the rear cages are driven by a chain connected to the forward cages, and they turn twice as fast in the opposite direction. Penetration is very shallow (Table 4.3), but they work the soil thoroughly. Consequently, few small weeds escape substantial damage even if they are not completely uprooted. Since the flow of soil is strictly parallel to the crop row, the implement can get within about 2.5 inches of the crop. Thus, it is very useful for cultivating close to the row in young crops. The manufacturer makes specially shaped baskets for cultivating the sides of beds. Because the baskets must be sized appropriately to the dimensions of the inter-row, you need to have separate machines for each row spacing. Basket weeders are not suitable for stony ground because rocks bend the baskets out of shape and can become caught between adjacent wires.
Brush Hoes
The standard brush hoe consists of PTO driven polypropylene brushes working parallel to the crop row (Figure 4.8). These cultivators uproot small weeds and shear off larger ones. The soil flow is primarily parallel to the row, which, in conjunction with narrow tunnel shields (2.5–8- inches wide) allows you to cultivate very close to small crop plants. You need to switch to another type of cultivator once the crop plants grow too large to move easily through the shields.
The brush hoe resists clogging with large weeds and debris, and works well in wet soils. An additional advantage is that, like the basket weeder, it leaves a loose, uniform soil surface that slows weed germination. However, because the brushes are mounted on a common axle, the implement requires a flat seedbed for consistent depth of operation. Working depth declines with increasing tractor speed, and consequently operating the implement at a high speed is impractical. Adjusting the row spacing requires substantial disassembly.
Because brush hoes work very close to the crop row, they come equipped with a driver's seat and steering mechanism. They are thus a labor-intensive implement. Moreover, when run on dry soil, they create much dust, which makes steering the implement unpleasant.
Torsion Weeders and Spring Hoes
Torsion weeders consist of spring steel rods that reach within a few inches of the crop row and travel about 1 inch below the soil surface (Figure 4.9a). The compressive action of the springs causes the soil in the row to boil up, thereby heaving out weeds that are not yet fully rooted. For weeds in the row, torsion weeders only work against weeds in the white thread stage, or ones that have just emerged. The tool shears off most of the larger weeds next to the crop row. Spring hoes work in a similar manner to torsion weeders but are more robust and aggressive (Figure 4.9b). A smooth, flat seedbed improves the consistency of weed control.
The inventor of these tools recommended torsion weeders for cultivating small crop plants and spring hoes for larger plants. We have not observed much difference in the action of the two tools in a silt loam soil, but action may vary with soil type. Both torsion weeders and spring hoes usually mount on a shovel cultivator in front of the forward shovels. These tools may perform better if spyders are run ahead of them to loosen the soil, but we know farmers who use the tools successfully without spyders. Several studies have demonstrated improved weed control and crop yield with these tools plus spyders relative to shovel cultivators without them.
Torsion weeders and spring hoes are precision tools that must be carefully set for depth and distance from the row to achieve good weed control without damaging crop plants. Consequently, they work best when belly mounted or front mounted. With a rear mounted cultivator, you need a guidance system. Otherwise, you will have to set the tools so far apart that the soil in the row will not boil properly. Most gang type, rear mount cultivators do not have enough room to mount these tools plus spyders. Since these tools and the spyders are close to the row you still need all the shovels. If too many tools (and the gauge wheel) are crammed close together, the implement will jam with weeds, crop residue or stones. One option is to lengthen the gang bars. A more elegant solution is to belly mount the torsion weeders (or spring hoes) and spyders, and then use a rear mounted row-crop cultivator to clean out the inter-row area.
Stiff, heavy duty spring hoes are available for work in orchards and vineyards. These scrape the soil surface free of weeds in and near the row. A castor at the tip allows the tool to bend past trunks without scraping the bark.
Vertical Axis Tine and Brush Weeders
These machines are designed to work very close to, or sometimes in, the row. They are rear mounted and have a seat for an operator, though the tine type can be locked for inter-row cultivation without an operator. The operator controls the position of a pair of rotating wire baskets or polypropylene brushes that stir the soil next to the crop. Handles allow the operator to accurately control the position of the tools. For crops that are well spaced within the row, the operator can bring the tools fully into the crop row between plants, thereby eliminating most in-row weeds. These are precision implements that require operator skill for maximum effectiveness while minimizing crop damage. The speed of cultivation depends on the skill of the operator.
The tine type machines have inverted baskets of nearly vertical spring tines that aggressively stir the soil and can uproot and break weeds of moderate size. These machines are particularly useful in strawberry production because, in addition to controlling weeds, they brush runners into the crop row with little damage. Because the operator is controlling the position of each of the rotating baskets independently of the other, the standard machine cultivates a single row. However, a machine with similar operating principles but controlled by a machine vision system can cultivate multiple rows.
The brush type machines have inverted cones of bristles that brush the soil surface with minimal disturbance of the soil profile. Although they can uproot very small weeds, much of their action involves shearing off the weeds at the soil surface. Because the bristles flex, they can brush against the stems of some crops with little crop damage, which allows the brushes to work in the crop row to control small weeds.
Spinners
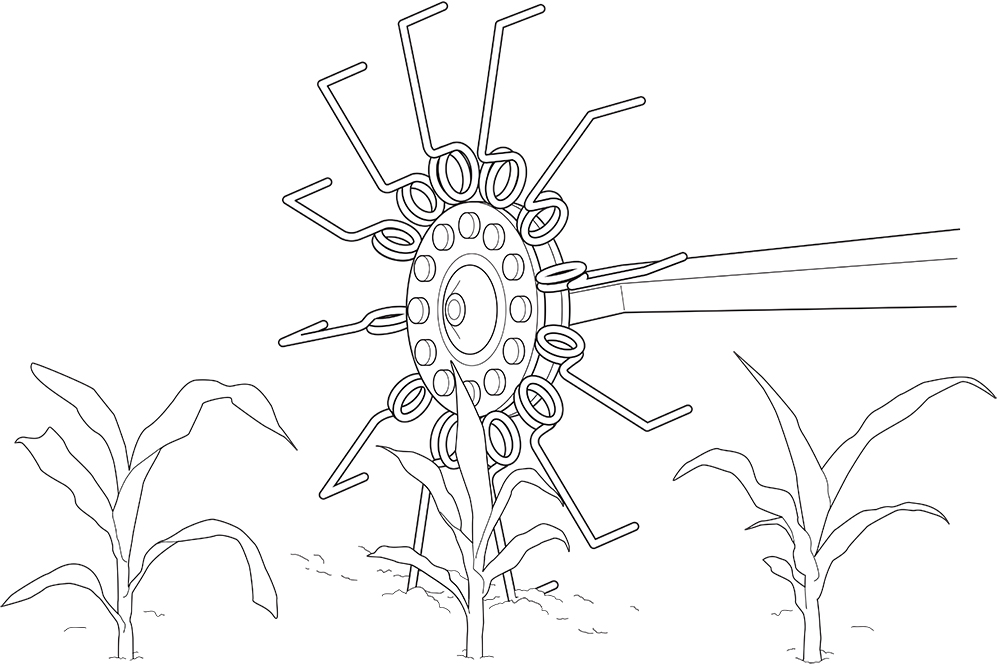
These ground driven in-row weeders consist of a basket-like arrangement of spring steel wires that scratch laterally across the crop row (Figure 4.10). Spinners are normally used in pairs, with the two tools working in opposite directions across the row. This increases the proportion of the row area that gets worked. Usually, the depth is set so that the deepest penetration is a little above the planting depth and squarely in the row. Alternatively, you can set the tool so that it penetrates deepest next to the row and scratches across the row with an ascending or descending stroke. Either way, deeper planting allows more aggressive weeding. Cultivation late on a sunny day, when crop stems are less stiff, reduces mortality in corn. Spinners are primarily effective against weeds in the white thread to cotyledon stages and are only safe while the crop is small. Consequently, the window of usefulness for these tools overlaps greatly with that of rotary hoes and tine weeders. Those full-field cultivators are easier to use but are less versatile than spinners.
A direct strike by the tip of a wire can cut off a crop plant. Consequently, spinners tend to thin crops like soybeans or peas that are planted closely within the row, but mortality from properly set tools is usually no more than a few percent in crops spaced more than 6 inches apart in the row. Spinners should not be used in transplanted crops until the plug is well rooted. If set deep, spinners can be used to deliberately thin an overly dense crop stand. Since the probability of a fatal strike is higher where crop plants are dense, thinning a spotty but overly dense stand with spinners results in a more uniform spacing of crop plants.
Rubber Finger Weeders and Rubber Star Wheels
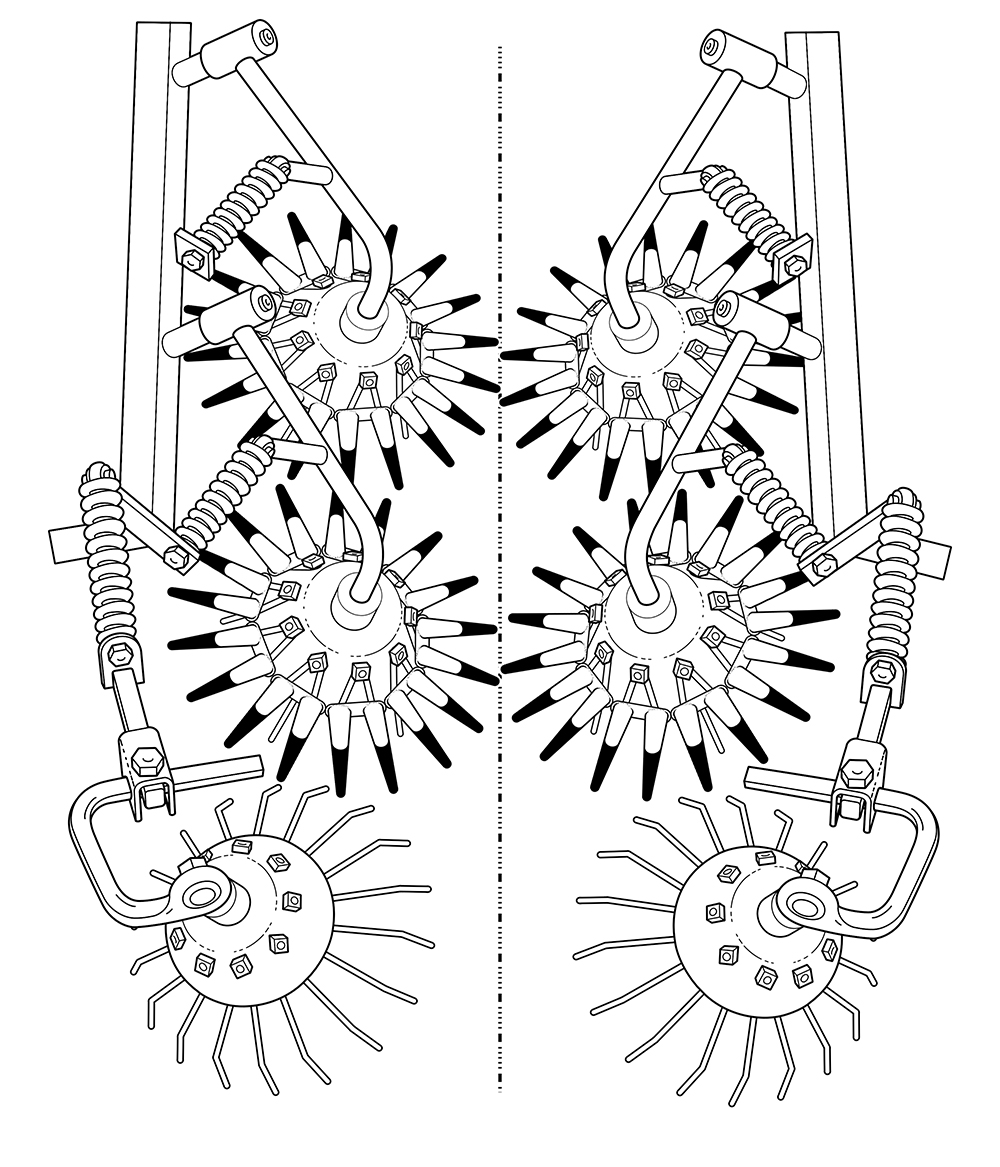
Rubber finger weeders consist of two pairs of ground driven wheels equipped with rubber-tipped fingers that stir the surface soil in the row but bend around well rooted crop plants. These are followed by wire baskets that aggressively stir the area adjacent to the row (Figure 4.11). The implement is usually belly mounted. Single row machines can work with row spacings as narrow as 20 inches, but cultivation of multiple rows requires a minimum row spacing of 34 inches. This essentially limits use of the machine to high value crops that are worth cultivating one row at a time or to crops with wide row spacing. Although the rubber fingers have some ability to flex, they are sufficiently stiff to damage most young crops. Unlike some other implements that attack weeds in the crop row, finger weeders can be used on large, upright crop plants. The upper limit on height is set by clearance under the tractor. This makes them useful in nurseries.
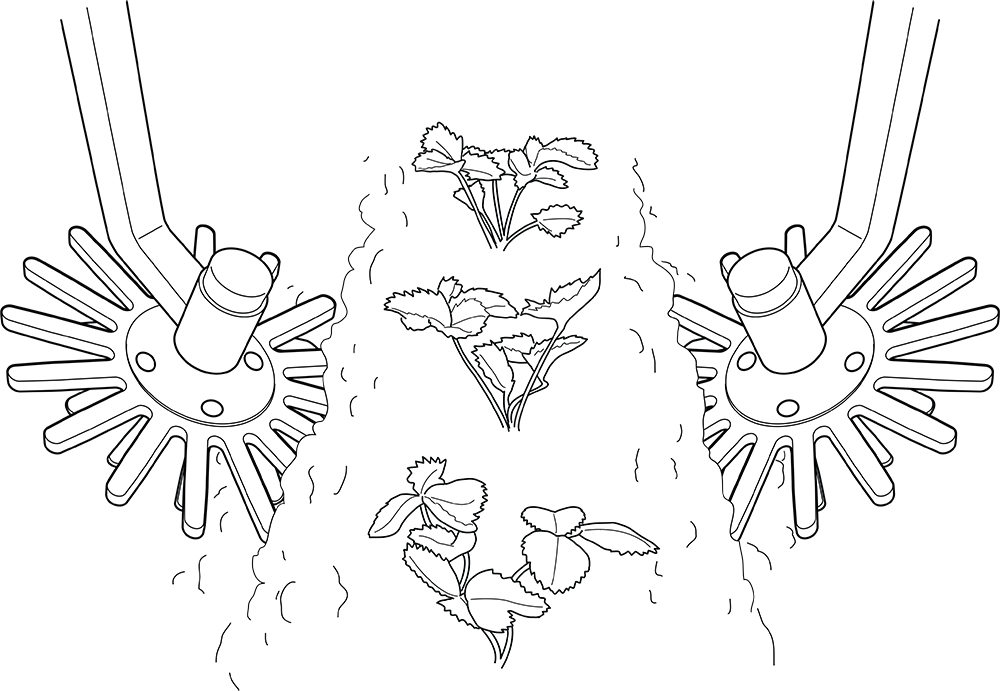
Rubber star wheels (Figure 4.12) are similar in concept to rubber finger weeders but are designed to mount on a row-crop cultivator to provide in-row and near-row weeding that cannot be achieved by sweeps and shovels alone. The rubber stars are available with multiple grades of stiffness, and the more flexible versions can be used in young and relatively delicate crops. The more flexible the rubber is, the more the soil in the row needs to be loose for the tools to work well. As with torsion weeders and spring hoes, finding a place to mount these tools on a cultivator gang can be challenging. As with all in-row weeding tools, exact guidance is required to prevent crop damage and achieve good in-row weeding.
Pneumatic Weeders
These consist of a PTO driven air compressor leading to a pair of small air-blast nozzles in each row. The nozzles point toward the row but somewhat backward, and they travel just under the soil surface. The blast of air blows shallowly rooted weed seedlings out of the ground, without damaging more deeply rooted crop plants. Effective action requires a loose, friable soil surface.
Rotary Hoes
A rotary hoe consists of one or two ranks of wheels each bearing 16 spoon-like projections (Figure 4.13). The wheels are attached to the toolbar by spring loaded arms to allow movement over obstacles. The ground driven wheels typically penetrate to a depth of 0.8–1.5 inches and flick up soil and small weeds as they turn. To disturb the soil effectively, you must operate the machine at high speed (Table 4.3). This allows rapid treatment of large acreage. Shallow penetration allows the wheels to contact young crop plants with little damage.
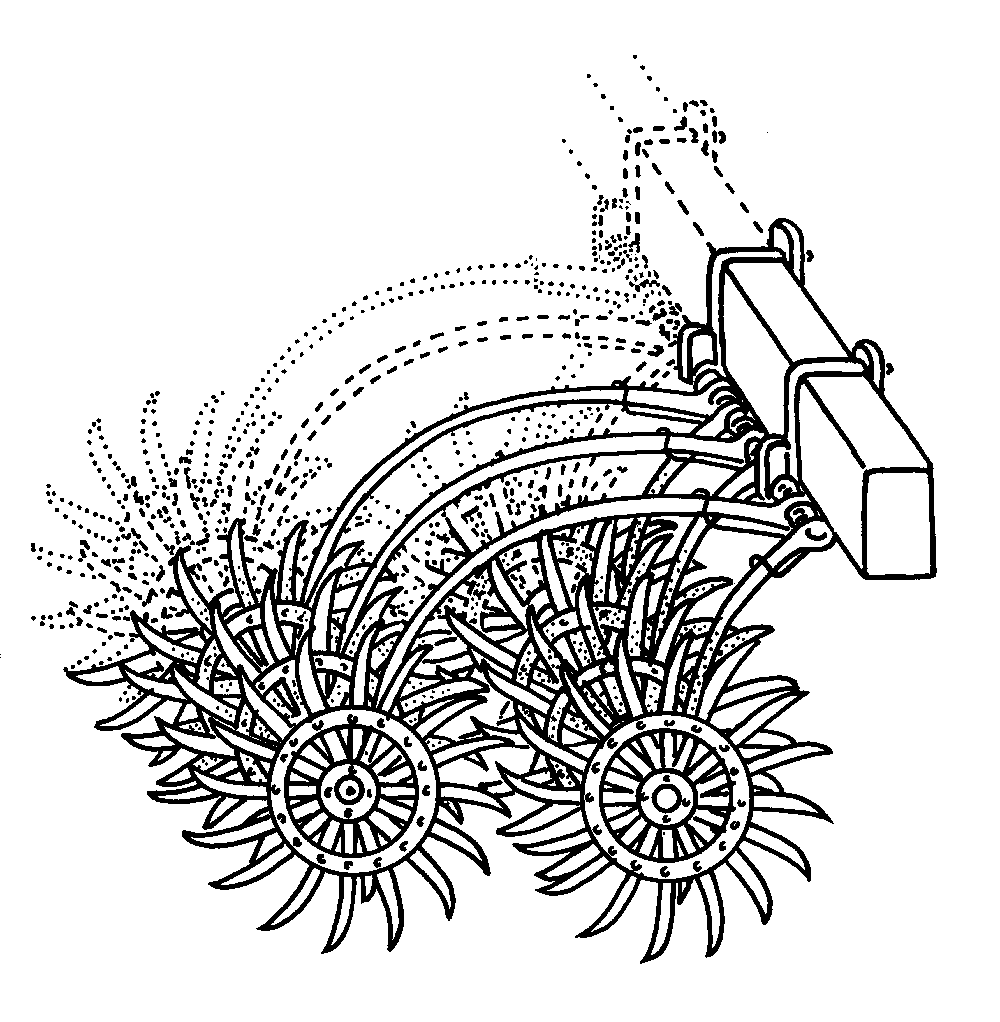
Most rotary hoes less than 20 feet wide do not come equipped with depth gauge wheels. If your rotary hoe does not have gauge wheels, you should get some. Although soil conditions that lead to excessive penetration only occur occasionally, running a rotary hoe deeper than planting depth will badly damage the crop. Carrying the implement on the three-point hitch is a poor alternative to gauge wheels because at the high speed necessary for effective operation, the tractor will bounce, and this causes inconsistent penetration.
Rotary hoes mostly kill weeds in the white thread stage; by one or two days after emergence, most weed species will be sufficiently well rooted to survive. Hence, timeliness is critical for success. When soil conditions are suitable for weed germination, typically the implement is used five days after planting and at five- to seven-day intervals after that. Two or three passes are usually all you can fit in before the crop will grow large enough to be damaged. One study showed that whereas three timely rotary hoeings reduced weed dry weight by an average of 72% in drilled soybeans, two untimely rotary hoeings only reduced dry weight by 38%. However, if the timing is good, most of the weed control results from the first rotary hoeing.
Wet soil conditions reduce the effectiveness of rotary hoeing. If the soil is too wet, the spoons just punch holes in the ground rather than throwing the soil and seedlings into the air. In addition, rainfall or irrigation soon after rotary hoeing reduces the percentage of weeds that dry out and die.
Unlike many cultivating implements that have a long lifespan, rotary hoes wear out within a few years. The spoon tips wear off and either tips or the whole wheels have to be replaced. Worn tips will not throw much soil and thus make the implement ineffective.
Tine Weeders (Weeding Harrows)
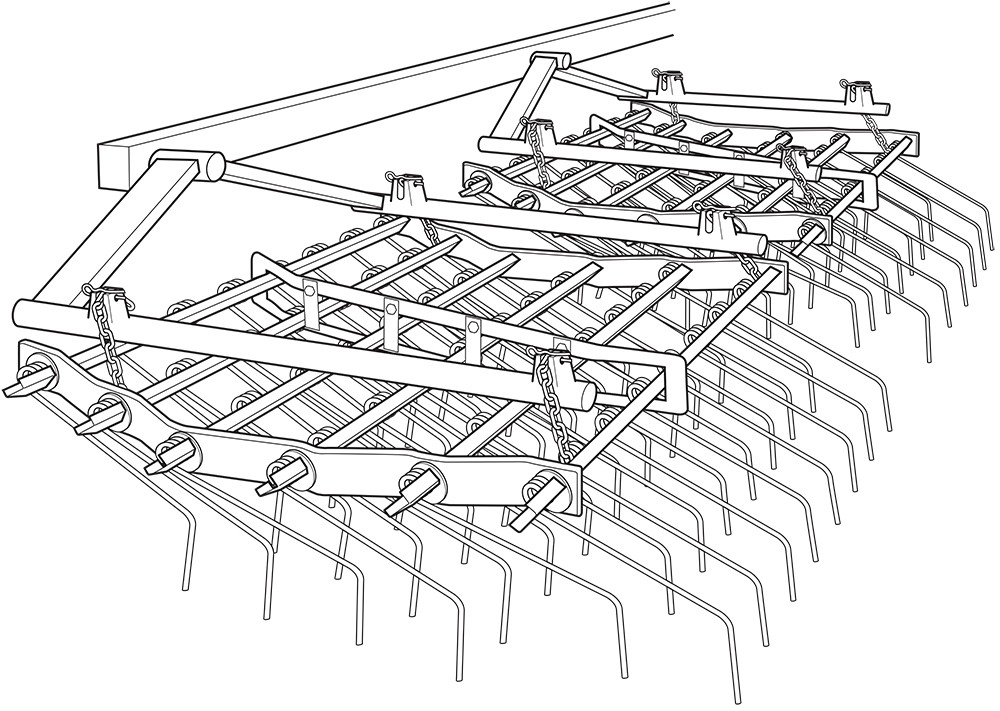
These implements vary greatly in design, but all consist of a frame with many downward pointing, small diameter tines (Figure 4.14). These machines are a key element in weed management on many organic grain and vegetable farms. Although some growers still use chain harrows and spike tooth or peg tooth harrows for weed control, these more traditional designs are rapidly being replaced by tine weeders. The tines on tine weeders are usually flexible spring steel wires, typically 0.19–0.38 inch in diameter. The popularity of this implement comes from the ability to adjust the tine angle and the down-pressure, and hence aggressiveness, coupled with the ability of the tines to spring around well rooted crop plants. Also, the springiness of the tines causes them to vibrate from side to side, which helps shake the weeds free from the soil. Unlike more traditional harrows with rigid tines, they do not throw rocks onto crop plants. Tine weeders are also sometimes called “finger weeders” but should not be confused with rubber finger weeders.
Makes and models vary in design. Machines with tine carriers rigidly mounted to the frame can transfer weight from the tractor to force tines into the soil. They can be used more aggressively but require careful adjustment to avoid crop damage. Machines in which the tine carriers are suspended from chains float on the soil surface and are less likely to damage the crop. Some designs lift the tine carriers on chains so they can float but also provide means for transferring tractor weight when necessary. The springiness of the tines increases with their length and decreases with their diameter but also depends on the type of steel and the design of the coil. A highly flexible tine will easily deflect around crop plants but may also leave many weeds undisturbed. Tines may be straight or bent at an angle from 45 to 85 degrees. A 45-degree tine will work well in most situations. An 85-degree tine can aggressively pull weeds out of taprooted crops like green beans and soybeans but easily damages corn, transplanted vegetables and other crops with a diffuse root system by hooking under the roots. Straight tines are generally less aggressive than bent tines of the same flexibility. A stiff straight tine can bury weeds in soil that is too damp for effective weeding with a springier bent tine.
Generally, corn and soybeans can be tine weeded from pre-emergence to about 7 inches, but avoid weeding soybeans or other beans from ground crack until the seed leaves are horizontal. Tine weeding is most effective against weeds that are just emerging or are in the white thread stage. Thus, tine weeding should be done before the weeds are readily visible. However, if the soil is too dry for weed seed germination, then tine weeding may be pointless. The soil disturbance from tine weeding will often prompt germination of a new flush of weeds. If a pre-emergence tine weeding is done too soon, then these weeds may emerge when the crop is susceptible to damage. Consequently, delaying the first tine weeding until the very first weeds emerge is often optimal. However, effectiveness of the operation declines rapidly once the weeds emerge, so tine weeding early by one day is usually preferable to weeding later by one day. Basically, tine weeding involves balancing timing of weed emergence, crop development, and weather and soil conditions.
We have successfully tine weeded soybeans up until the second leaves with three leaflets were beginning to emerge. Tine weeding in soybeans can be aggressive once the soybeans have developed deep taproots. The aggressive tine weeding will flatten many of the weeds that are not uprooted, and these can then be buried by immediately throwing 1 inch of soil into the crop row with a row-crop cultivator. When corn is between emergence and about two leaves, use tine weeders at a low aggression setting to avoid killing the crop.
Regardless of the crop or the weeder, the machine must be carefully adjusted to kill the weeds while preserving the crop. The tine carriers should be level when they are in the soil. As a general rule, the tines should not penetrate deeper than the seeds are planted. Since the tines bounce and seed depth varies a little, this means the tines should be adjusted to run at least 0.5 inch above the seeding depth (even shallower in rough or crusted conditions).
In small grains, tine weeders are most commonly used pre-emergence or at emergence, and again when the crop has two to four leaves. Many experienced operators suggest waiting until oats have two to three leaves and until barley, wheat or spelt have four leaves before a post-emergence tine weeding. Several extensive studies have demonstrated, however, that earlier weeding can be conducted without stand loss. Whether early post-emergence weeding is safe probably depends on soil type, soil moisture and how carefully the weeder is adjusted and operated. Waiting for the crop to become well established is the safest course of action, but this also allows the weeds to become larger and more resistant to damage and soil covering. Generally, a tine bent at 45–60 degrees works best with small grains. An 85-degree tine tends to uproot the grain. A straight tine works well pre-emergence but tends to bury more plants during early post-emergence weeding than a bent tine. Some growers also use tine weeders to comb sprawling and vining weeds like common chickweed and catchweed bedstraw out of small grains shortly before the stem of the grain elongates. Several studies in small grains have shown a close relation between the percentage of weed control and the percentage of grain plants covered with soil. Consequently, you may want to increase planting density to compensate for plant loss during tine weeding. Close spacing of plants in the row also helps deflect the tines out of the row, thereby causing more damage to weeds and less damage to the crop. Because of the tradeoff between crop damage and weed control, most studies in small grains and legumes planted at narrow row spacings have found no consistent increase in yield with tine weeding relative to weedy control plots, except occasionally when the weeds are dense. This does not mean, however, that tine weeding small grains is useless. Generally, weed seed production in grains is directly related to the density of mature weeds. Tine weeding may not improve yield of this year's grain crop, but it will reduce seed input and help prevent a dangerous buildup of weeds that can affect yields in later years.
To prevent damage to your tine weeder, always lower it to the ground when the tractor is moving forward. Also, avoid turning with the implement in the ground, as this can bend the tines.
Tines wear faster on the sides than on the front or back, leading to sharpening over time. A sharpened tine can cut the crop. Also, it will not push enough soil to bury weeds. Moreover, the flattening will prevent the tine from wiggling from side to side, which is important for uprooting small weeds. When tines become sharpened by wear, they can be clipped off. Note, however that this changes the length of the tine and therefore the action of the weeder. Remember that a shorter tine is stiffer and more aggressive. Be cautious after clipping tines until you understand how your rejuvenated weeder will perform.
Rod Weeders
These consist of a rotating square or triangular rod that is turned by a chain or gear drive connected to the implement's gauge wheels. When the rod encounters a weed, the turning motion of the rod pushes the plant upward out of the soil (Figure 4.15). The implement is commonly used for fallow weed control in dryland farming systems where land is regularly fallowed to restore soil moisture. It is ideal for post-harvest mechanical weed control because it preserves and even increases surface organic matter. However, in humid conditions, many weeds will often reroot.
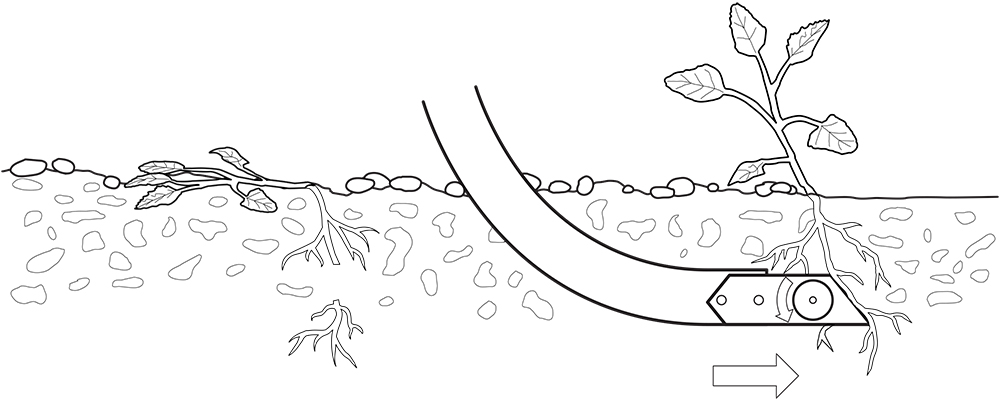
Other Physical Weed Control Devices
Mowers
Mowers can be used for weed management in several ways. They are clearly useful for preventing seed production and suppressing perennial weeds around field margins and in grassed alleys, particularly when these are planted between permanent vegetable beds. A study in Missouri showed that a mower using multiple PTO driven string trimmers effectively controlled annual weeds between the rows in a no-till system. This implement may be useful as growers and researchers continue to develop increasingly reduced tillage organic cropping systems. We also know a group of growers that put together an elevated, multiple blade rotary mower for topping weeds that emerge through soybeans. Such a mower would be useful for reducing seed production by in-row escapes even in situations where yield is not threatened. Mowers designed for removing corn tassels during hybrid corn seed production are ideal for cutting off weeds that emerge above crop canopies. However, they will generally be too expensive for most growers to purchase specifically for weeding. Although most weed species will recover to some extent after being topped, the reduced shade cast on the crop can improve yield, and removing the tops of the weeds will often substantially reduce weed seed production.
Flame Weeders
Flame weeders briefly expose weeds to a propane or butane flame at 1,500–1,800°F. This damages cell membranes and leads to rapid dehydration. A bank of burners can flame a wide area to kill weeds before crop planting or before crop emergence, or to defoliate plants prior to harvest. Flame weeding is currently the most common way to create a true stale seedbed in an organic cropping system. A canopy over the burner that contains the heat increases efficiency when flaming a whole bed. If you irrigate a few days before planting, the first flush of weeds will emerge in time to flame before the crop is up.
Burners directed toward the row can control in-row weeds in crops that have a protected terminal bud, like corn and leeks, and in cotton and sunflowers, which have tough stems (Figure 4.16). Although the range of crops that can be flame weeded after emergence is limited, the value of flame weeding for those crops is great. Flame weeding can effectively control weeds that escape in-row cultivation and can make the difference between a weedy and a weed free crop. Since most of the crops that tolerate flaming require several months to mature, they tend to be crops in which weeds go to seed. Flame weeding thus has consequences for weed management in subsequent crops. Flaming has little effect on weed seeds that have already fallen to the ground, however, since these are protected by surrounding soil particles.
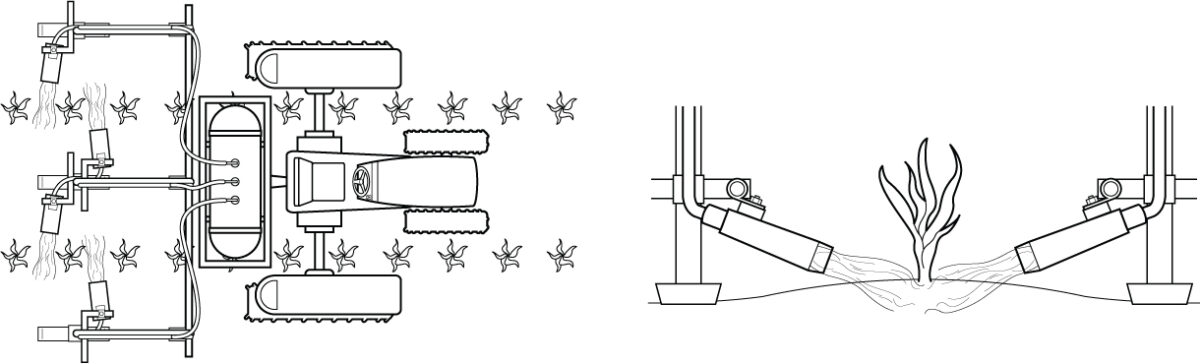
Shields can also be used to protect flame sensitive crops from the direct heat of the flame and to allow highly effective weed control close to the crop row. Shields similar to those used for close cultivation of small crops can be fitted on tractor mounted flame weeders. With a shield in place, the flame should be directed rearward instead of toward the row as when weeding flame tolerant crops. Fixing a wheel and a shield to the flame wand of handheld and push type flame weeders allows precision flaming of small acreages.
The length of time weeds are exposed to the flame is usually adjusted by changing the speed of movement through the field. A slow speed kills better but also uses more gas. The amount of gas required for 95% control varies substantially with weed species and weed size. For example, control of white mustard (similar to wild mustard) in the two- to four-leaf stage required 1.5–2 times more propane per acre than seedlings in the zero- to two-leaf stage (Ascard 1994). Many species such as common lambsquarters, common chickweed and common groundsel are well controlled by gas doses of less than 45 pounds per acre when young (Ascard 1995b). In contrast, grasses, which will generally resprout from ground level, and broadleaf species in which the bud is protected by tightly clustered leaf bases (for example, corn chamomile and common purslane) may regrow after flaming. Controlling such species may require multiple treatments or large gas doses (Rahkonen and Vanhala 1993, Ascard 1995b).
Flame weeding is most effective when the plant surface is completely dry. Otherwise, vaporization of surface moisture absorbs some of the heat and protects the weeds. Soil moisture is not critical, but the soil surface should be smooth. A lumpy surface will shelter some weeds and, during in-row flaming, reflect heat up onto sensitive parts of the crop plants.
Starting a fire is a risk with flame weeding. Particular care should be taken to avoid igniting dry grass or brush when turning near the ends of a field. Bits of crop residue may also catch fire, even in a relatively clean tilled field. These usually quickly burn out without damaging crops but under windy conditions may blow away to ignite flammable materials outside the target area. Particular care also should be taken in small scale intensive vegetable systems where dry crop residue or a bed mulched with straw may be near a flamed area. Other methods of killing weeds with heat or cold that have reduced fire danger have been studied. These include freezing the weeds with a jet of liquid nitrogen or with carbon dioxide snow, and cooking the weeds with infrared radiation. The latter simply involves running a very hot metal plate near the weeds. These approaches all use substantially more energy than direct flame weeding and have not been commercialized.
Steam and Hot Water Weeders
Like flame weeders, steam and hot water weeders kill by disrupting plant surfaces, leading to subsequent desiccation. Their advantage over flame weeders is that the flame is enclosed in a boiler, which minimizes risk of starting a fire. Their energy use, however, is several fold higher per acre than typical flame weeders. Hot water weeders are more energy efficient than steam weeders because they do not bring water to a boil, but steam weeders require a smaller volume of water. Although hot water and steam weeders are finding some acceptance for urban weed management, adoption rates in agriculture have been low due to their high fuel usage and the potential soil compaction from hauling large volumes of water over tilled fields.
Electrical Discharge Weeders
The type of electric discharge weeder currently marketed in the United States is used primarily to kill weeds that escaped cultivation earlier in the season in relatively low growing row crops like beets and beans. They operate by bringing a high voltage electrode into contact with weeds above the crop canopy. Electrical resistance of the weeds causes sap to vaporize, which disrupts tissues. The proportion of weeds that are controlled decreases with increasing weed density because many pathways for electricity to reach ground results in a lower energy dose per plant.
The equipment consists of a horizontal charged bar carried by a front three-point hitch or loader arms. This electrode is powered by a PTO driven generator and transformer carried in a cart behind the tractor. Large tractors of 125 hp or more are required. Energy use increases with weed density, which makes charged bar electrical discharge weeders impractical as a primary weed management tool. However, they are cost effective for low density populations that escape other management measures. Operating speeds vary with weed density and the type of weeds, from 3 to 6 mph. Generally, slower speeds are required for grass relative to broadleaf weeds because the electricity has to travel down many leaves rather than a few primary stems. Ground speed will be slow and fuel use excessive if the weeds are wet because the moisture on the plant surfaces provides alternative routes for the current to travel to ground.
One study showed that an electric weeder, an herbicide wiper and a mower all controlled seed production of sugar beet bolters equally well, but that the electric weeder killed more bolters than the mower and could be used in a wider range of weather conditions than the wiper without damaging the crop. Electric discharge weeders are important in an integrated weed control program because they are one of the few implements that can remove weeds from the crop row after the crop grows large. Removing the largest weeds potentially improves yield in the current crop, but it also reduces weed seed production. This can ease weed management in subsequent crops. Because the electrical discharge kills the weeds and disrupts development of immature seeds, charged bar electrical discharge weeders have advantages over other late season weed management tools like raised mowers and weed pullers. Electrical discharge weeders are, however, substantially more expensive to purchase and operate.
A radically different type of electrical discharge weeder is sold in Europe. In this type of weeder, a row of electrodes is pulled through the soil or brush over all vegetation in an area. Models are available for inter-row weeding and to kill weeds prior to no-till planting of crops. It has potential for continuous no-till organic cropping systems. However, few data are available on horsepower requirements, fuel usage, ground speed or effects of weed density, residue and soil conditions on performance.
Weed Pullers
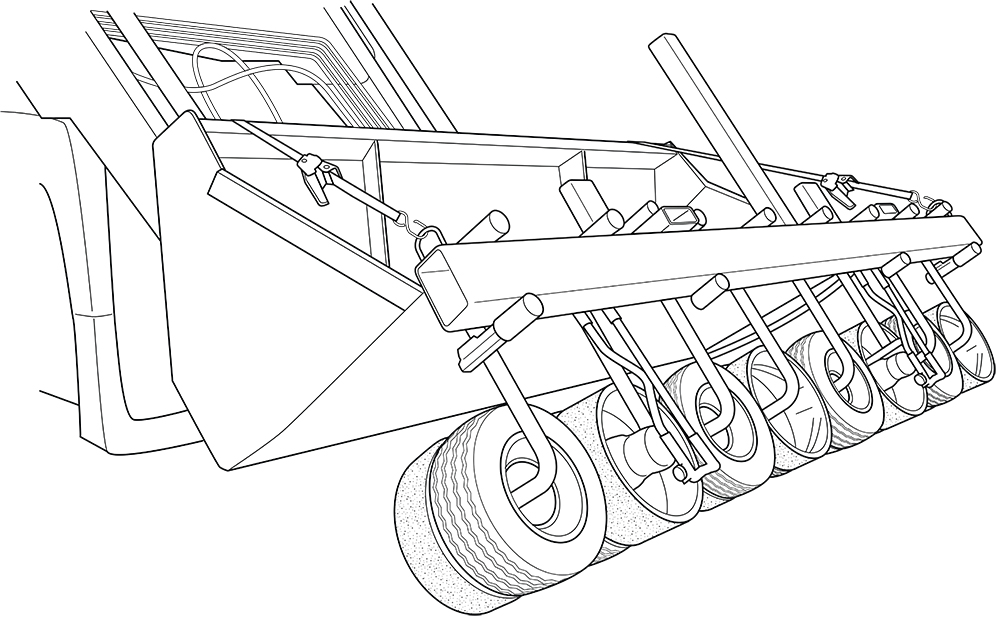
Mechanical weed pullers are another tool for removing tall weeds that have overtopped the crop. The only machine of this sort currently on the market consists of hydraulically driven pairs of wheels that rotate upward over the crop row (Figure 4.17). The wheels consist of a rubber tire either backed or fronted with a metal wheel covered with rubber mesh. When a weed contacts the wheels, it is drawn into them and pulled out of the ground. The machine can be front or rear mounted but works best in a front mounted position. It can be attached to a front-end loader, however, so a front three-point hitch is not required. Moist, loose soil and dry foliage improve action. The device is most effective against tall, fibrous stemmed species like waterhemp, shattercane, volunteer corn and sugar beet bolters. The tool is potentially effective for reducing weed seed production if it is used before seeds have begun to form. However, in many cases, by the time the weeds have gotten tall enough for the puller to selectively pull the weeds without damaging the crop, seeds will have begun to form and will continue to develop on the dying weeds. Crop root damage is likely to be slight in taprooted crops like soybeans and carrots, but the potential for root damage of fibrous-rooted crops like tomatoes needs to be evaluated.
Abrasion Weeders
Abrasion weeders are still in the development stage but offer potential for weed management without soil disturbance. These weeders work like miniature sand blasters, with an air stream directing grit at small weeds, particularly in the crop row. The grit of choice appears to be ground corn cobs. Trials with prototypes have shown good control of broadleaf weeds with minimal damage to corn. One potential application for this type of weeder might be supplemental weed control in crops no-till planted into rolled cover crops.
Cultivator Guidance Systems
Cultivation is an exacting task that wearies the tractor operator and can kill crop plants if you are not careful. These problems are multiplied when you use tools that work in or very near the crop row. Fortunately, great progress has been made recently in automation of implement and tractor guidance.
The simplest approach is purely mechanical. Wheels mounted on the cultivator guide the implement by rolling along the sides of raised beds or ridges, or else travel in furrows that are laid down by the planter. These systems are sufficiently accurate for cultivating at high speeds with in-row tools. They are best adapted to rear mounted machines since the implement must have some lateral sway relative to the tractor. These systems are inexpensive relative to the electronic guidance systems discussed below. Furrow guidance requires implements that are six rows or wider, however, since two wheels are needed for stability, and the tractor tires must not obliterate the furrows. Also, if you are working with a planter-made furrow rather than with ridges or raised beds, you need to preserve the furrow through early season full-field cultivations. We have done this by removing rotary hoe wheels or raising tine weeder tines over the inter-rows where the furrows are located (Mohler et al. 1997). This does not reduce weed control since you will later clean up the inter-rows with a row-crop cultivator. The furrow also has to be recreated by the row crop cultivator for subsequent passes. You can do that by mounting a furrower instead of the central sweep in the appropriate inter-rows. Placing the guide wheels onto the cultivator is usually easy, but mounting the furrower on the planter may require substantial shop work. In loams and clay soils, the guidance furrows can be stabilized by running a wheel behind the furrower. An appropriately shaped packing wheel can be constructed by welding two disks together at the rims. In sandy soils, instability of the furrow can limit the usefulness of furrow guidance.
Three general types of electronic guidance systems are currently in use. They are distinguished by the type of sensors that determine the position of the crop rows:
- Wands that sense the crop rows by physically touching them
- Global positioning systems (GPS) that create an electronic map of the crop rows
- Machine vision systems that find the crop rows optically.
Once the position of the rows is sensed, a computer sends a signal to a steering mechanism that adjusts the position of the cultivator. Steering devices correct the cultivator’s position either by
- Shifting it laterally relative to the tractor’s three-point hitch
- Turning it slightly using disk wheels
- Turning the tractor steering wheel. The last approach results in a longer delay between error and correction on rear mounted machines but allows the driver to watch for jamming and other problems. It is also the only approach that is well adapted to belly or front mounted machines, although in principle the first approach could work if the implement is attached to the tractor by a laterally sliding carriage.
The oldest electronic guidance systems use a pair of wands that touch a pair of rows. If the cultivator strays to one side, then one of the wands loses contact with its row and a signal is sent to correct the cultivator position. Generally, the wands cannot sense crops like corn and sorghum that are flexible when young until the crop is 5–6 inches tall; beans can be detected at 3–4 inches. Since guidance is most critical when the crop is small, the crop size limitation on wand-based systems restrict their usefulness. In particular, by the time the crop is large enough to sense, many weeds will be too large for control with in-row tools. Some wand systems can guide electronically off of a planter-made furrow when the crop is too small to be sensed. However, if an adequate furrow is available, one might as well guide the cultivator directly from this without the wands. High weed density can also limit the performance of wand guidance systems by causing the wands to lose track of the crop rows.
Real-time kinematic (RTK) GPS can accurately determine the position of a sensor to within less than 0.5 inch and can be used to guide tractors and cultivators. These systems greatly improve GPS accuracy by analyzing the carrier waves from the satellites in reference to a ground station. For cultivator guidance, a map of the crop rows is made during planting. Sensors on the tractor or cultivator then allow a computer to direct the tractor and cultivator through the precise electronic map of the field. If side hills are present on the farm, a dual guidance system, in which the tractor is guided between the crop rows and the cultivator is independently adjusted to the proper position relative to the crop rows, is useful. In theory, RTK GPS can determine position with great accuracy. However, suboptimal satellite positioning, unfavorable weather conditions for signal transmission and the inevitable error in translating a computer position into positioning a large piece of machinery reduce the accuracy of positioning an actual implement to within 1–1.5 inches of the crop row. This level of accuracy is sufficient for high-speed inter-row cultivation with minimal fatigue for the tractor operator but is not sufficiently accurate for use with most in-row cultivating tools without risk of crop damage.
Most machine vision guidance systems use black and white video cameras operating in the visual spectrum coupled with artificial intelligence image-recognition software to distinguish the regular pattern of plants in the crop row from weeds. These systems work best when the crop is taller than the weeds and the weeds have low to moderate density. Performance is markedly better with two camera systems relative to those with a single camera, because a single camera can be fooled by shadows. Good machine vision systems provide enough guidance accuracy to allow use of in-row weeding tools like rubber star wheels at speeds up to 7 mph. For such high-speed weeding, sweeps will usually be the most practical tool for cleaning out the inter-row weeds. The most sophisticated tractor-mounted machine vision systems distinguish individual crop plants from weed plants and cultivate the spaces between crop plants using reciprocating knives, horizontal cultivating disks or rotating tines that move in and out of the crop row.
Machine vision systems that use hyper-spectral analysis to distinguish between hundreds of colors are under development. Coupled with computation-intensive visual recognition software, these systems can distinguish between closely related species like tomatoes and black nightshade. These systems could be very useful in situations where weed density is high or where the weeds have over-topped the crop. Another system under development that could be useful in high weed density situations involves the measurement of x-ray absorption by the crop-weed canopy. Absorption of this short wavelength electromagnetic radiation is usually greatest in the crop row where biomass is greatest, and thus the sensors can find the crop row even when it is over-topped by weeds. Whether the sophistication of hyper-spectral and short wavelength absorption systems has value for routine cultivation remains to be determined.
Rapid strides in artificial intelligence are leading to the development of autonomous, self-driving robot weeders. Multiple models of such machines should be commercially available by the mid-2020s or sooner. Some of these machines simply allow inter-row cultivation without the supervision of an operator. More sophisticated machines can locate individual crop plants and remove in-row weeds from between them. Some current prototypes use a solar panel to allow continuous operation during daylight hours without the need for recharging or refueling. The only robot weeders commercially available as of the writing of this book are small devices that wander about randomly, deflecting off crop plants taller than about 1 inch while cutting weed seedlings with a tiny string trimmer. They are only suitable for small areas, such as a home garden.
Matching the Implement to the Task
Effective mechanical weed control typically requires several machines. These need to be appropriate for the type of crop, timing of crop development, tillage practices and type of weed problem. That is, you need to integrate various mechanical weed management practices into a program appropriate for the crop and your farm. Moreover, you need to integrate the mechanical methods with the cultural management methods discussed in Chapter 3.
A mechanical weed management program commonly used by organic corn and soybean growers in the midwestern United States consists of two to three rotary hoeings followed by two cultivations with sweeps or shovels. It is well adapted to both ridge tilled and flat tilled fields. In this system the rotary hoe reduces weed density and delays establishment of the weeds relative to the crop. At the first inter-row cultivation the crop is usually protected from burial by shields, though some soil may be allowed to roll under the shields to bury small weeds. At the second inter-row cultivation, the grower uses the cultivator to throw more soil around the plant bases to bury more weeds. The machines used are simple, robust and pulled at high speeds, allowing rapid cultivation of large fields. The weed control may be less complete than that achieved by more sophisticated devices, but some weeds can be tolerated in competitive field crops.
Well managed mechanical weed control programs in high value vegetable crops vary enormously in detail, but many share common elements. Often the grower uses a short-tilled fallow or stale seedbed to reduce initial weed density. Tine weeding of large seeded crops or flaming of small seeded crops can then be used to further reduce weed density before crop emergence, but surprisingly few growers use these options. After the crop is up, the emphasis is often on frequent cultivation close to the crop row using a basket weeder or vegetable knives. After the crop gets large, most growers cultivate the inter-rows with duck-foot shovels or sweeps. The high value of the crop often makes hand hoeing of weeds in the crop row economically viable. Consequently, the fields may be very clean, and this facilitates weed management and minimizes the cost of hand weeding in subsequent years.
You need to find the right mix of implements to meet the particular situations presented by the soils, climate, crops and weed species on your farm. Given the idiosyncrasies of many cultivation tools, the equipment should also match your personality and your proclivity for adjusting and experimenting with machinery. You will probably need multiple implements to meet the diversity of weeding tasks that you encounter; additional machines may be useful for saving crops in unusual circumstances.
Hoeing Weeds
Hand hoeing is often cost effective for in-row weeding of high value crops, especially if they are poor competitors (figures 4.18, 4.19 and 4.20). Hoeing is easiest when the weeds are still small. For example, Maine farmer and author Eliot Coleman finds that multiple passes hoeing small weeds is less time consuming than hacking out large weeds in a single pass. In addition, hoeing when the weeds are small allows you to hoe shallowly, which prevents bringing more seeds to the soil surface where they can establish.
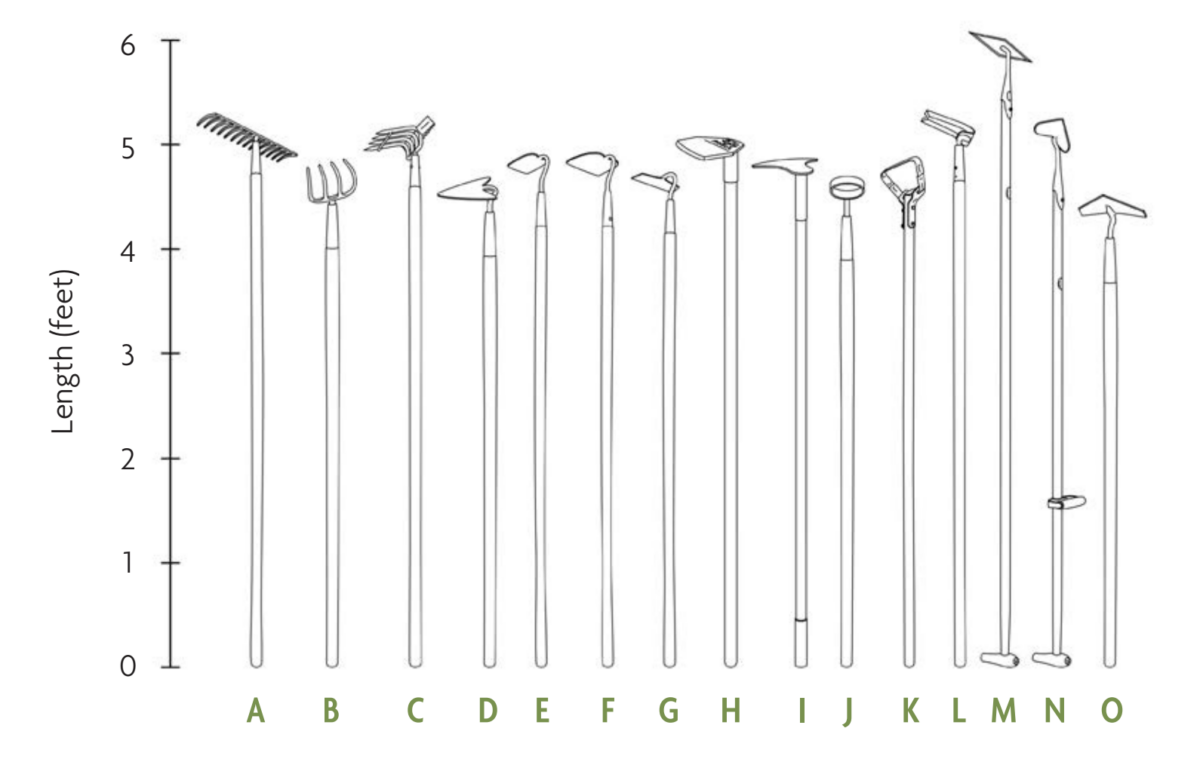
Traditional chopping type hoes (figures 4.18 E, F, H, and 4.19 D) tend to dig too deep, damage crop roots and bring up more weed seeds. They also tend to leave an uneven soil surface that exposes more weed seeds to germination cues (see “Seed Germination: Why Tillage Prompts Germination”). Stirrup hoes (Figure 4.18 K) (also called scuffle or shuffle hoes), onion hoes (Figure 4.18 G), sweep hoes (Figure 4.18 N, O) and diamond hoes (Figure 4.18 M) are designed to weed shallowly and move less soil. They can cover more ground with less effort than traditional hoe designs if weeds are small, but they have difficulty digging out large weeds if hoeing is delayed. Sweep hoes and diamond hoes (Figure 4.18 N, O, M) have long handles and a blade angle that allows reaching across a typical vegetable bed so that the whole bed can be weeded from one side without walking on it. They can easily cut off a crop plant, however, if not aimed carefully. Stirrup hoes (Figure 4.18 K), in contrast, can easily be used close to the crop without damaging it since the sides of the stirrup help prevent the crop from being nicked by the blade. The wobble in the blade of a stirrup hoe helps keep the blade horizontal as the hoe slides toward and away from the user. The circle hoe (Figure 4.18 J) is similarly effective for precision weeding around delicate crop plants, but its area of coverage is small. Weeding forks, particularly those with spring steel tines (Figure 4.18 B, C) can be used like a precision tine weeder in taprooted crops when they are young. An ordinary garden rake (Figure 4.18 A) can sometimes be used in the same way. Garden rakes are also useful for loosening soil to kill small weeds when planting a small area is delayed, for example, when sowing parts of a bed with different herbs at various times. Handheld, battery powered, variable speed mini-rototillers are now available for power assisted hoeing.
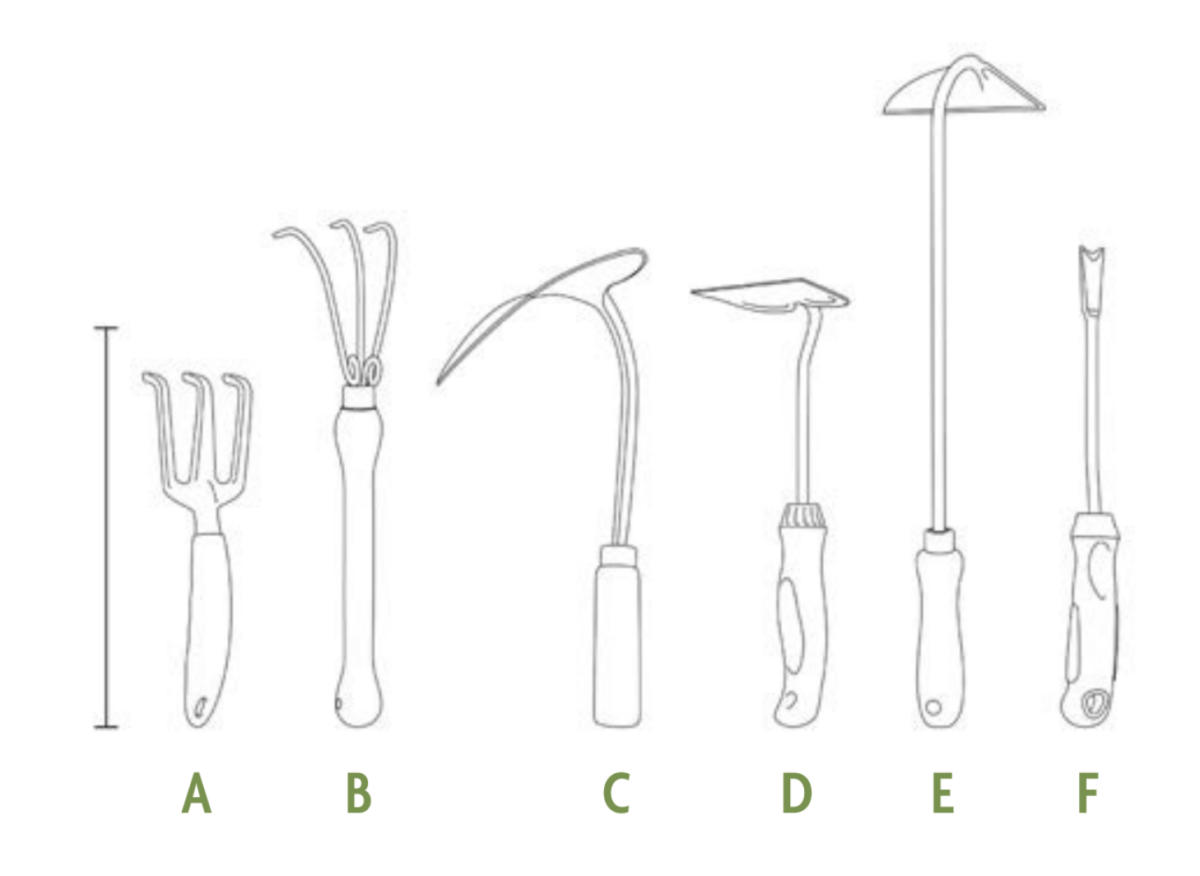
Using short handled tools for more than a few hours is potentially damaging to the ergonomic health of workers and should be avoided. Situations sometimes arise, however, when use of these tools is unavoidable without substantial crop loss. For example, we have used swan neck weeders (Figure 4.19 C) and short handled hoes (Figure 4.19 D) to remove weeds from cabbage after the leaves had become too large and brittle to allow use of stirrup hoes (our preferred tool for this crop). If the farm manager participates in weeding with short handled tools, he or she is likely to take precautions to avoid the need for short handled tools in the future!
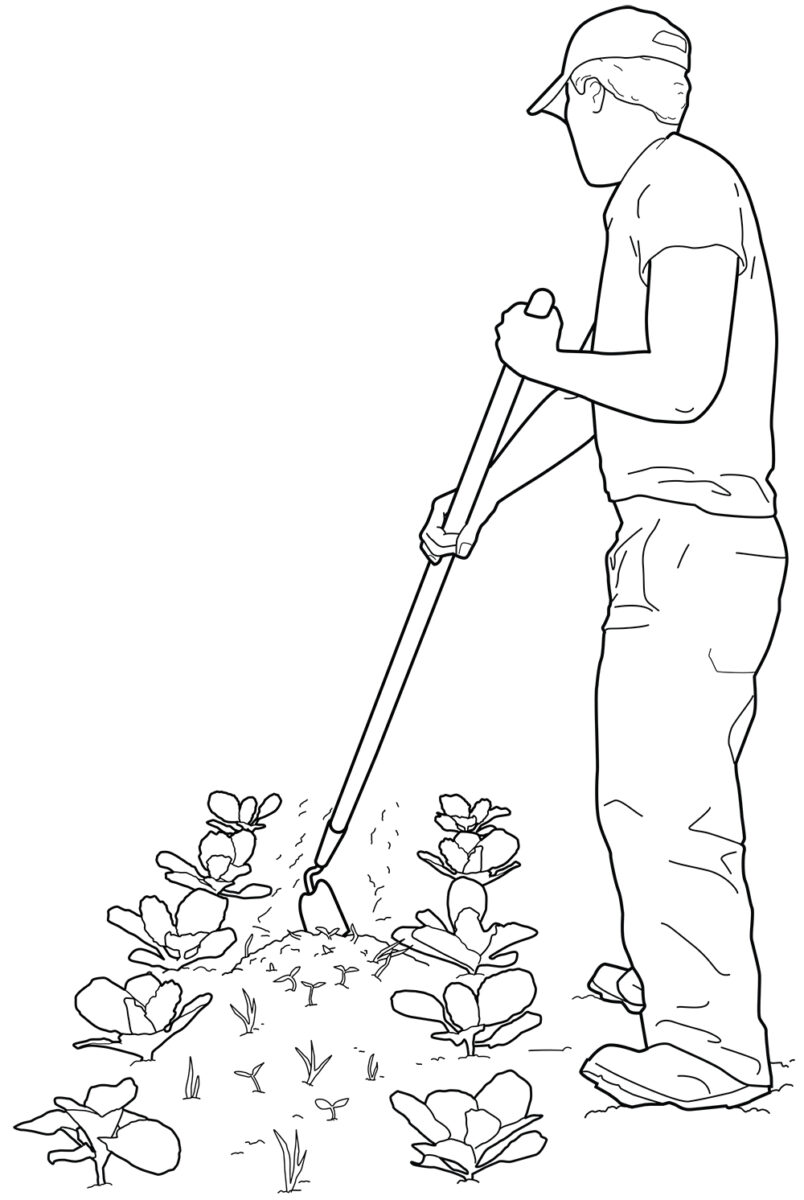
Wheeled hoes can be used for inter-row weeding in place of a tractor mounted cultivator on small acreage farms (Figure 4.21). They are several times faster than conventional hoeing. Since hand guidance allows operation very close to the crop row, they can remove weeds that tractor drawn sweeps and knives cannot get without an expensive guidance system. A wide range of tools can be mounted on wheel hoes, from sweeps, to narrow tines, to stirrup hoes. The double wheel type wheel hoe allows very close, simultaneous cultivation on both sides of the crop. A disadvantage of wheel hoes is that the operator generally walks close to the crop row, creating compaction. Not only can this inhibit crop growth, but it also helps bring on the next flush of weeds and makes subsequent hoeing more difficult. Battery powered wheel hoes are now available that reduce the labor involved in pushing the hoe. If soil in the bed is loose, the battery powered wheel hoe can be guided from the side of the bed, thereby eliminating the compaction problem.
Crops that you expect to hoe should be planted with hoeing in mind. Space the crop 1–3 inches farther apart in the row than the hoe is wide. If you plant several rows to the bed, stagger the middle row relative to the outer rows so that you can hoe in a cross hatched pattern without having to try to straddle the bed. Having hoes of several widths and types helps you match the hoe’s action to the crop and situation. Many of the basic principles of mechanical weeding apply to hand hoeing as well.
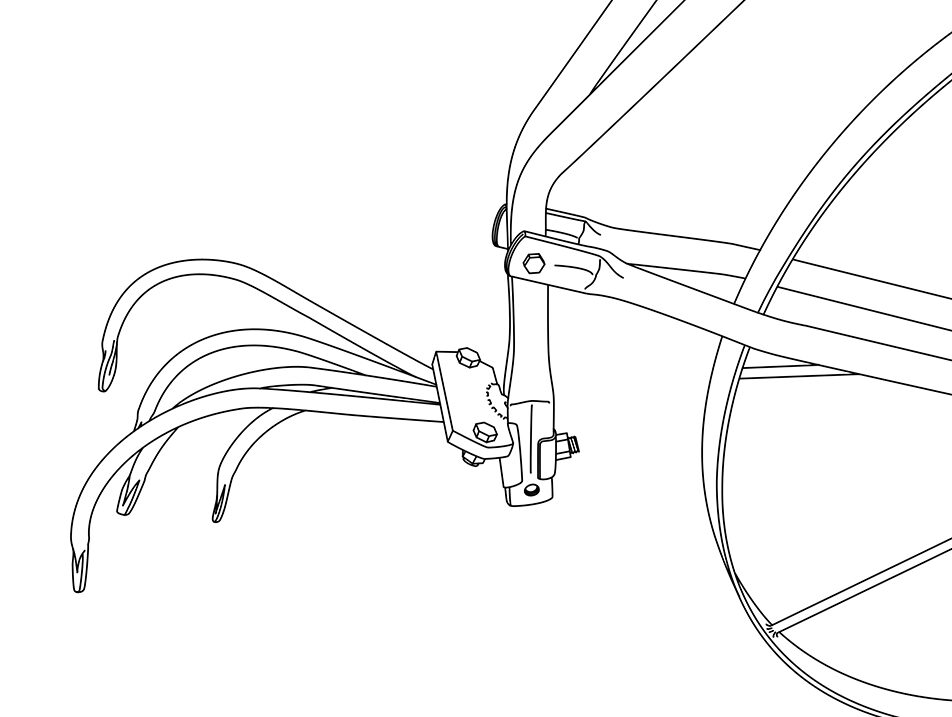
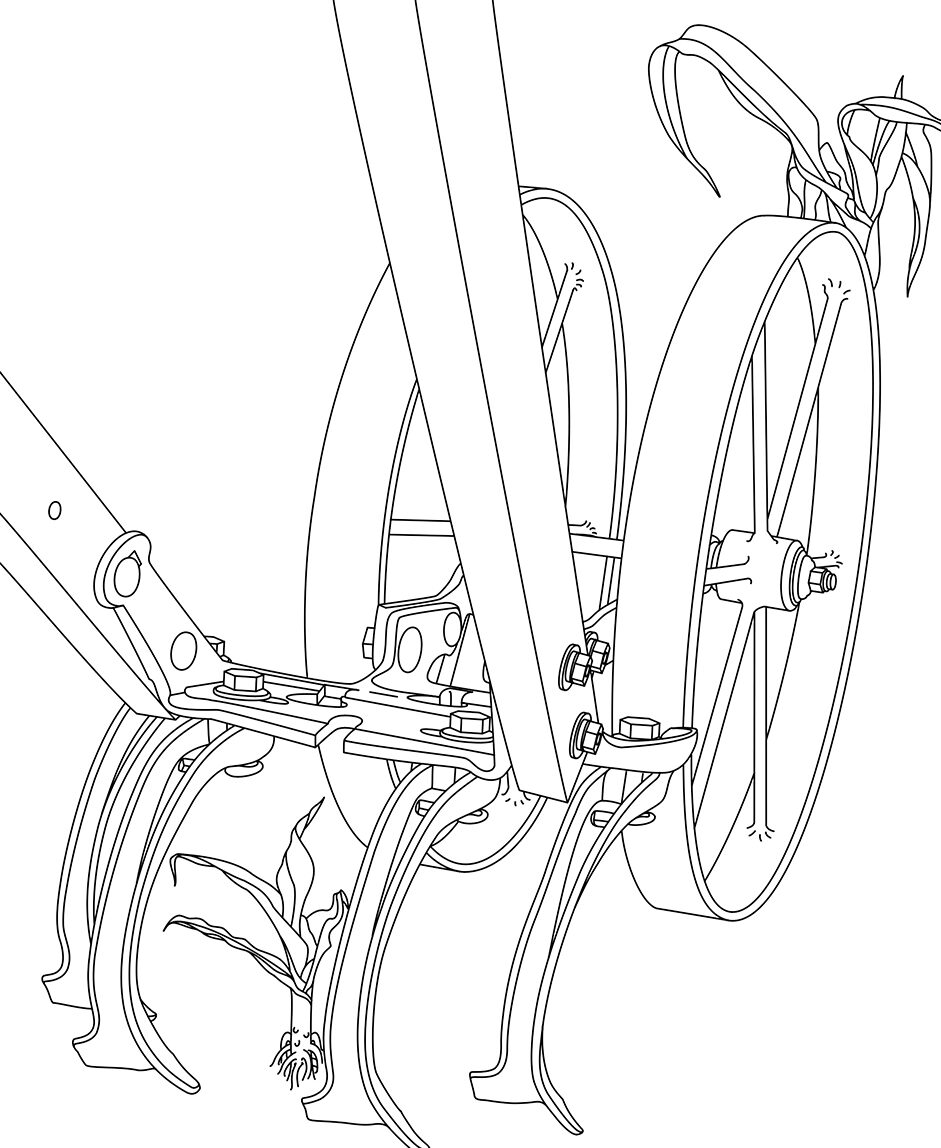
Cultivation and Tillage in the Dark
As explained in "Characteristics of Weeds That Affect Their Management", light stimulates seed germination in many weed species. During cultivation or tillage, seeds may be exposed to a brief flash of light and then buried again. Consequently, tillage and cultivation at night, or with implements that are covered with light-excluding canopies, can result in a modestly lower weed density. Nevertheless, some seeds, even of generally light sensitive species, do not require light for germination. Others will end up near enough to the surface to satisfy their light requirement regardless of how or when you do the operation. Thus, dark cultivation only reduces but does not eliminate weed emergence. Probably for the same reasons, the degree of weed reduction by dark cultivation has varied greatly across experiments. Reductions in weed density of 20–50% relative to tillage in light are typical, but in some experiments, no reduction was observed.
The optimum strategy for using dark cultivation may be to perform primary tillage in the light, wait for emergence, and then prepare the final seedbed and plant in the dark. So far, no studies have reported on the effectiveness of dark cultivation after planting. A possible strategy for post-planting cultivation would be to perform tine weeding or rotary hoeing in the dark to minimize weeds in the crop row. Early inter-row cultivation could then be done in the light to help clean out the seed bank, since usually 100% of young weeds in the inter-row can be killed by subsequent operations.
Some species, like the pigweeds (Gallagher and Cardina 1998), require only a very tiny amount of light to stimulate germination. Potentially, moonlight or light reflected from tractor headlights could be sufficient to stimulate germination, and a canopy over the implement is unlikely to provide a sufficient level of darkness. Given that the method is ineffective against species that are not light sensitive or those that are hypersensitive, and that the procedure usually provides a relatively low reduction in weed density, the extra bother of cultivating at night will rarely be worthwhile.
Soil Tilth and Cultivation
Good soil tilth is critical for weed management. Good tilth helps the cultivator break weed roots free from the soil. It also reduces the chances of knocking over crop plants with clods. Moreover, shallowly working tools like tine weeders is relatively ineffective in cloddy soil because 1) seedlings emerge from greater depths in cloddy soil, and the tools cannot reach them without damaging the crop, 2) when clods are moved, seedlings emerge that otherwise could not reach the soil surface, and 3) seedlings in clods may be rolled around by the cultivator but continue growing if rain or irrigation eventually allows the clods to merge back into the soil. All of these factors argue for practices that improve soil structure, including cover crops, manuring, rotation with sod crops and controlling wheel traffic. They also argue for delaying tillage until soil moisture conditions are appropriate, even if this entails a delay in planting.
Even in soil with good structure, clods will form if the seedbed preparation is inadequate to eliminate them. For many large seeded crops, a coarse seedbed is not detrimental to establishment and may be beneficial in reducing erosion. However, for the reasons mentioned above, a coarse seedbed is rarely advantageous during cultivation. If the seedbed is too fine, however, the probability of wind erosion may increase, and a crust may form when the soil dries after rain.
Four elements are key to obtaining good soils structure:
Avoid Working the Soil When Wet
Tillage or cultivation when the soil is wet smears the soil below the tool, creating a sealed layer that roots and water have difficulty penetrating. The soil chunks that are thrown up by the implement later bake into clods that interfere with cultivation. Moreover, pressure of the implement on wet soil squeezes out pore space, creating a massive structure that will be difficult to work into a seedbed in the future.
Working the soil when it is wet is also a poor practice from a weed management perspective. Soil will not flow properly off of sweeps and tines, and it will gum up spyders and rolling gangs. Wet soil will tend to stick to weed roots, preventing desiccation. Moreover, weeds are more likely to reroot if the soil is wet.
Control Wheel and Foot Traffic
In vegetable systems, you can control wheel traffic by creating permanent beds with paths between the beds. The beds never have to be driven on. You can sow the paths with grass and then mow periodically to prevent weed growth. The sod will compete with weeds between the beds, help support the weight of the tractor and reduce muddy working conditions for the field crew. You will, however, need to regularly edge sod alleys to prevent grass from encroaching on the beds. Raised beds have advantages, including early warming in the spring and less stooping by workers during picking. Weeding the sides of the beds will require equipment that can disturb soil on the sides of the beds while simultaneously pushing it up out of the alley. Rolling cultivators and disk hillers are commonly used for this task. Avoid walking on the beds. Foot traffic can create an amazing amount of compaction, especially when the beds have been recently tilled.
In grain crops, the traditional way of controlling wheel traffic was to use a ridge till system. The tractor tires always travel in the furrows between the ridges, so that the area where the crops grow never gets compacted by wheel traffic. Maintaining the ridges through a rotation into small grain crops requires planting arrangements that skip planting rows in the furrow. Innovative growers are increasingly using high accuracy GPS systems to maintain the same wheel tracks (see profiles of Scott Park and Carl Pepper). This approach is applicable to complex crop rotations and a wide range of crops. At present, however, the systems are expensive, and this restricts use to larger farms.
Regardless of what system you use, avoid walking and driving on the soil when it is wet. Soil strength declines with increasing moisture content, and compaction from traffic thus increases with increasing soil moisture. Combine harvesting of crops like corn and soybeans is a frequent cause of compaction because the soil often dries slowly in cool autumn weather and combines are heavy machines. If combine harvesting frequently causes ruts in a field, avoid planting late harvested crops there. Shifting these fields to perennial forages or early harvested row- and small-grain crops will decrease compaction and improve mechanical weed management.
Add Organic Matter to Soil
When compost, cover crops and mulch materials from the previous year are incorporated into the soil, the decomposing organic matter and the beneficial fungi that grow on it bind soil particles into small, stable crumbs. The spaces between crumbs allow air and water to easily penetrate the soil and crop roots to grow rapidly. Good crumb structure also facilitates cultivation and formation of dust mulches. The decomposing organic matter provides a source of nutrition for crop growth. Since much of the benefit of organic matter additions to the soil derive from the activity of rapid-acting microbial populations, regular annual additions of organic matter are better than occasional heavy pulses. Cover crops are a particularly valuable source of soil organic matter because they improve the soil while growing as well as after incorporation. The fibrous roots of grasses help bind soil into crumbs, and root secretions from legumes also bind soil into aggregates. Finally, taprooted cover crops like red clover and sweet clover penetrate and loosen the subsoil. Killing the cover crop and leaving it on the surface as a mulch for weed suppression will be more beneficial for surface soil structure than incorporating it, since tillage tends to disrupt aggregation. But either way, the soil benefits from a cover crop.
Keep Soil Covered
Keeping the soil continuously covered with a crop, cover crop or mulch prevents raindrops from breaking up soil crumbs. It also prevents the soil from baking hard in the sun. Moreover, organic materials from cover crops and mulches provide food and cover for earthworms. Earthworms avoid hot, dry soil and are much more active near the surface when the soil is covered by an organic mulch or a dense crop canopy. Earthworms create soil pores with their burrowing and cement soil particles into crumbs with their slime. They also consume many weed seeds.
Keeping the soil covered has additional benefits for weed management. Fewer weed seeds will be prompted to germinate under a cool, dark cover of crop plants or residue, and the weeds that do emerge from the soil will grow poorly in the low light conditions.
Energy Use in Physical and Chemical Weed Management
Physical weed management is often assumed to require more energy than chemical management. This is sometimes the case, but depending on the implements and chemicals compared, the two approaches are often surprisingly similar in energy intensity, and sometimes the physical approach compares favorably. Primary tillage is unquestionably energy intensive (Table 4.4), and if perennial weeds are not an issue, then reducing tillage will result in substantial energy savings regardless of the overall weed management strategy. If perennial weeds are a problem, however, then in a chemical no-till system a glyphosate containing product like Roundup PowerMax® will probably be used, whereas in a non-chemical system the field will probably be moldboard plowed and then disked or finished with a harrow before planting. Plowing plus disking uses approximately 2.02 gallons per acre of diesel fuel (Table 4.4). However, control of perennial weeds with Roundup® typically requires 1–3 quarts per acre (Monsanto 2010), and manufacturing the herbicide is an energy intensive process (Table 4.5). Even assuming a relatively low application rate for perennial weed control of 1 quart per acre, manufacturing the active ingredient (glyphosate) requires the energy equivalent of 1.69 gallons per acre of diesel. With an additional 0.27 gallons per acre of diesel required to spray the herbicide (Table 4.4), chemical control of the perennials in a no-till system requires the equivalent of 1.96 gallons per acre of diesel, which is scarcely different from the mechanical management. If a higher rate of Roundup® or an additional herbicide is needed, then the mechanical management is likely to be the less energy intensive approach. Conversely, if multiple passes with a tillage implement are required, as in a bare fallow, then the mechanical approach may require more energy.
| Table 4.4. Energy Requirements for Tillage and Weed Management Machinery, Given in Equivalents of Gallons per Acre of Diesel Fuel Used1, 2 | |
|---|---|
| Tool | Fuel Use (Gallons per Acre of Diesel) |
| Moldboard plow | 1.32 |
| Chisel plow | 0.99 |
| Disk | 0.7 |
| Field cultivator | 0.43 |
| Inter-row cultivator | 0.38 |
| Rotary hoe | 0.31 |
| Sprayer | 0.27 |
| Flame weeder | 7.93 |
| 1All figures are from Clements et al. (1995) except the flame weeder, which is from Ascard (1995a). 2Fuel required for use of a harrow or tine weeder is probably similar to that for an inter-row cultivator or rotary hoe. | |
Chemical and mechanical weed management in the crop can also have similar energy requirements. For example, a common cultivation regimen for corn and soybeans is to rotary hoe twice and then cultivate with a row-crop cultivator twice (Mohler et al. 1997). From Table 4.4, this requires approximately 1.38 gallons per acre of diesel fuel. If triazine resistant weeds are not present in the field, a reasonable herbicide program for field corn might be 1 pint per acre of an atrazine product plus 1.33 pints per acre of Dual II Magnum® (Table 4.5). This requires the energy equivalent of 1.22 gallons per acre of diesel for manufacturing the active ingredients in the herbicides plus 0.27 gallons per acre of diesel for spraying, for a total energy usage of 1.47 gallons per acre, slightly more than the standard cultivation practice. The usual management for conventional soybeans is 22 ounces per acre of Roundup®, which requires the equivalent of 1.16 gallons per acre of diesel for manufacturing the glyphosate plus 0.27 gallons per acre to spray the herbicide, for a total energy usage equivalent of 1.43 gallons per acre of diesel. Again, this is slightly greater than the standard cultivation program.
| Table 4.5. Energy Embodied in the Active Ingredients of Various Common Herbicides, Given in Equivalents of Gallons per Acre of Diesel Fuel Used per Application1 | ||||
|---|---|---|---|---|
| Product2 | Active Ingredient | Group | Typical Rate per Acre3 | Energy per Application |
| Solve 2,4-D LVE | 2,4-D | Phenoxy acid | 1 pt | 0.13 |
| Banvel | Dicamba | Benzoic acid | 4 fl oz | 0.11 |
| Fusilade DX | Fluazifop-butyl | Aryloxyphenoxy propionate | 8 fl oz | 0.43 |
| Dual II Magnum® | Metolachlor | Chloroacetimide | 1.33 pt | 0.3 |
| Glean | Chlorsulfuron | Sulfonyl urea | 0.66 oz | 0.01 |
| Aatrex | Atrazine | Triazine | 1 pt | 0.31 |
| Treflan | Trifluralin | Dinitroaniline | 1.5 pt | 0.37 |
| Gramoxone | Paraquat | Bipyridylium | 3.5 pt | 1.33 |
| Roundup PowerMAX® | Glyphosate | Organophosphorus | 22 fl oz | 1.16 |
| Lorox | Linuron | Substituted urea | 1 pt | 0.48 |
| 1Energy embodied in herbicides from Green (1987), converted to diesel fuel equivalents assuming one liter of diesel = 36.4 megajoules of energy (NCCE 2009). The embodied energy in a chemical is the cumulative energy in the form of heat and electricity required to transform and purify simple precursor molecules into the final product through many steps. 2The same active ingredient may be present in several commercial products. The herbicides listed are used as examples and do not imply endorsement of any particular product. 3Application rates vary with crop, timing and target weeds. The application rates listed are typical of those used for major crops in which the herbicides are commonly used. | ||||
These calculations leave out some energy costs such as the energy required to make additives like wetting agents and to package, transport and market the herbicides. They also leave out the energy costs of manufacturing the cultivators and transporting them from the factory to the farm. All of these energy costs are relatively small on a per acre basis (Green 1987, Clements et al. 1995), however, and would not substantially affect the comparisons above.
Obviously, both herbicides and physical weed management programs vary greatly with crop and region. Tank mixing multiple herbicide products and repeat applications are common for some crops, and some crops may be cultivated many times. Flame weeding has very high energy costs compared with both mechanical and chemical approaches (Table 4.4). In contrast with these energy intensive approaches, the sulfonyl urea herbicides are applied at very low rates and thus have negligible energy costs (e.g., Glean in Table 4.5). But these herbicides are commonly used in conjunction with others to achieve a broader spectrum of control and are more prone than most classes of herbicide to select for resistance. Consequently, they cannot be considered a panacea for the problem of energy use in weed management. Although particular chemical and physical weed management practices use more energy whereas others use less, neither approach appears generally superior to the other with regard to energy use.
As more weeds become resistant to particular herbicides, however, additional herbicides will need to be added to herbicide programs to obtain full spectrum control. This seems likely to improve the energy use advantage of mechanical weed management programs. This will probably result in a greater integration of herbicide-based systems with the cultural and mechanical systems described in this book.
Chapter 4 Summary
- Tillage and post-planting cultivation affect growing weeds by cutting them up, burying them and uprooting them so that they desiccate. They affect seeds in the soil by changing soil properties and the position of seeds in the soil profile.
- The effect of tillage or cultivation on a weed population depends on the interaction between the nature of the soil disturbance and the ecological characteristics of the weed.
- The timing of a tillage or cultivation event relative to season, weather, and the growth stage of the weeds and the crop largely determines the effectiveness of the procedure.
- Mechanical weed management is most effective when it follows a well-considered sequence of events using a variety of implements, with each one appropriate to the size and species of the weeds present and the crop being grown.
- A primary way to control perennial weeds is the repeated removal of the shoots to exhaust the storage roots or rhizomes. The process is most effective if the storage organs are first cut into small pieces and subsequent shoot removal occurs at the point carbohydrate reserves in the storage organs are at a minimum. Other tactics that may be effective against certain perennial species include drying out the storage organs, exposing the storage organs to freezing and physically removing the storage organs.
- Delayed tillage and planting of spring planted crops often reduces subsequent weed density because the early flushes of weeds will be eliminated by the tillage and many species of spring germinating weeds enter secondary dormancy during hot weather. Delayed tillage before planting winter grains may similarly reduce the density of winter annuals in the crop. Delayed tillage and planting before summer planted crops is rarely effective for reducing subsequent weed density.
- Tillage redistributes seeds in the soil profile, which can change the proportion of both seeds that survive and seedlings that emerge. Moldboard plowing buries most seeds on the soil surface too deeply for subsequent emergence. If seed survival is high, moldboard plowing the next year will bring many seeds back to the upper part of the soil profile. Chisel plowing, disking and rotary tillage keep a large proportion of surface seeds in the upper part of the soil profile. A consistent no-till system with good weed control can exhaust the near surface seed bank, leading to low weed pressure. If the field is regularly tilled, then moldboard plowing will tend to have lower weed emergence than other tillage systems, particularly if it is used after seasons with high weed seed production.
- Ridge tillage reduces tillage intensity while achieving adequate weed control. Ridges built the previous year are scraped by an attachment on the planter and rebuilt during inter-row cultivation. Ridge scraping moves seeds shed the previous year into the inter-row, where emerging seedlings are easily controlled by cultivation.
- Tilled fallows can flush seeds out of the seed bank. Integrating tilled fallow with good cover crop management can maintain soil tilth.
- In the stale seedbed technique, the soil is tilled and firmed as for a tilled fallow, but then the weeds are killed with a propane flame or herbicide without further soil disturbance before planting. The absence of soil disturbance reduces the emergence of weeds, giving the crop a strong head start and minimizing expensive hand weeding in high value crops.
- Cultivation for weed management is guided by several simple principles:
- The planter and any inter-row cultivator should work the same number of rows.
- Cultivation timing becomes increasingly critical the closer to the row that the cultivator operates.
- Cultivation is most effective if a size difference between the crop and the weeds is created and maintained.
- Over a wide range of weed densities, cultivation kills the same proportion of the weeds present, but at a very high weed density, the proportion of weeds killed declines.
- When you intend to use an implement that randomly kills a small proportion of the crop, like a rotary hoe or tine weeder, you should plan ahead by increasing your planting density to compensate.
- Good soil drainage and careful timing with regard to changing weather and soil conditions can improve the effectiveness of cultivation.
- Effective cultivation requires good soil tilth and careful seedbed preparation.
- Using cultivators to create a 1-inch-thick layer of loose crumbs on the soil surface (a “dust mulch”) keeps the zone from which most weed seedlings arise too dry for successful weed emergence.
- Use cultivators to weed early, shallow and often.
- To weed effectively without damaging the crop, cultivators must be adjusted to the conditions at hand. Generally, the importance of adjustment is greater the closer the implement works to the crop row.
- A wide range of implements is available for killing weeds within a crop. Inter-row cultivators can be equipped with sweeps, knives, horizontal disks and spider gangs. PTO powered tines rotating on either horizontal or vertical axes can create intense soil disturbance to kill weeds. Machines that work especially close to the crop row include cultivating disks, spyders, basket weeders and weeders that use plastic brushes. Tine weeders and rotary hoes kill weeds regardless of their position relative to crop rows but are aimed primarily at removing weeds from within the row. Additional devices that kill small weeds in the crop row include torsion weeders, spring hoes, spinners, rubber finger weeders, rubber star wheels and air jet weeders. All of these implements kill weeds through soil disturbance that uproots, breaks or buries weeds.
- Additional weed control implements that do not rely on soil disturbance include mowers, weed pullers, electric discharge weeders, abrasion weeders, and flame and other thermal weeders.
- Each of the many machines available for managing weeds within crops has its particular strengths and weaknesses. Acquiring a complementary set of implements appropriate for the types of weeds, crops, soils and weather conditions on the farm is critical for good weed management.
- Guidance systems ranging from the simple and mechanical to sophisticated computer-based systems are available to facilitate operating cultivation equipment. Good guidance allows higher cultivating speeds with less stress on the tractor operator. Highly precise guidance facilitates the use of in-row cultivating tools.
- Hand hoeing is frequently an economically viable option for high value crops. The long-handled garden hoe is the most widely used type of hoe, but it is neither the fastest nor the most effective tool. Short handled weeding tools provide greater precision, but due to health problems associated with prolonged stooping, they should only be used when other management options are ineffective.
- Good soil tilth helps cultivators shake soil loose from crop roots and decreases crop damage caused by clods thrown into the crop row. Good tilth can be achieved by regular incorporation of crop and cover crop residue, rotation with soil building perennial forage crops, keeping the soil covered with vegetation as much of the time as possible, and controlling wheel and human traffic.
- Although tillage during seedbed preparation is highly energy intensive, energy use during common mechanical post-planting weed management programs is similar to or even lower than the energy use required for manufacturing and applying common herbicide programs. As additional herbicide applications become necessary to control herbicide-resistant weeds, the energy use advantage of mechanical weed management is likely to increase.
Chapter 4 References
Anbari, S., A. Lundkvist and T. Verwijst. 2011. Sprouting and shoot development of Sonchus arvensis in relation to initial root size. Weed Research 51: 142–150.
Ascard, J. 1994. Dose-response models for flame weeding in relation to plant size and density. Weed Research 34: 377–385.
Ascard, J. 1995a. Thermal weed control by flaming: biological and technical aspects. Institutionen für lantbruksteknik, (Swedish University of Agricultural Sciences), Alnarp Report 200: 1–61.
Ascard, J. 1995b. Effects of flame weeding on weed species at different developmental stages. Weed Research 35: 397–411.
Buhler, D.D., K.A. Kohler and R.L. Thompson. 2001. Weed seed bank dynamics during a five-year crop rotation. Weed Technology 15: 170–176.
Clements, D.R., S.E. Weise, R. Brown, D.P. Stonehouse, D.J. Hume and C.J. Swanton. 1995. Energy analysis of tillage and herbicide inputs in alternative weed management systems. Agriculture, Ecosystems and Environment 52: 119–128.
Cussans, G.W., S. Raudonius, P. Brain, and S. Cumberworth. 1996. Effects of depth of seed burial and soil aggregate size on seedling emergence of Alopecurus myosuroides, Galium aparine, Stellaria media and wheat. Weed Research 36: 133–141.
Gallagher, R.S. and J. Cardina. 1998. Phytochrome mediated Amaranthus germination II: development of very low fluence sensitivity. Weed Science 46: 53–58.
Green, M.B. 1987. Energy in pesticide manufacture, distribution and use. In: Energy in Plant Nutrition and Pest Control, eds. B.A. Staut and M.S. Mudahar. pp. 165–177. Elsevier: Amsterdam.
Grubinger, V. and M.J. Else. No date. Vegetable Farmers and their Weed-Control Machines. DVD 75 min.
Mirsky, S.B., E.R. Gallandt, D.A. Mortensen, W.S. Curran and D.L. Shumway. 2010. Reducing the germinable weed seed bank with soil disturbance and cover crops. Weed Research 50: 341–352.
Mohler, C.L., J.C. Frisch and C.E. McCulloch. 2006. Vertical movement of weed seed surrogates by tillage implements and natural processes. Soil and Tillage Research 86: 110–122.
Mohler, C.L., M. Liebman and K. Staver. 2001. Mechanical management of weeds. In Liebman, M., C.L. Mohler and C.P. Staver. 2001. Ecological Management of Agricultural Weeds. Cambridge University Press: New York.
Mohler, C.L., J.C. Frisch and J. Mt. Pleasant. 1997. Evaluation of mechanical weed management programs for corn (Zea mays). Weed Technology 11: 123–131.
Mohler, C.L. 1993. A model of the effects of tillage on emergence of weed seedlings. Ecological Applications 3: 53–73.
Mt. Pleasant, J. and R. Burt. 1994. Time of cultivation in corn: effects on weed levels and grain yields. Proceedings of the Northeastern Weed Science Society 48:66.
Monsanto. 2010. Roundup PowerMAX® Label. Monsanto Company: St. Louis, Missouri.
NCCE. 2008. Conversion Factors for Bioenergy. North Carolina Cooperative Extension.
OSU. 2005. Weed 'Em and Reap. Part I. Tools for Non-Chemical Weed Management in Vegetable Cropping Systems. Oregon State University, Department of Horticulture: Corvallis, OR. DVD 36 min.
Rahkonen, J., and P. Vanhala. 1993. Response of a mixed stand to flame and use of temperature measurements predicting weed control efficiency. International Conference I.F.O.A.M. Non-Chemical Weed Control Proceedings, Dijon: 177–181.