Because the planning procedure presented below is lengthy and detailed, some of the most useful steps are summarized briefly in this section. Growers who do not wish to go through the detailed planning procedure will still find this summary useful in planning crop sequences. Note that the simplified steps presented here do not cover development of a flexible generalized rotation plan (see sidebar 5.1) but rather summarize the ad hoc sequencing introduced in chapter 2. To avoid confusion, the steps in this simple summary section are labeled A, B, C to distinguish them from the numbered steps in the systematic planning procedure.
A. Identify and prioritize goals.
Write down what you want your crop rotation to accomplish (see sidebar 2.8 for rotation goals of expert farmers). Decide which goals take precedence this year if not all goals can be met simultaneously.
B. Write down your crop mix.
List the crops you plan to grow next season and the amount of land you will devote to each crop. For crops grown in succession plantings, list each planting as a separate crop (for example, spring broccoli, fall broccoli). This will help with planning, since the crops and cover crops that precede and follow will differ with the season of the planting.
SIDEBAR 5.1
Rotation Planning vs. Crop Sequencing
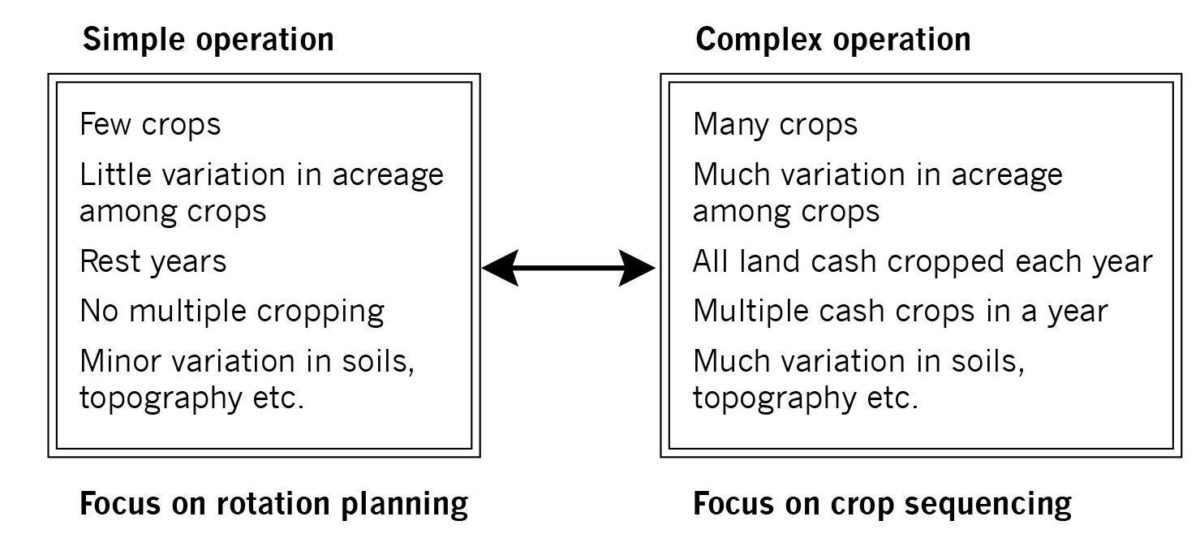
Cropping plans have two aspects: the development of a general rotation plan and the sequencing of particular crops. The general rotation plan might specify, for example, that nightshade crops will be followed by mustard family crops, then salad greens other than mustards, and finally cucurbits; or that full-season crops will be followed by a year of cover crops and then early-planted short-season crops. The rotation plan provides the framework; the sequencing plan provides the details of what crop goes where in succeeding years. The rotation plan needs to be general enough to allow flexibility in sequencing. The sequencing plan is necessarily tentative and ideally leaves room for alternative crops in case weather or markets force last-minute changes.
The relative importance of rotation planning versus crop sequencing in overall crop planning depends on the farm. In general, as the complexity of the farm operation increases, rotation planning becomes less possible and careful crop sequencing becomes more critical (figure 5.1). If your farm operation is suited to rotation planning, developing a plan will greatly simplify your crop sequencing. If, however, your operation is highly complex, following a general plan is likely to prove futile. In that case, detailed record keeping and careful placement of crops become the keys to avoiding rotation problems.
C. Check for excessive acreage of one family.
Write the family name next to each crop and add up the acreage of each family (family names of crops are given in Appendix 1). If you find that any one family (other than grasses) would be grown on more than 25 percent of your land, consider increasing the diversity or balance of your crop mix. A high proportion of land in one family necessarily means that most locations will rotate back to that family quickly. This can lead to problems with soilborne diseases (see “Managing Plant Diseases with Crop Rotation” and Appendix 3).
D. Identify crop couplets and short sequences that work well on your farm.
Expert growers simplify their planning by building their rotations around short sequences of two or three crops or cover crops. Think about what has worked on your farm in the past. Many additional short sequences can be gathered by talking with other farmers or gleaned from the sample rotations in chapter 4 and from Appendix 2.
E. Make a crop rotation planning map.
Thoughtfully dividing your farm into relatively small management units of approximately equal size greatly simplifies planning and record keeping. The management units should be no larger than the area you ever manage as an independent unit. On grain farms, management units are often long strips across the field. On vegetable farms, they may be individual beds. Having the farm divided into relatively small units allows you to keep track of exactly what you planted on a particular piece of ground one, two, or five years later. In addition, if soil conditions, weed problems, or other factors that affect management vary across a field, managing the farm in small units allows systematic matching of crops to conditions for site-specific management. A single crop will often be planted on several adjacent management units if that is convenient.
Make a map of your farm showing every management unit. Make the map large enough so that information can be written in each management unit (this may take more than one sheet of paper). Give each unit a number. When you are satisfied with your map, make multiple (six or more) copies. Creating a computer version of your map reduces the labor of writing crop names onto management units, simplifies revising plans, and makes producing copies of the map easy (see Appendix 6).
F. Identify conditions that affect what crops can be grown on each management unit.
On one copy of the map, note any difficult or desirable characteristics that influence what crops you may want to plant there. Some locations may be wet; others may warm earlier in the spring. Sidebar 2.9 lists field properties that expert growers take into account when placing crops, and table 5.5 provides abbreviations that fit easily onto a map. Although these lists are long, note that many of the field characteristics probably do not vary across your farm and thus are of no interest to you.
G. Plan next summer.
On another copy of your map, assign each crop to as many management units as you need to meet the area specified by your crop mix (see step B above). If a management unit will be double or triple cropped, separate the crop names with slashes (for example, May lettuce / buckwheat cover / fall spinach). Placing crops in the following order often works well:
- Crops that are already planted. (You do not want to plow them up!)
- Crops in your major crop family, especially if one family will cover more than a fourth of your acreage. Do these early in the process so that you can avoid locations that have had that family recently. This does not apply to grasses, since they rarely foster soilborne diseases.
- High-value crops that do best in particular field conditions.
- Other high-value crops.
- Lower-value crops that do best in particular locations.
- Lower-value crops that can be grown anywhere.
SIDEBAR 5.2
Small Valley Farm: An Example to Illustrate the Procedures
Small Valley Farm is a cash grain and beef operation (figure 5.2 below). The farmers grow grain and soybeans for human consumption and alfalfa-grass hay for winter feed for their herd of beef cattle. The farm has 720 tillable acres. Although the farmers can grow all crops successfully on all of the tillable land, 240 acres are sufficiently steep that erosion is a potential problem when they grow row crops. A desire to avoid row crops on their steep land has motivated them to undertake rotation planning.
In the past, they have followed a six-year rotation: oat/clover/spelt → spelt/hay → hay → hay → corn → soybean and then back to oat/clover/spelt. Their crop mix is summarized in table 5.4. They establish alfalfa-grass hay by overseeding it into spelt in the spring. They plow hay in the fall before corn to allow the sod to break down, and they sow an oat cover crop to protect the soil over the winter. They plant red clover with oat to provide a boost of N for the following spelt crop.
When placing a crop onto a management unit, refer to your list of crop couplets, avoid units that have had the same family in the past few years, and check Appendix 2 for potential problems. To limit buildup of pests and disease, avoid placing succession plantings of a crop species in adjacent management units.
H. Plan the following year.
To plan the next seasons, repeat the same process you used in step G. For the moment, ignore winter cover crops.
I. Plan fall-planted crops and cover crops.
Place your fall cover crops and overwintering cash crops on another copy of the map by the same process used for G and H. Note that the cover crop on each management unit needs to work well with both the preceding and the following crops.
J. Take your plans to the field.
Take your maps with the crops written on them and walk your fields. For each group of management units assigned to a crop, imagine farming that piece of land through the coming years. Consider tillage, planting, maintenance, and harvest of the crops to see if the proposed crop sequence makes sense for that location. Note any changes you decide to make.
K. Develop contingency plans.
Think ahead to see what problems might arise with growing the proposed crops in the planned management units. How might the plans need to shift if the spring is too wet for early-planted crops, if labor for transplanting is unavailable at a critical time, or if you experience some other problem that could affect where various crops can be planted? Write action plans for coping with various potential problems and make provisions for possible problems (for example, by obtaining extra crop or cover crop seed to fill in locations that could not be planted as planned).
The steps above capture the essence of the planning procedure. The following sections include a method for developing a general rotation plan, examples, additional hints, an explanation of why these steps are sensible, and a means of checking for errors to ensure that your plans do not contain contradictions.