Bumble bee domestication is in relatively early stages of development as an industry. Currently, it is dominated by a few international companies. Methods have been industry secrets or have been buried in the scientific literature, not easily available to the public. Recent publication of a bumble bee rearing manual has made it possible for more people to get involved in raising bumble bees. There is great potential for individuals to work with rearing to supply colonies for pollination. The following is a summary of the basic principles of bumble bee rearing. More details can be found in Befriending Bumble Bees by Evans et al.
Catching Queens
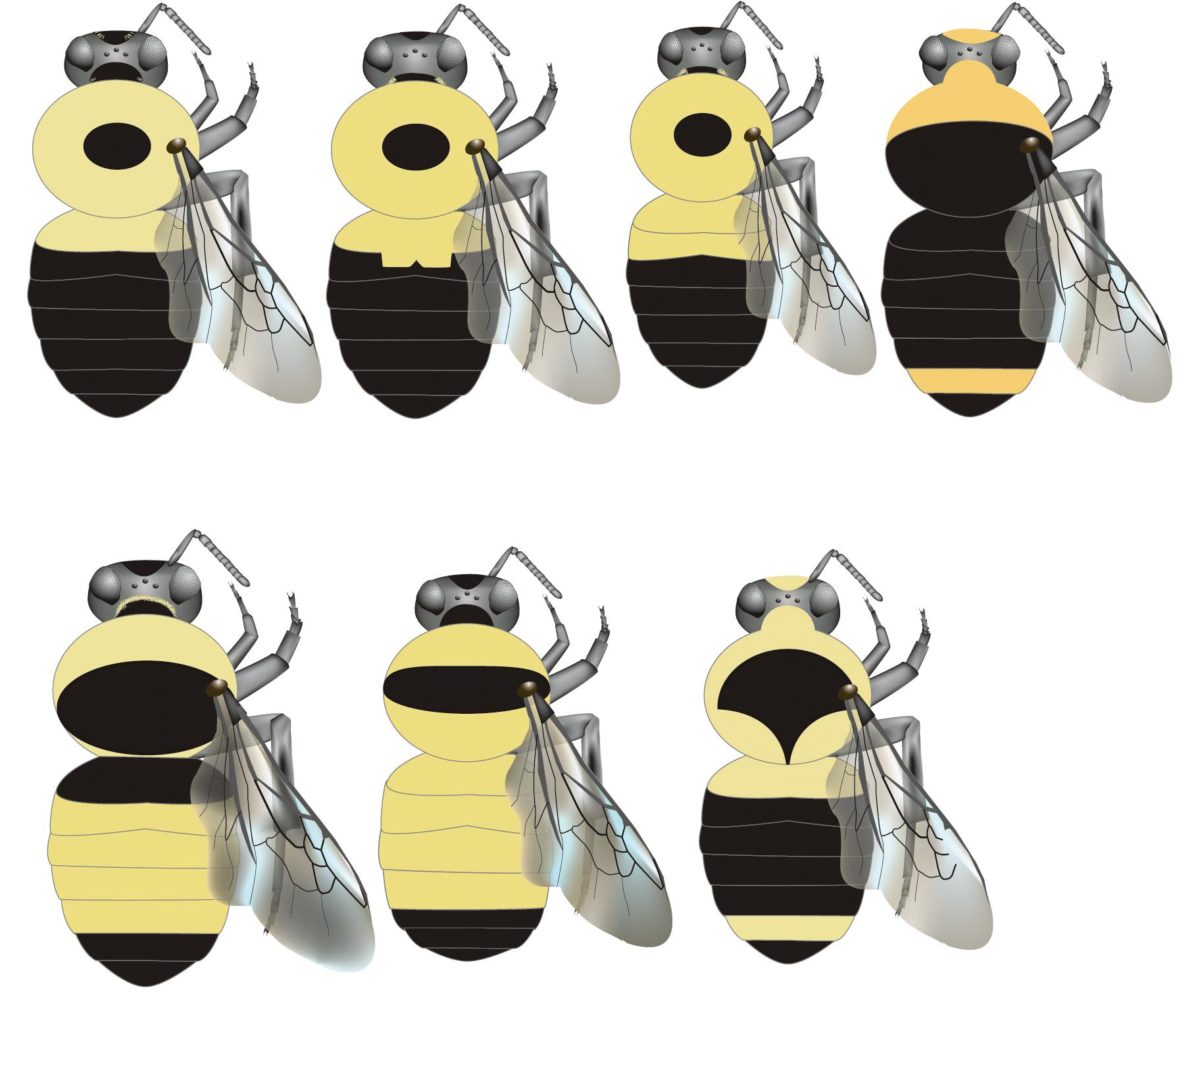
Bumble bee species vary greatly in their ease of domestication. Of the over 250 bumble bee species in the world, there are only two that are currently reared commercially, though there is potential for many other species to be raised. In eastern North America, good candidates for rearing include B. impatiens and B. bimaculatus. In western North America, good candidates for rearing include B. bifarius and B. vosnesenskii (figure 5.7). Take the time and effort to learn how to identify your local bumble bee species (see sidebar). Some bumble bees are rare and should not be collected. Bombus affinis, Bombus occidentalis, Bombus terricola, Bombus franklini, Bombus sonorus, Bombus pensylvanicus, and Bombus ashtoni populations have dropped in recent years. If you find a rare specimen, please leave it in the wild but take a photo to help document its population status (send the photo to: www.bugguide.net or bumblebees@smcgovernxerces.org).
Identifying Bumble Bees
Many bumble bees can be identified easily by their color patterns. Some require closer examination. It is helpful to closely examine specimens as you are learning to identify them. Take an ice chest out to the field and slow bees down by cooling them for a few minutes. The bees will recover unharmed after they warm up, but while they are slowed down, you can examine them more closely.
Here are a few great resources for identifying North American bumble bees.
Golick, D. A. and M. D. Ellis. 2000. Bumble Boosters: A Guide to the Identification of Nebraska Bumble Bee Species. University of Nebraska Press.
Griffin, B. L. 1997. Humblebee Bumblebee. Knox Cellar Publishing. Bellingham, WA.
Heinrich, B. 1979. Bumble Bee Economics. Harvard University Press.
Kearns, C. A. and J. D. Thompson. 2001.
The Natural History of Bumble Bees, a Sourcebook for Investigations. University Press of Colorado.
Thorp, R. W., D. S. Horning, Jr., and L. L. Dunning. 1983. Bumble Bees and Cuckoo Bumble Bees of California. Bulletin of the California Insect Survey. Volume 23: 1–79.
To successfully raise bumble bees, the most important element is a supply of bumble bee queens. Only mated queen bees are capable of producing an entire colony of bees. Once your rearing system is established, you can supply yourself with your own queens. Before this, you will need to capture wild bumble bee queens. Some people set out empty boxes with the hope of attracting wild nesting bumble bee queens. Even with hundreds of boxes, the success rates reported are typically very small. Finding queens while they forage on flowers is the most reliable method for collecting them. Spring favorites of bumble bee queens include honeysuckle, dandelion, mountain laurel, clover, rhododendron, Siberian pea, horse chestnut, Virginia waterleaf, mint, apples, cherries, willows, and gooseberry.
Queens are the only bumble bees that hibernate through the winter. Search for them after they have emerged from hibernation and before they start a nest on their own. Different species have different emergence times, but in North America, most will emerge between March and July. Queens with established nests will have pollen loads. Capture only bees with no pollen loads.
Caring for Your Queen
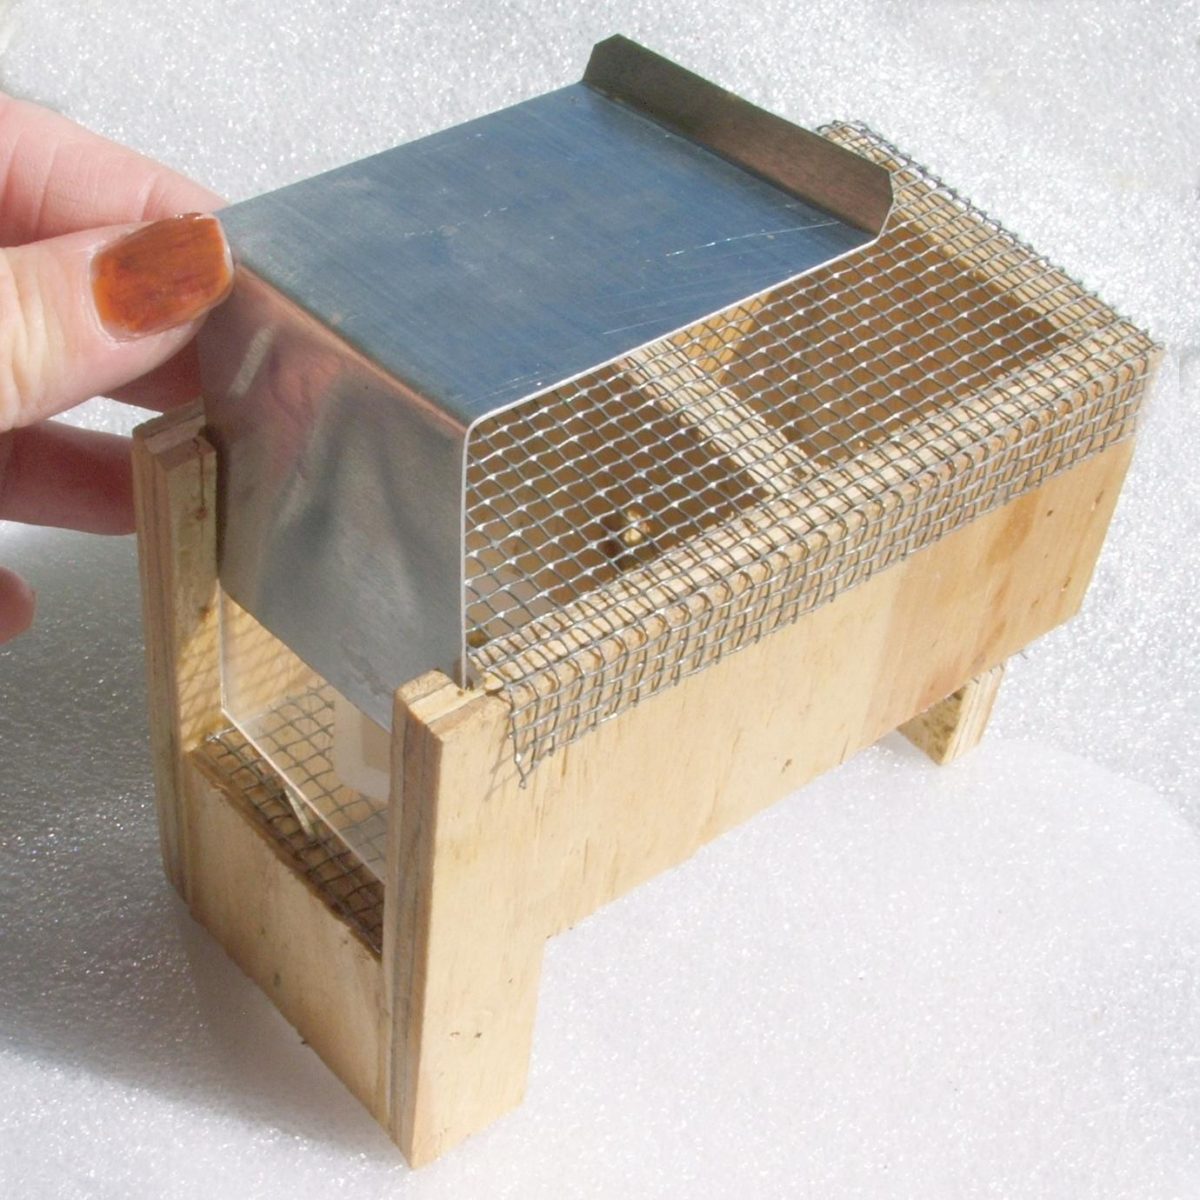
Now that you have your queen, place her in an environment that will encourage her to begin laying eggs. Many different housing designs are suitable for raising bumble bees. Often queens are placed in a small box until they lay eggs (Figure 5.8). After workers have emerged, they are moved to a larger box. Boxes can be made of any material that is hard enough to resist the strong mandibles of bumble bees. Wood is the most commonly used material. Plexiglas® can be used to enable better viewing inside the nest. Heavy cardboard and poured plaster are also possible construction materials. If your colony is to be placed outside to forage freely, all sides should be wood or some other opaque material, with a few small screen-covered ventilation holes, so that the nest stays dark. Nest boxes can also be buried underground or in sand with an entrance tube connecting the colony to the outside. This can help the bees maintain favorable temperatures and humidity in their nests. It also will help conceal the nest from predators.
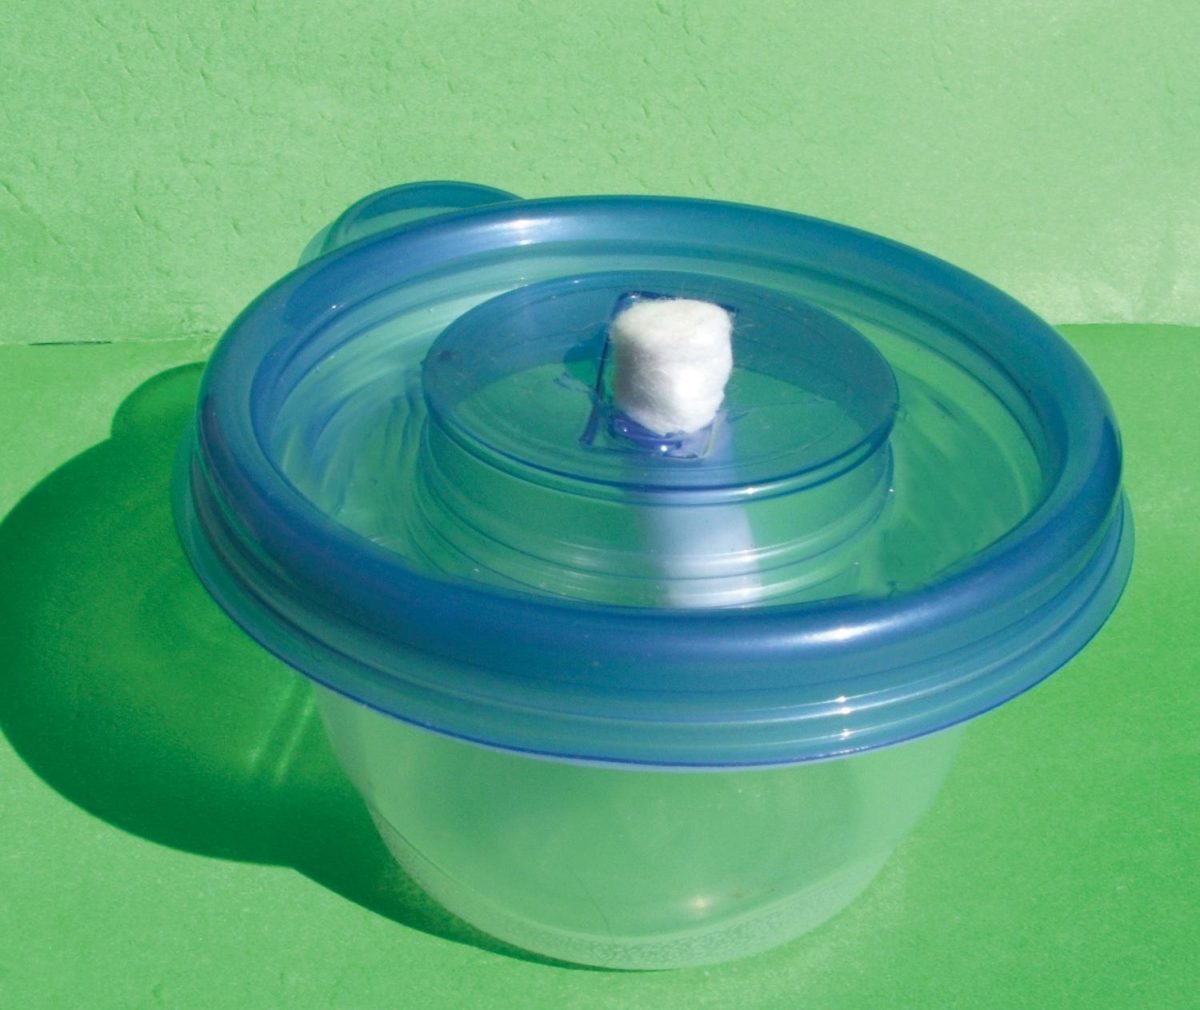
Provide the queen with nectar and pollen as she establishes her nest. Sugar solutions make excellent nectar substitutes. Place the solution in some kind of closed dispenser. Bees may accidentally drown in an open liquid source. For dispensing from the top or side, use a bottle with a very small opening (some use a syringe), so that only one drop forms at a time. For dispensing through the floor, a feeder is set below the floor of the starter box with a wick protruding through the floor; cotton wicks are available through dental supply stores (Figure 5.9).
Supply the queen with a pea-sized pollen ball. The pollen used to make the “pollen ball” should be as fresh as possible, ideally frozen as soon as possible after collection from the honey bees and used within a month or two. Contact a local honey bee beekeeper to buy fresh pollen from them. One-half pound (0.23 kilograms) of pollen per colony should be more than enough to raise a colony to the point where they can forage independently. Replace the pollen ball every few days unless there is evidence of eggs having been laid on it. Once larvae hatch, provide fresh pollen on a regular basis. Developing colonies will need an amount of pollen equal to roughly one-third of the size of the brood area each day. The brood area includes the wax cells occupied by eggs, larvae, and pupae.
Bumble bee colonies are usually raised in a dark environment with 50 percent relative humidity, at temperatures above 70°F (21.1°C). If you cannot keep the room warm, be sure that you provide the queen with insulating material. Upholsterer’s cotton is the ideal material. Do not substitute cotton balls, as the bees will become tangled in the fibers.
Handling Mature Colonies
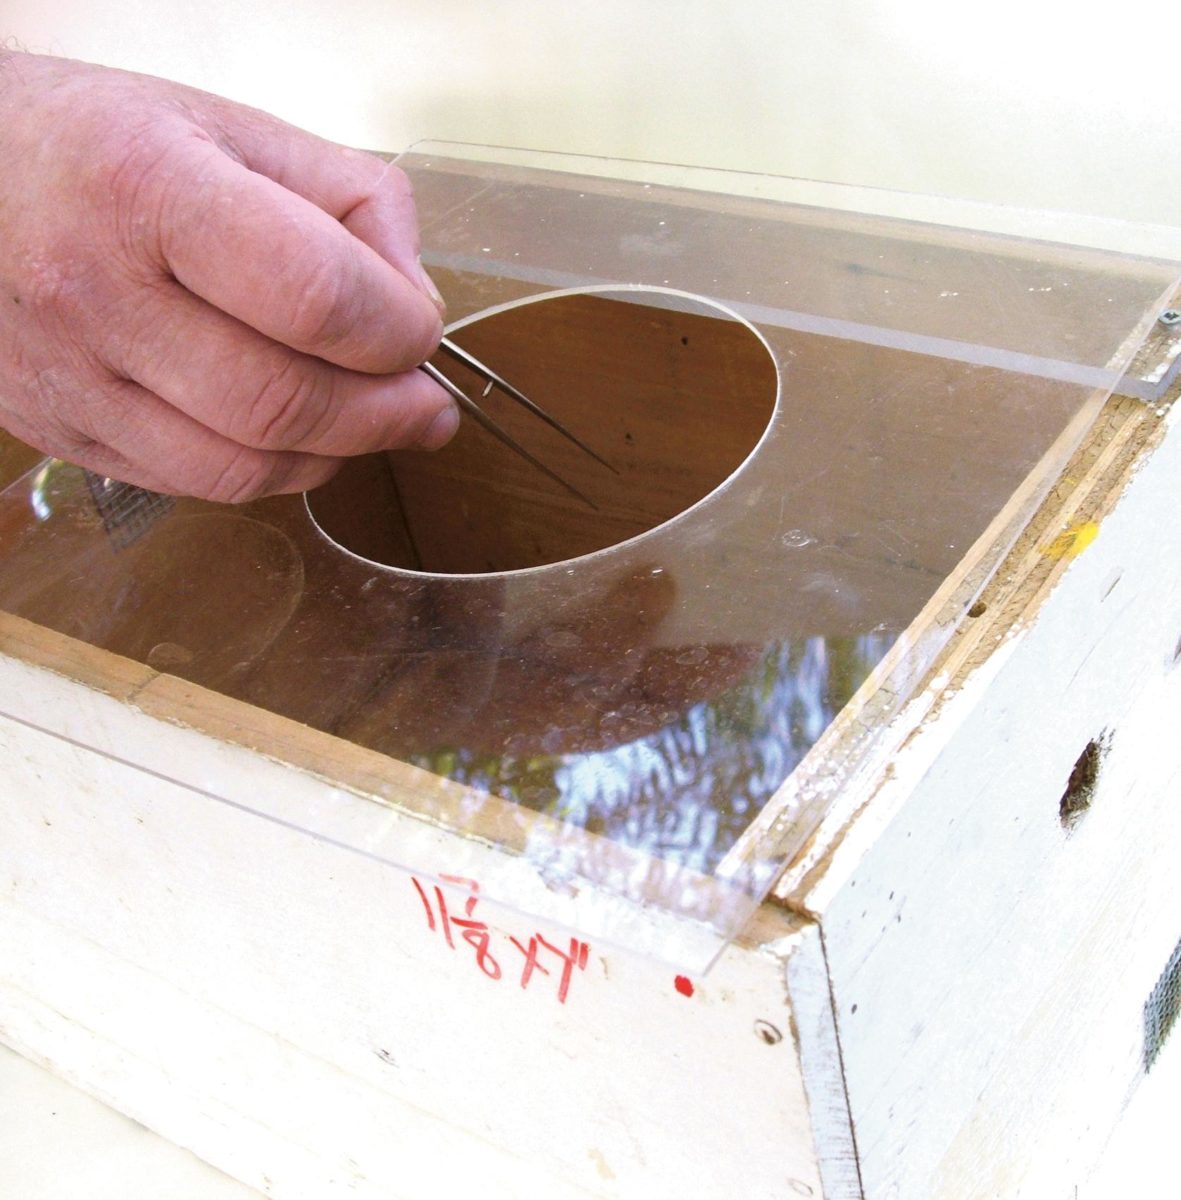
It is useful to have at least one extra cover for your bumble bee box that is made of clear plastic with a hole in the center. The hole should be large enough for your hand to fit through (Figure 5.10). By using a solid sheet of plastic in combination with the cut sheet, you can gain access to the colony without letting bees escape. Place the solid piece of plastic on top of the sheet with the hole. When you see that no bees are flying or moving near the top, slide the solid piece off, giving you access to the hive. A pair of blunt-ended tweezers is the best tool for grabbing bees from the nest. With experience and patience, you can gently pick them up by the back legs without causing them any harm. It is also helpful to keep some small jars in the bumble bee room to trap any escaped bees. If you use only red light in the rooms where you work with the bees, the bees are less likely to fly out of the nest. Bumble bees do not see the red spectrum, so a red light disturbs them less than the typical lights we use in our homes.
Before you open colonies to the outside to forage freely, there are several things to consider. It is important to wait until the colony is strong, meaning there are at least 20 workers present, before letting them have access to the outside. Even then, the bees may require some food supplementation until they get used to foraging. Provide all colonies with nectar and pollen during the first week of their release. After this, monitor the nest occasionally to make sure they have enough food. If placing the box outside, place it in the shade. Secure the lid so that it will not blow off in the wind. More protection may be needed if there are skunks or bears in the area.
Queen Mating and Hibernation
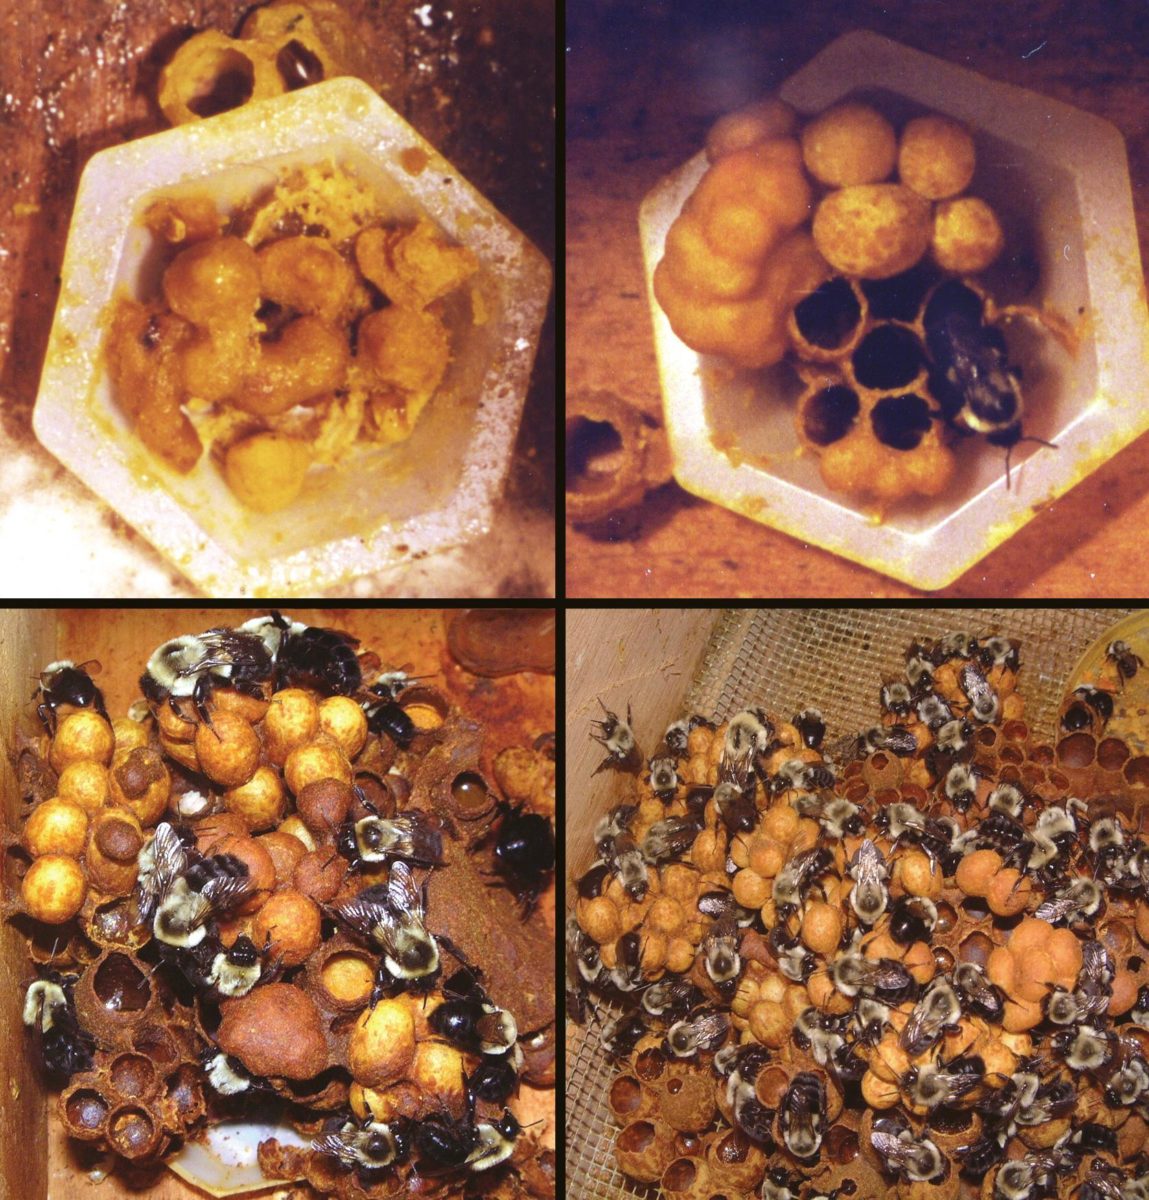
Colonies produce queens and males at the end of the colony’s life cycle (Figure 5.11). Signs of queen production are enlarged cells containing queen pupae and the production of males. Males can be distinguished by longer antennae and a lack of pollen baskets on the hind legs. It is possible to allow queens produced by a colony to mate in confinement with males from another colony and then store queens in a refrigerator with the temperature set between 30° and 40°F (-1.1° and 4.4°C), mimicking winter hibernation. This procedure will provide you with fertilized queens whenever you need them. Year-round production of bumble bee colonies depends on this year-round access to queens.